What is it and why would I use it?
This activity will allow you to generate message files that you can use in your development and testing. The process of creating messages and files, particularly in formats like XML, JSON, and CSV, plays a crucial role in the development and testing of software systems, particularly those handling financial transactions (ISO20022) or other data-intensive operations. This utility can handle any structured message, with repeater loops, embedded structures, conditional statements, and more. The resulting messages or files can also be modelled to generate covered sets of messages for specific use-cases such as testing or virtualisation. These covered sets ensure that all possible data combinations and scenarios are accounted, thus providing comprehensive and thorough testing of business rules or simulation environments.
Create Message Management Data Activity
Note that You need to have a file definition set up, there are more details in the guide: Register a definition
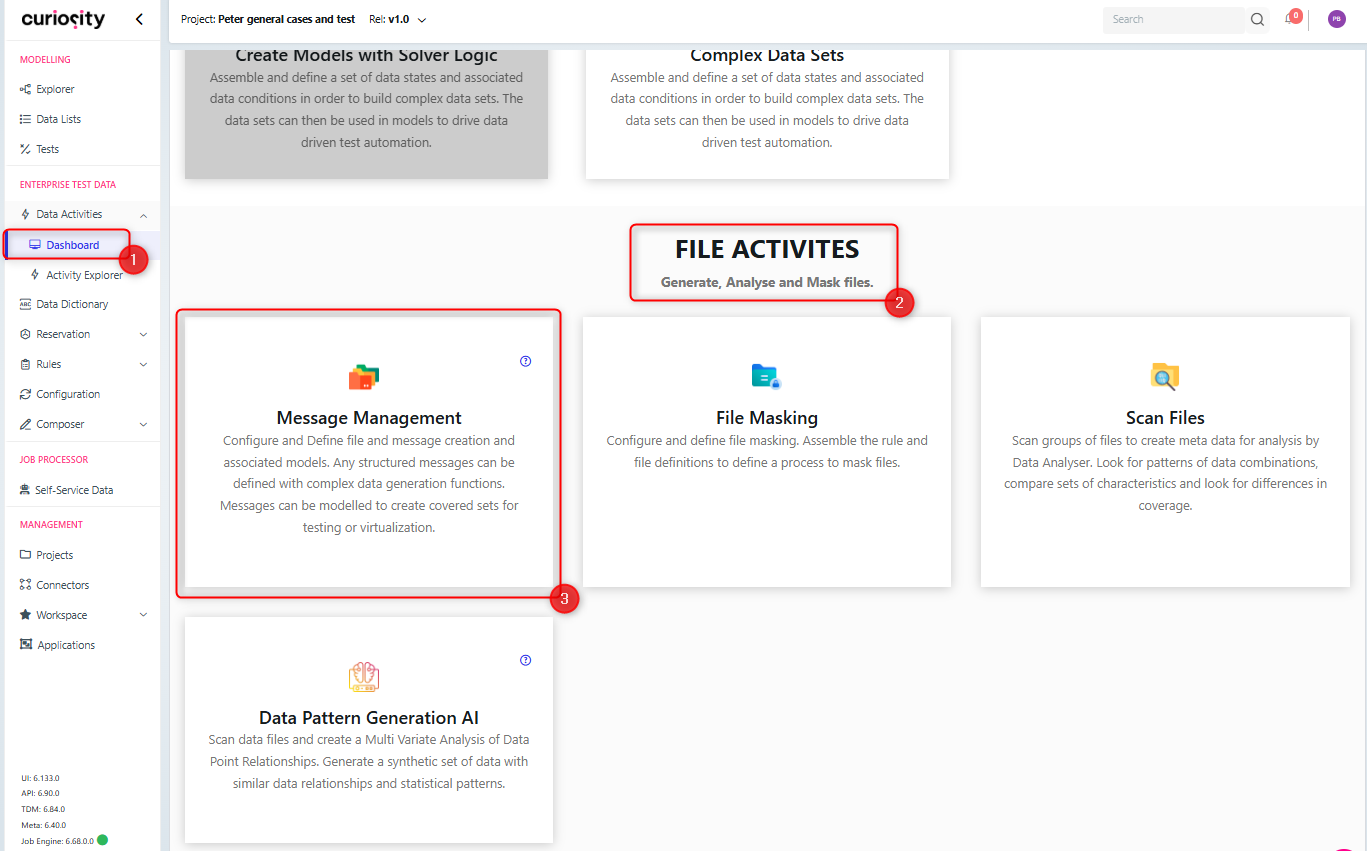
There are a couple of ways to create a message management data activity n the Curiosity platform. Either in the Dashboard (1), scroll down to the File Activities section (2) and click the Message Management link (3).
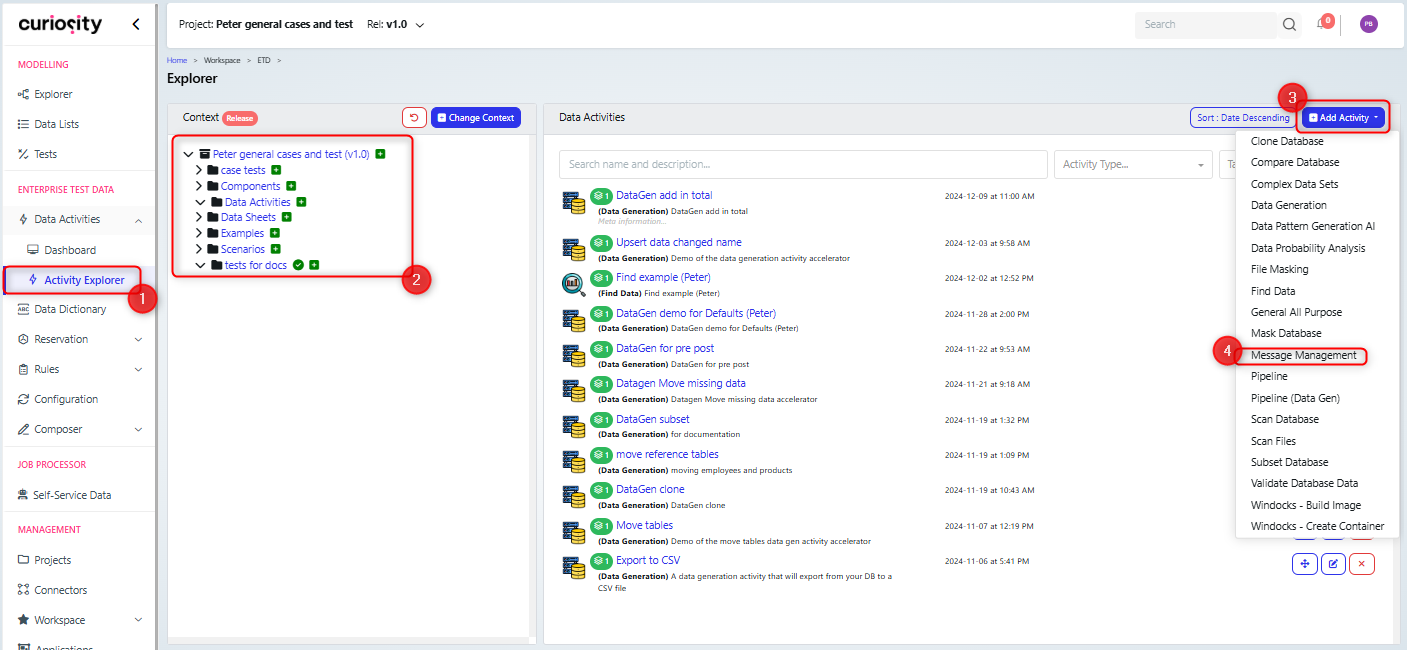
Alternatively, in the Activity Explorer (1), navigate to the required directory to save the activity in (2), click Add Activity (3) and select Message Management (4)
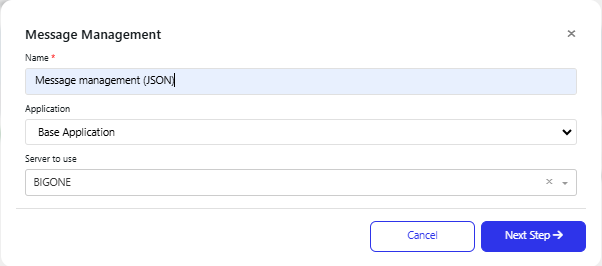
You will then need to name your activity and give it a location (if not already done).
You can then open the Data Activity.
The next action will be to attach a file definition.
Attach File Definition
A file definition is required as it gives the layout and fields of the message file that needs to be created.
On the Message management data activity page, click the Attach File Definition link in the Add components section.
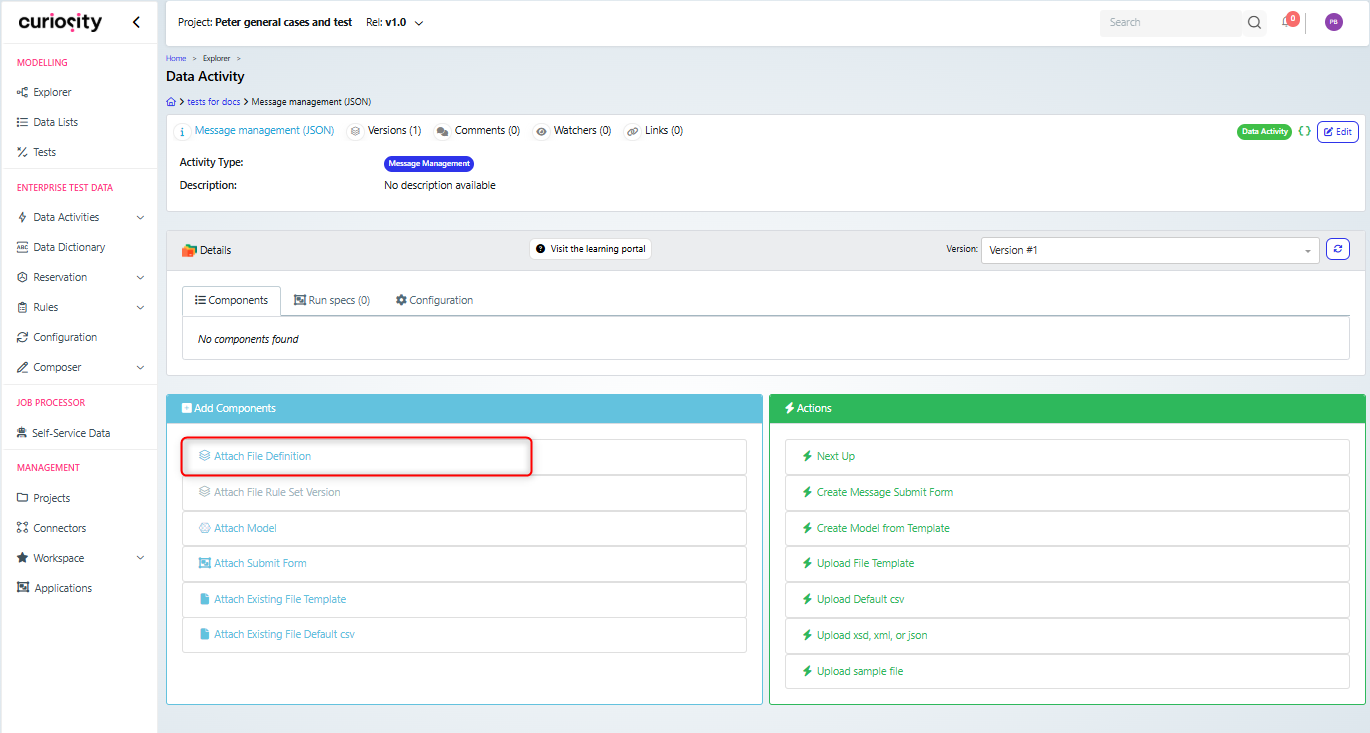
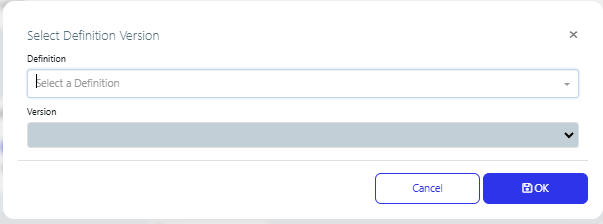
This will display the “Select Definition Version” dialog where you can select the file definition and version to attach.
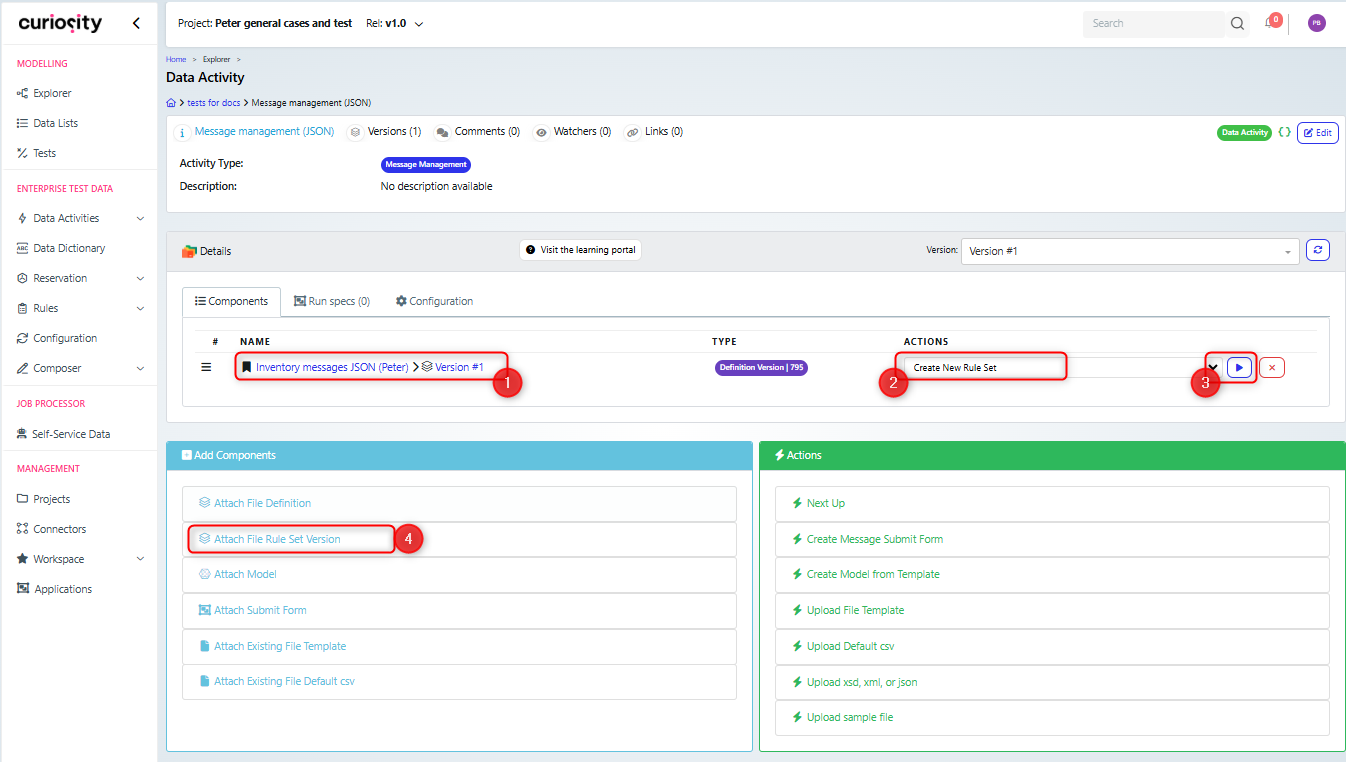
Having attached the Definition, you need to create a rule set.
Create Rule Set
The rule set is used to set up how that data, that will be used in the message file, is going to be generated.
On the definition version component of the data activity (1), select (2) and run (3) the “Create New Rule Set” action.
Note that if you have already created a rule set, then you can attach it instead (4).
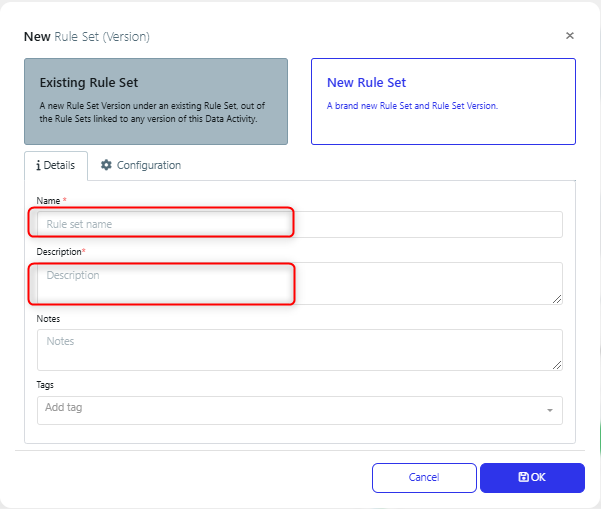
When creating a new rule set, you need to name and describe it.
Next you will need to modify the rule set to update the rules to generate the file data.
Modify Rule Set
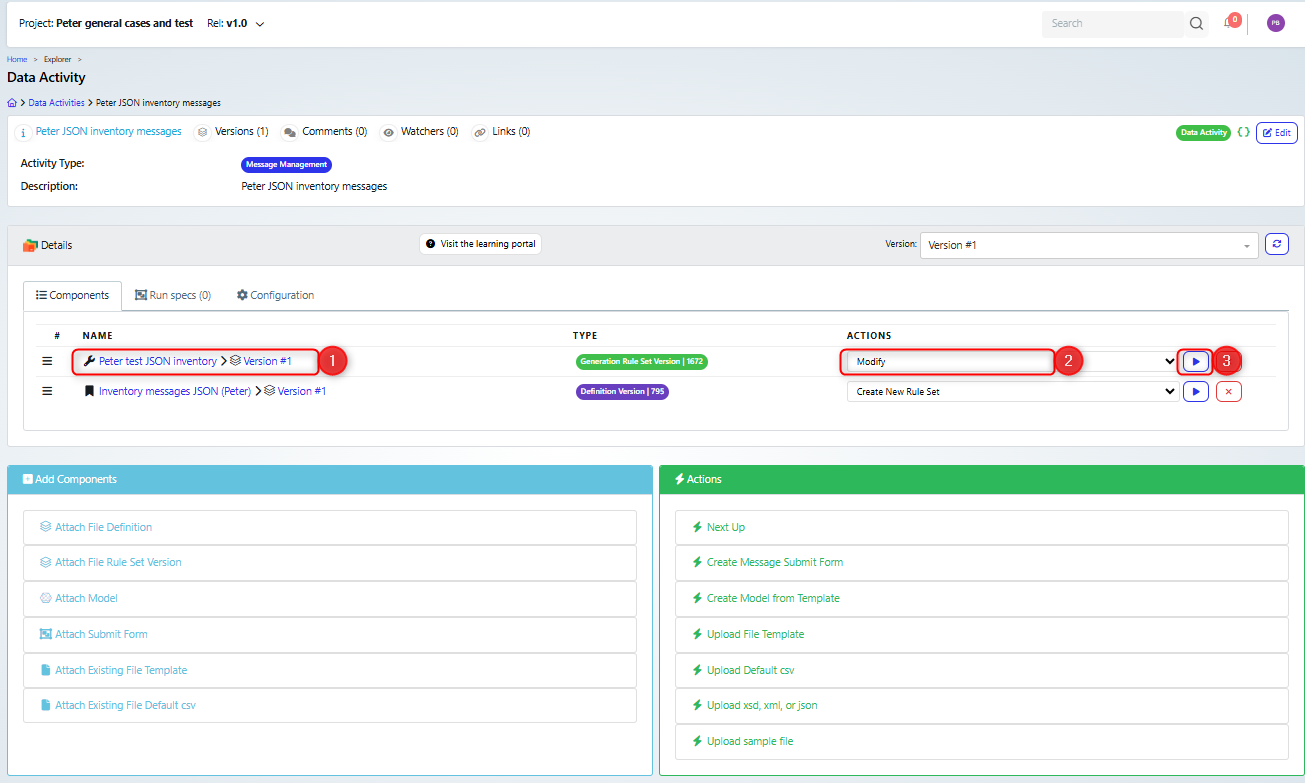
In order to modify the rule set (1), ensure that the Action is set to Modify (2) and click the run button (3).
This will display the Rule set page, which allows you to carry out various actions like viewing the structure of the data and updating the rules for generating data,
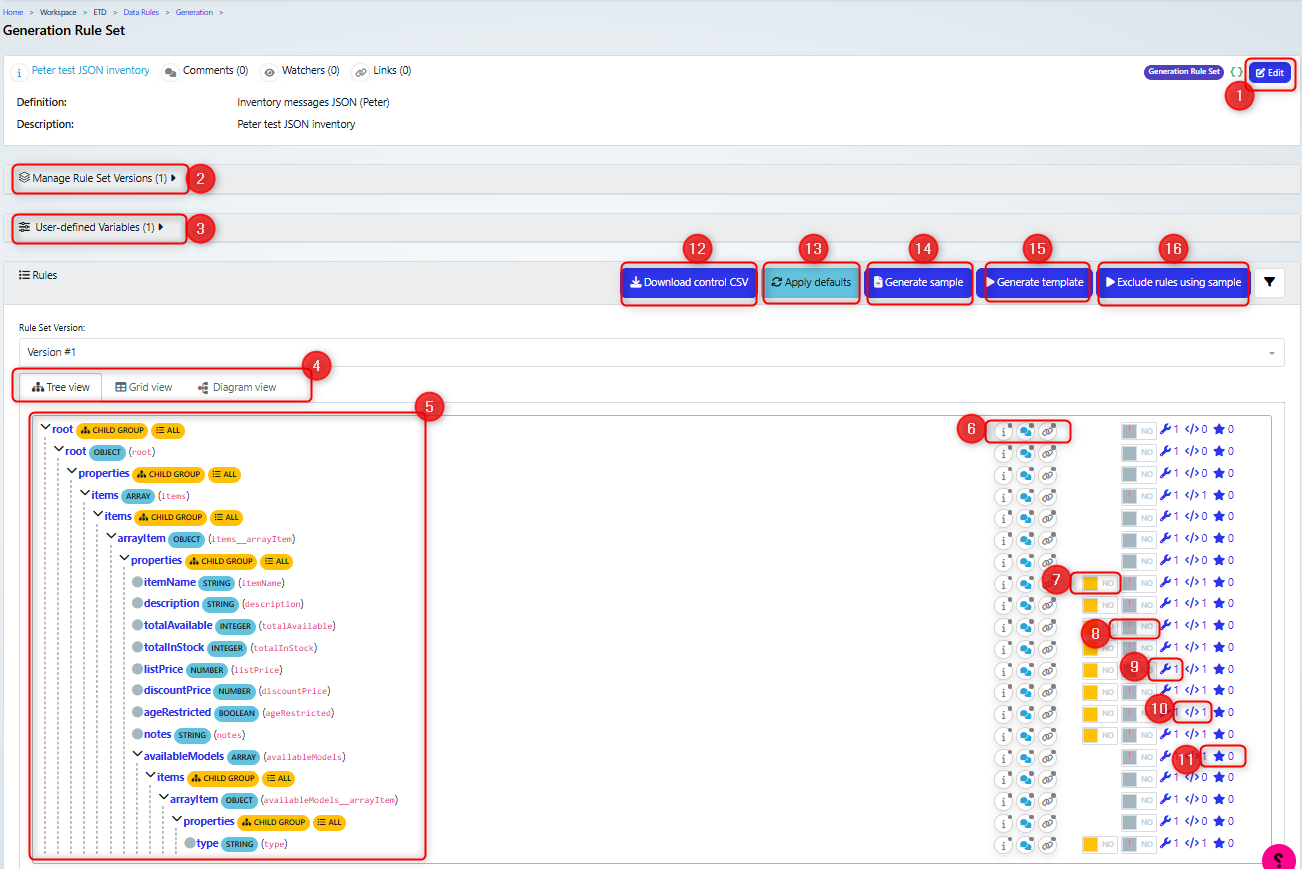
A summary of the available actions is given below:
Edit the name and metadata for the rule set (1).
Manage and create new versions for the rule set (2).
Set up user defined variables (3), see the section User defined variables.
Change the view of the elements (4), see the section Element views.
View the message elements (5). Note this view depends on the view selected.
View and update metadata for each element (6).
Make the element available in the template (7). Additionally, this will mean that the element is available on the submit form and it will overwrite any generation rules set for the element.
Exclude the element from the generated message (8). Note that an ! indicates that excluding the element will break a validation rule for the element.
View and edit the generation rule for the element (9) see section Modify Generation rules.
Show the validation rules for the element (10).
Show any samples for the element (11).
Download the control CSV file for the rule set (12).
Apply a set of defaults to the generation rules for this rule set (13), see the Rule Set Defaults guide.
Generate a sample message file (14), see section Generate sample.
Generate the template file (15) see section Generate template.
Exclude rules using sample (16).
Element views
You can change the view of the elements, to help you visualise the data as needed
Tree View - which shows the parent/child relationships in the data, you can expand and collapse elements as needed.
Grid View - a list of the elements. You can filter them as needed, for example only displaying the leaf elements.
Diagram view - which shows the relationship between elements. By clicking on an element, you can see the properties and have access to edit the generation rules.
Modify Generation rules
When you click the spanner you will view the generation rule for the element, along with the number of instances of that rule and the conditions under which it is used (1). You can edit the rule by clicking the edit button (2) and can also clear or delete the rule. Finally there is a button to allow you to add a new rule (3).

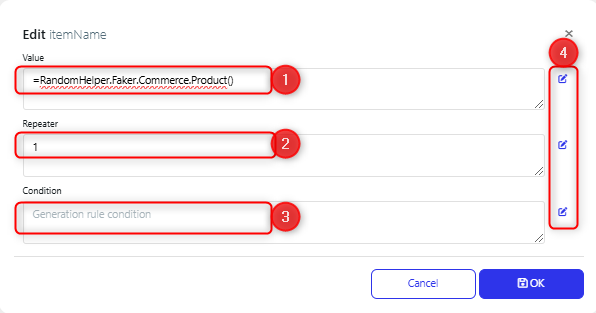
When you edit the rule, you can update the Value (1), the number of times it is repeated (2) and the condition under which this value will be used (3). There is a Data Painter available for each field (4). In the example below, the value of the itemName element, is being set to a random product, using the function RandomHelper.Faker.Commerce.Product() and there will be one instance of the element.
If you need to set up a field that combines two or more numbers, then surround the whole value in brackets, to ensure that the maths calculations are carried out correctly. For example:
where the value is set to (var__totalAvailable + RandomHelper.GetRandomInt(0, 100) )
You can use user defined parameters in the value of the rule, so that, if needed, you could have control over the value at generation time.
Below is an example of having multiple rules, using a condition. This are the rules for the Description element. In the case that the variable var__itemName (which is the value of the itemName element) is empty, this element will be set to the value “No item is set”, else it will be set to a random sentence.

If you have multiple rules for an element, each one must have a different condition set.
Once you have set up all the rules, you are advised to create a sample message, to confirm that it is generated as you expect.
Generate Sample
The Generate sample button will create a sample file that you can download and check that values are being created as expected.
User defined variables
You can set up parameters that can be used in your generation rules in the user defined variables section of the rule set page
Expand the section (1), then click Add (3). You can also edit existing variables (3).

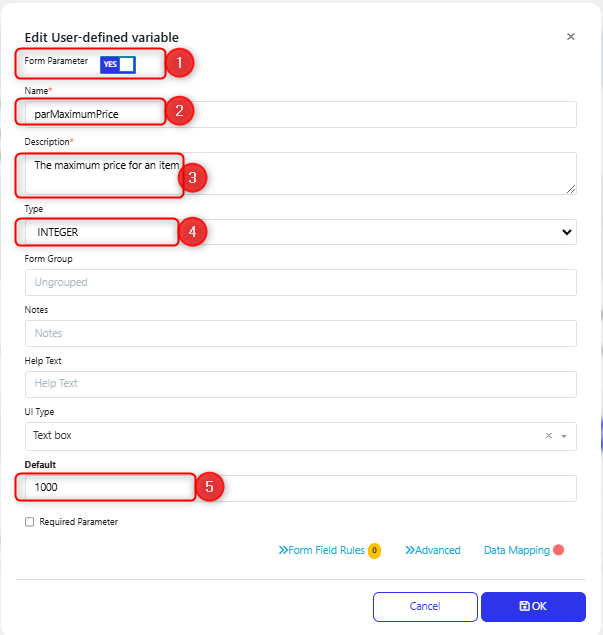
Clicking the add or edit buttons will present the dialog where you can set up or edit your variable. In the example below, we have set it to be a Form parameter (1), so that it will appear on the submit form. It has been named (2) and given a description (3), note that this description will be used on the submit form. Its type is INTEGER (4), as we will use it in a function call. Finally we have set a default value (5)
In our example, this is used in a function that generates a random value for the list price:
 RandomHelper.Faker.Finance.Amount(1, par__parMaximumPrice, 2)
Generate Template
Templates are created based on the Rule set configuration and the scanned definition version of the file. They are written in C# Scriban and once you have downloaded it, you can edit it manually, if needed.
There are a couple of ways to generate a temple:
On the rule set page, click the Generate Template button

On the data activity page for the rule set component (1), select the Generate Temple action (2) and click run (3)
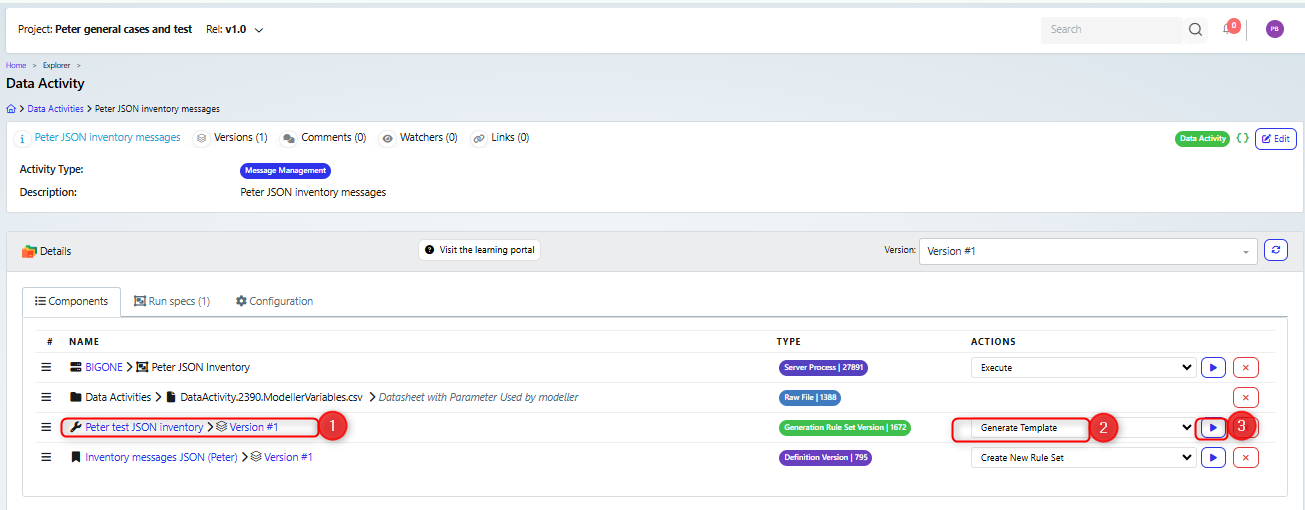
In both cases, a job will be started to generate the template and once it is complete, you can view the job and download the template.

You will need to attach this template to the data activity.
Upload File Template
On the data activity page, click the Upload File Template action.
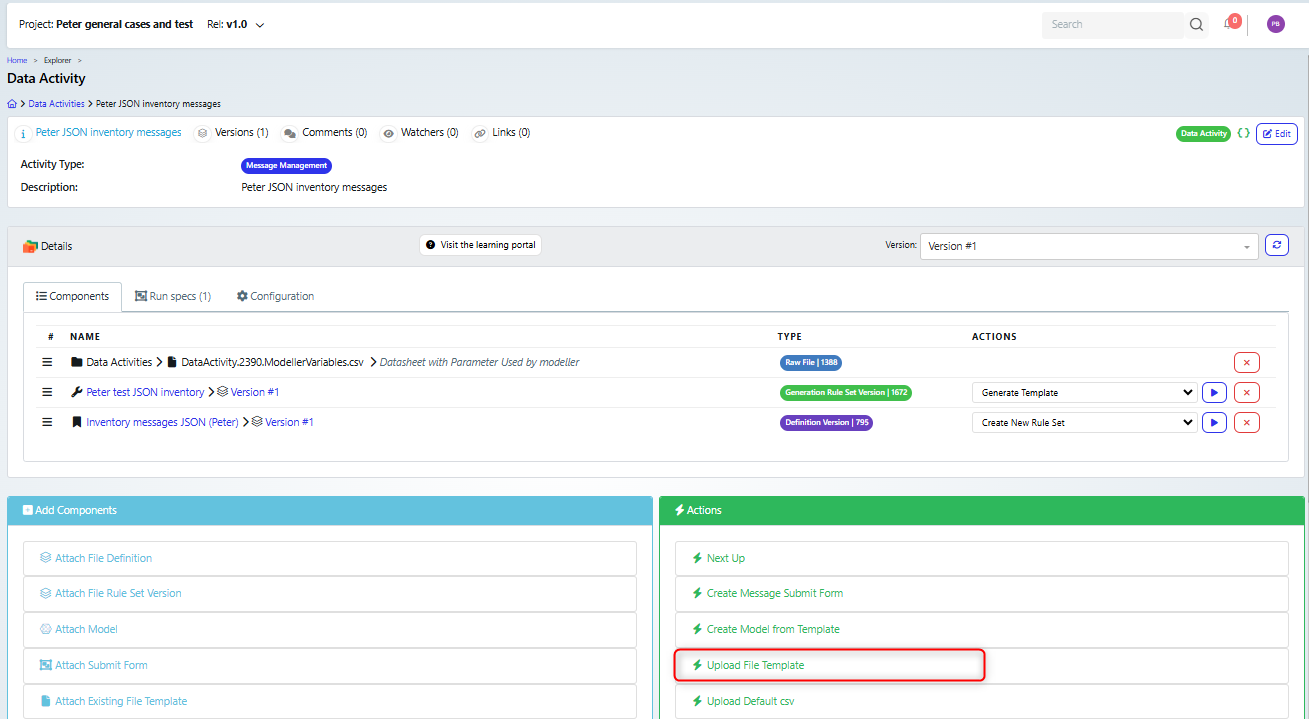
This will display the upload file template dialog, where you can browse to the template file to be uploaded (1)
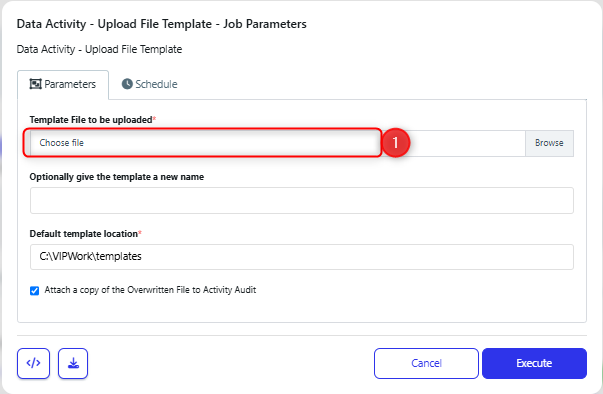
This starts a job that will upload the file.
Once the file is uploaded, you will have components similar to this:
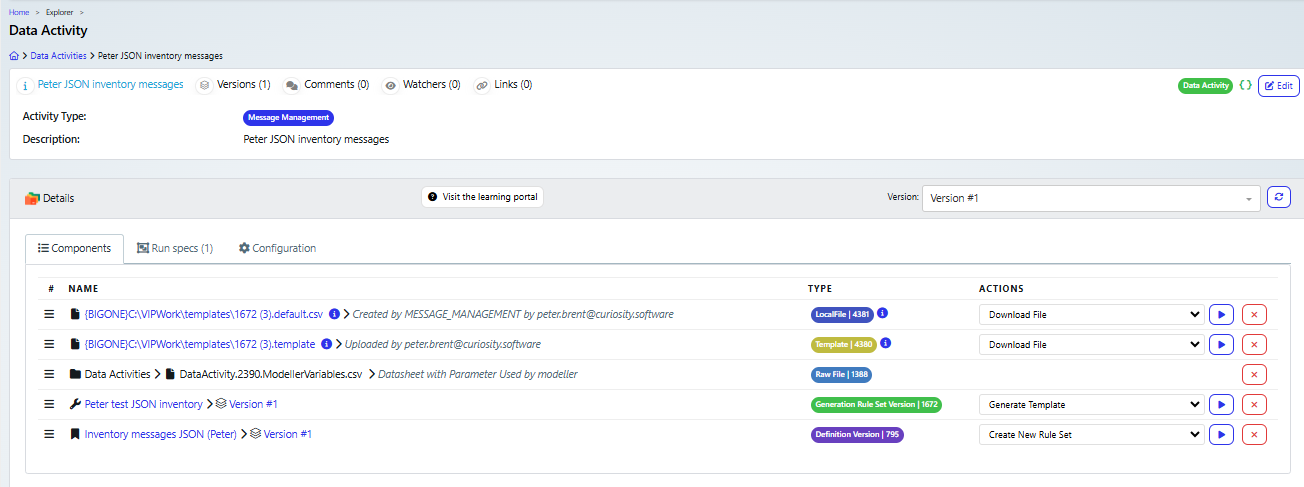
Now you can build a submit form, so that other users can generate data.
Create the Submit Form
A submit form is a reusable form which can be embedded into the self-service portal for future use. Whenever any user wants to create messages, they can do so using the created form.
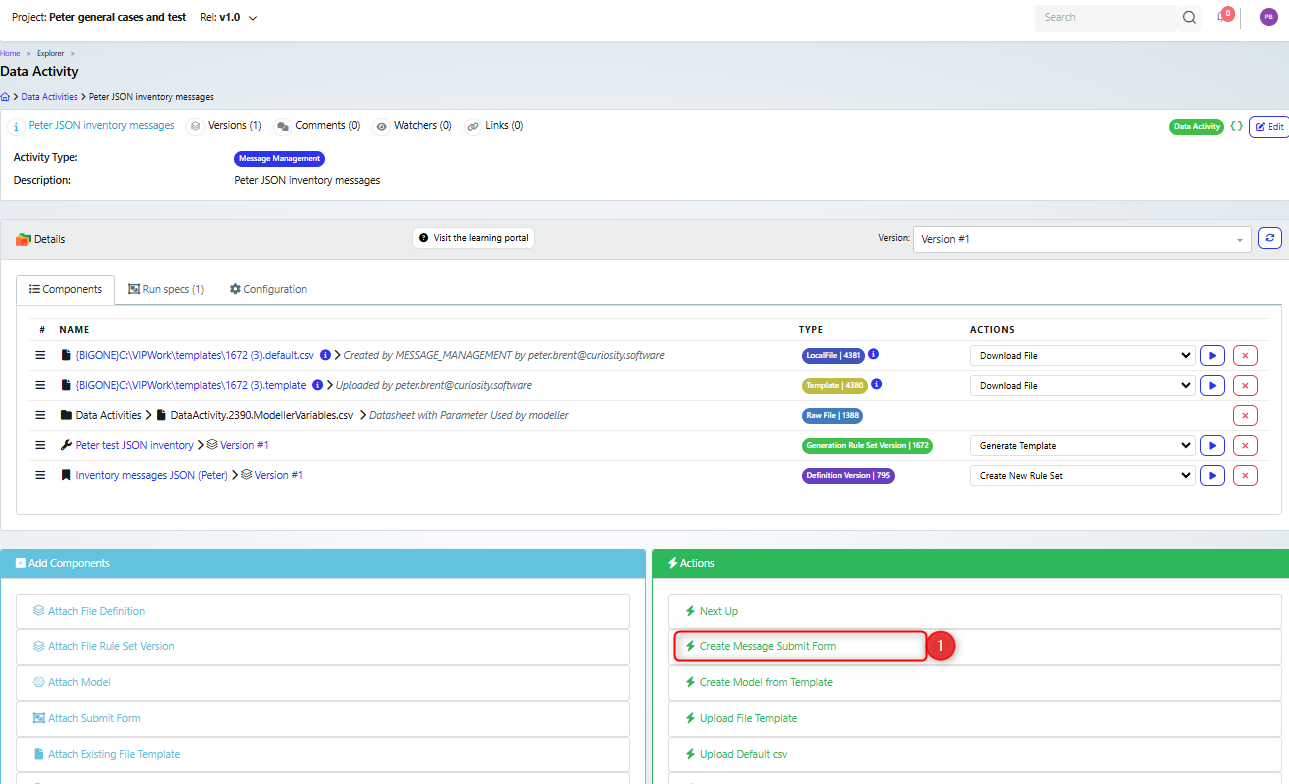
To generate one, click the Create Message Submit Form action (1).
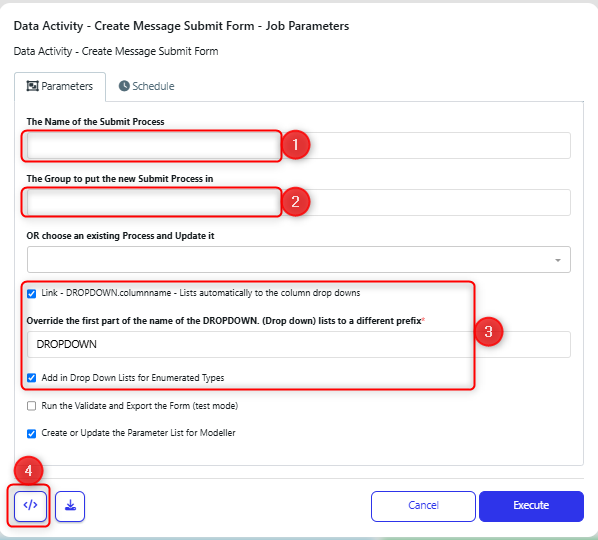
This will display the Create Message Submit Form, where you can set the name (1) and group (2) for the form process. It is also possible to update an existing process, if you had already created a submit form for this activity and needed to update it.
There are also options to handle drop down lists, if you are using any fields that applies to (3).
Finally you can retrieve the links or code for embedding the submission form in an external page (4).
Generate Files & Messages
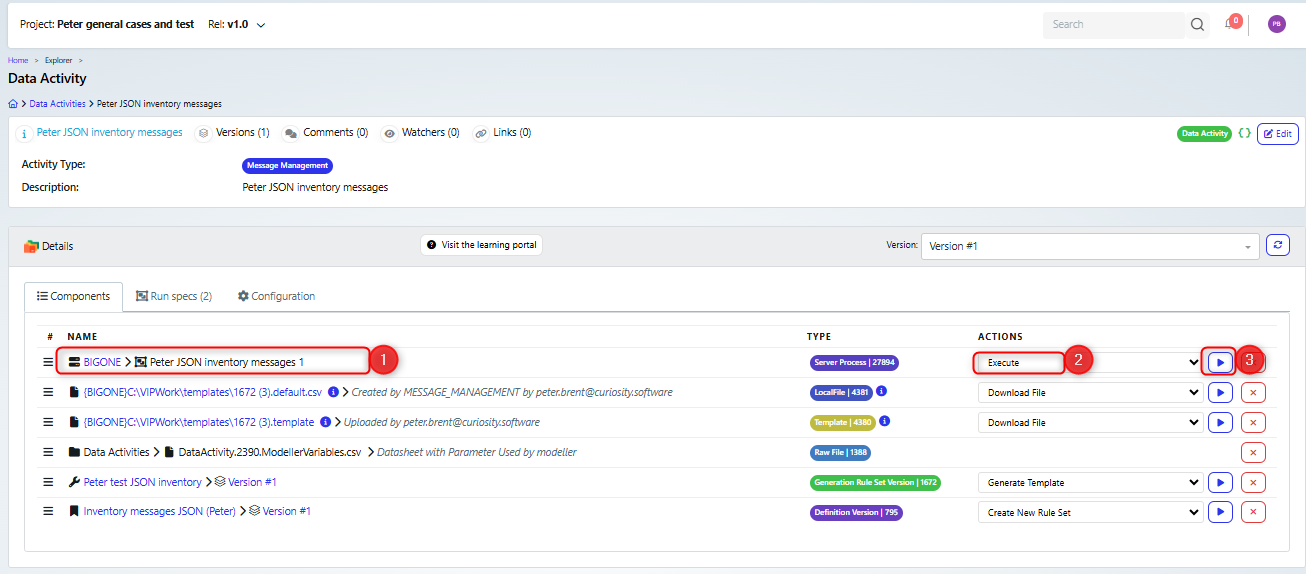
Once the form is created and the data activity is refreshed, then the form component will be visible (1). To run it, ensure the action is set to execute (2) and click run (3).
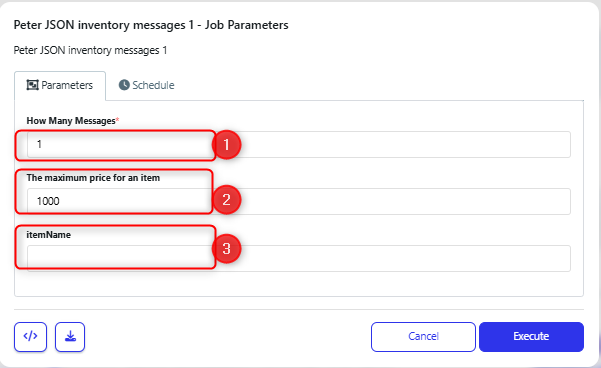
This will display the form, like the example below. You can specify how many messages to create (1).
There are a couple of additional fields on this form. The maximum price for an item (2) is a user defined variable that sets the maximum price (as seen previously). The itemName (3) is a parameter that was created by setting the message element as being “exposed in template” (as seen previously).
Updating the rule set
If you need to update the rule set, then you will need to:
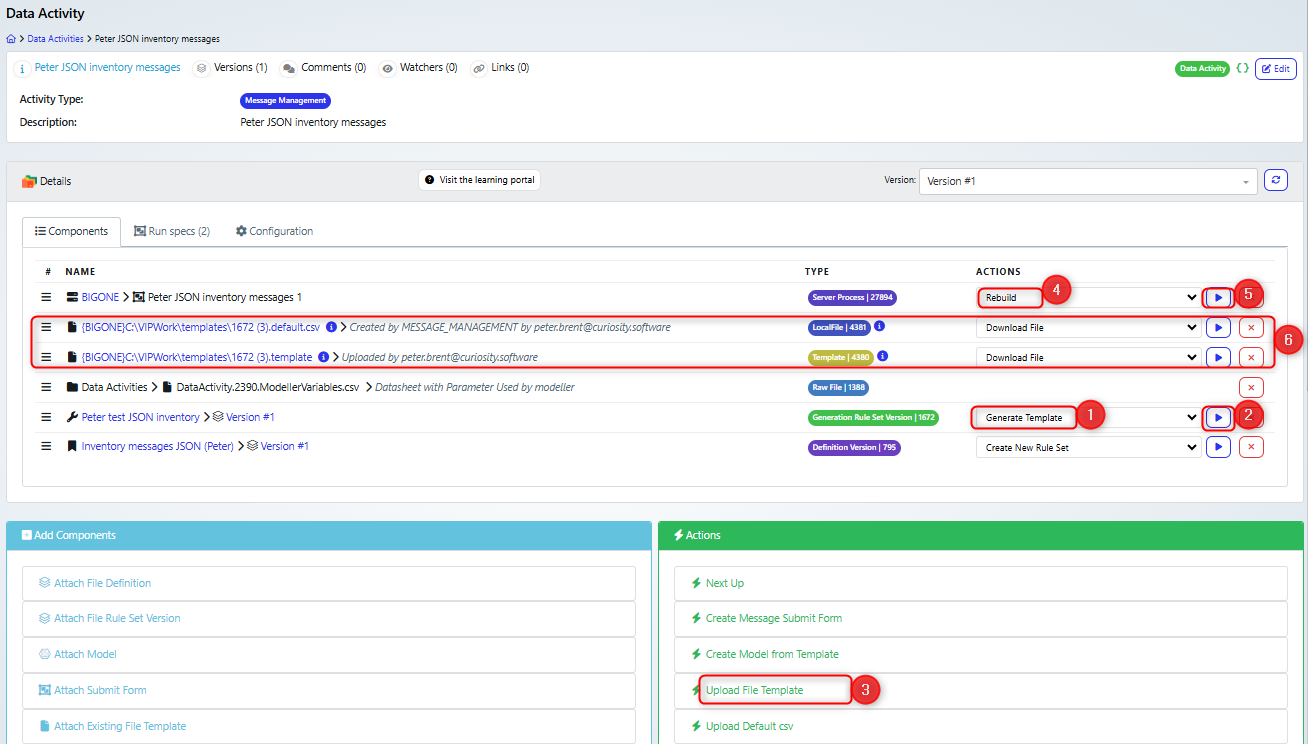
Regenerate the template: set the rule set action to be “"Generate Temple” (1) and click run (2).
Upload the new template (3).
Rebuild the form: set the form action to Rebuild (4) and click run (5).
Note that if you do not delete the old templates (6), then you will have both the old and new templates generated.
