What are they and why would I use them?
The data generation activity has many potential uses and is highly configurable. In order to make it easier for you to set up common use cases, we have created a series of accelerators that will do much of the work of configuring the data generation activity to carry out the accelerator task. They give you a good starting point which you can then adapt to your own use case. For example by limiting the data that is extracted or masking some of that data.
Below is the list of the accelerators that are available.
Accelerator name | Action | some suggested use cases |
|---|---|---|
Extract the Data to a CSV | Extracts data from selected database tables into CSV files | Extracting data for a third party. |
Move the data from source to Target | Copies data from selected tables in one database, to another database | Creating a clone of tables for testing. |
Convert the RuleSet to a Upsert (update) any Matching Data between Schemas | Updates the values in one database with those from the source (reference) database | Updating data from a master data source, for example if your test customer has been amended. You can use this to update the changes from the master database. |
Convert the RuleSet to a Clone | Creates copies of the selected data. You can manipulate the copied data, as needed for your use case. | Creating multiple copies of a data record for testing. The data can be modified as needed. For example you could copy an unusual transaction then update parameters like the amount or currency to improve test coverage. |
Convert the RuleSet to a Subset | Creates a subset of data.
| Copy a selected set of data from a master data source, to carry out specific tests. |
Convert the RuleSet to a Move any Missing Data between Schemas | Update the tables in the target database with any additional data that has been added to the source database. | Update a copy of test data with new records that have been added to a master test data set. For example, new test customers or products added to your master database. |
This guide will step you through the process of setting up and using these different accelerators and guide you on some variations that you can add to customise your data. Where there are differences between the accelerators, these are highlighted in the guide by using collapsible sections.
Create a data generation activity
Prior to running the accelerator, you need to have created a data generation activity.
Follow the steps in the Synthetic Data Generation guide to create a data generation activity, to which you have:
Used ‘Attach Default Database Connection’ (1), to attach the required database (2).
Used ‘Attach Definition Version’ (3) to attach the definition (4).
Used ‘Create New Rule Set’ (5) to create an appropriate rule set (or used ‘Attach Rule Set Version’). Note that at this stage you do not need to make any changes to this rule set, as the accelerator will do the initial configuration.
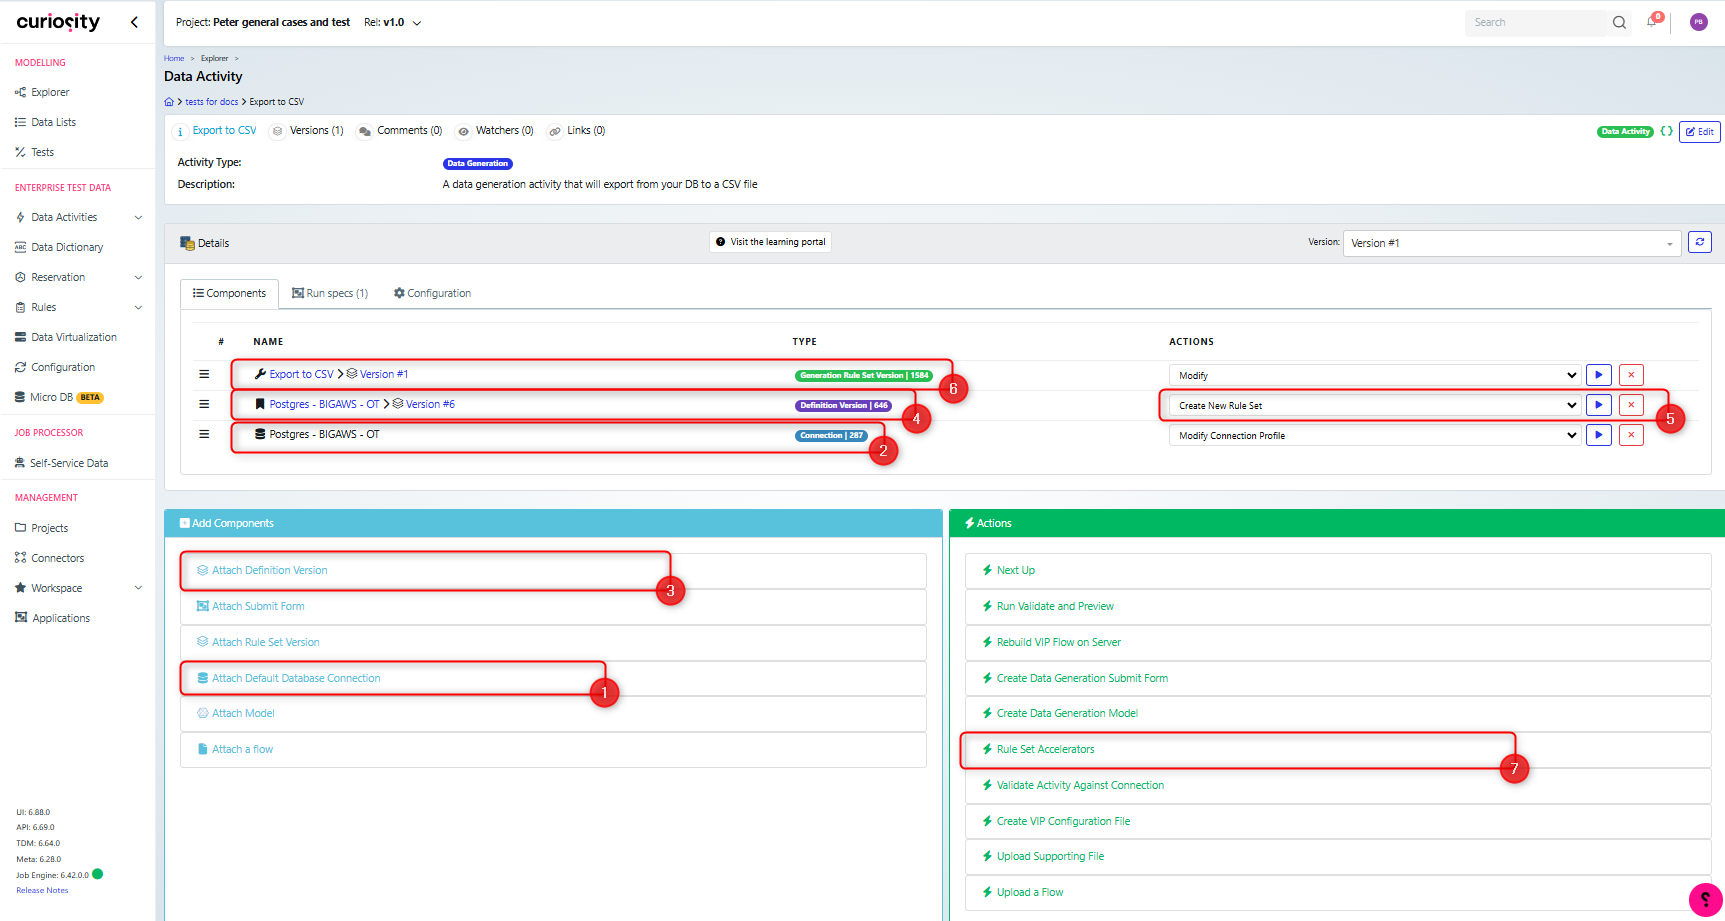
When you have created your data generation activity, Click the Action ‘Rule Set Accelerators’ (7) in order to apply one.
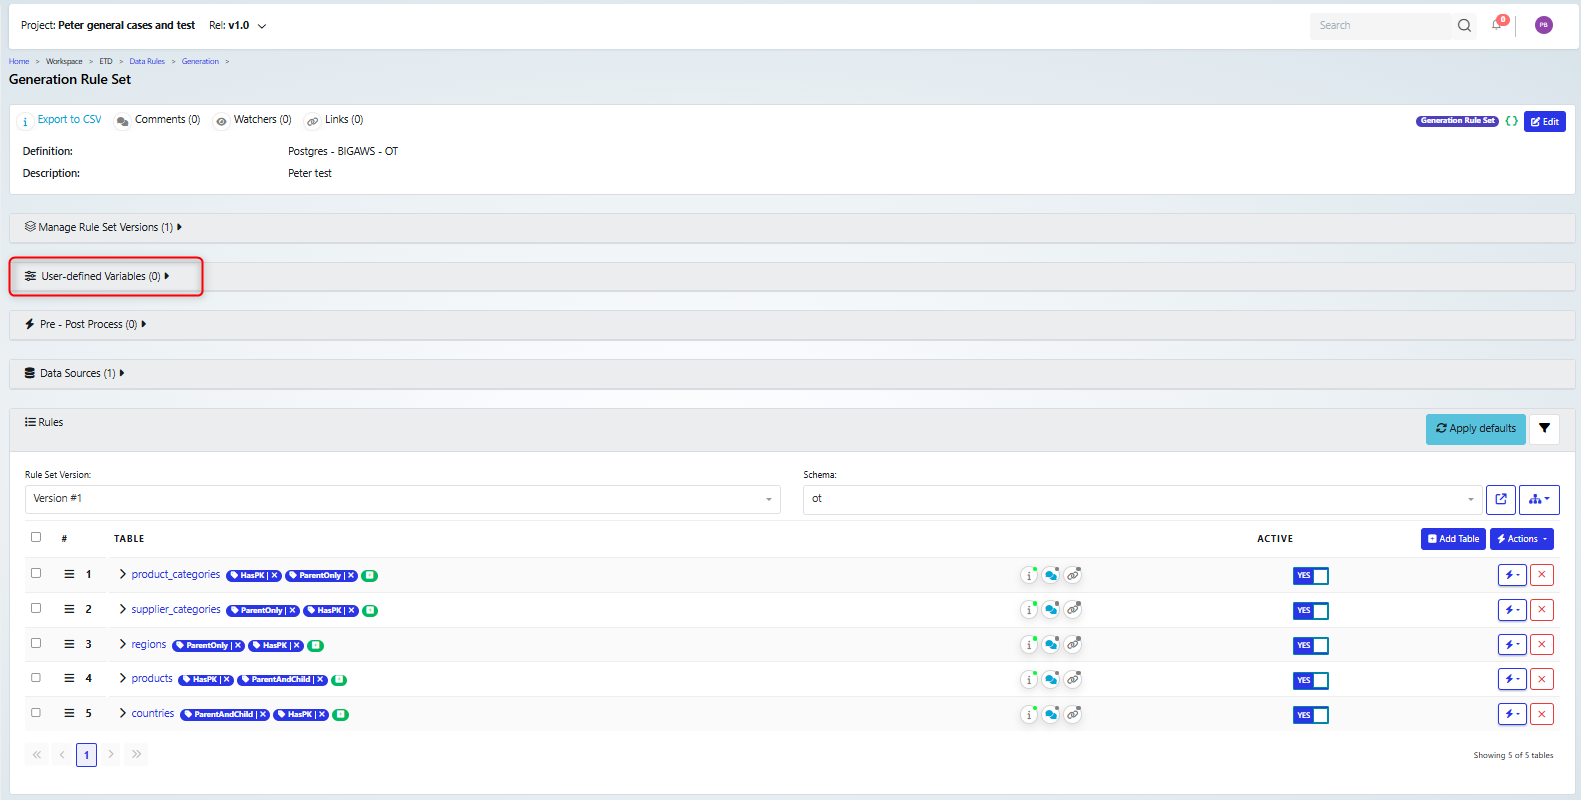
Note that at this point, the rule set is basic, with no user defined parameters set. In this example, we have added 5 tables to the rule set.
Run the Accelerator
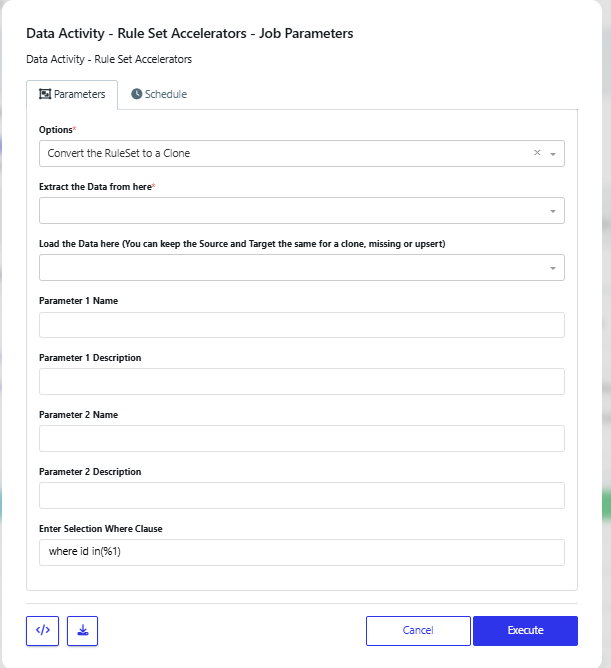
The ‘Data Activity - Rule Set Accelerators - Job Parameters’ dialog will be displayed and the parameters available will depend on the accelerator option that you choose. These are listed in the collapsible sections for each option below.
Note that when the job is executed, you can open the job Detail page in a new browser tab, so you can review the progress and outcome, examples of which will be shown in the sections below.
If you copy data into a table that has a foreign key on itself, then you may need to suspend or temporarily remove that constraint in order to be able to import the data. For example an employee table where an employee will have a manager, but that manager will be referenced by their employee id.
This could affect any of the accelerators that copy data into a new table, like: Move data, Subset data and update missing data.
Extract the Data to a CSV
In the dialog:
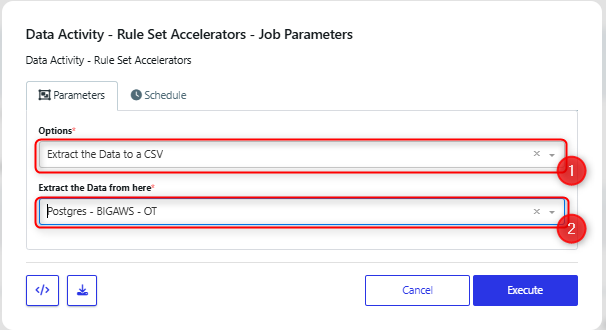
choose ‘Extract the Data to a CSV’ from the drop-down option list (1)
the database from the ‘extract the Data from here’ drop-down list (2)
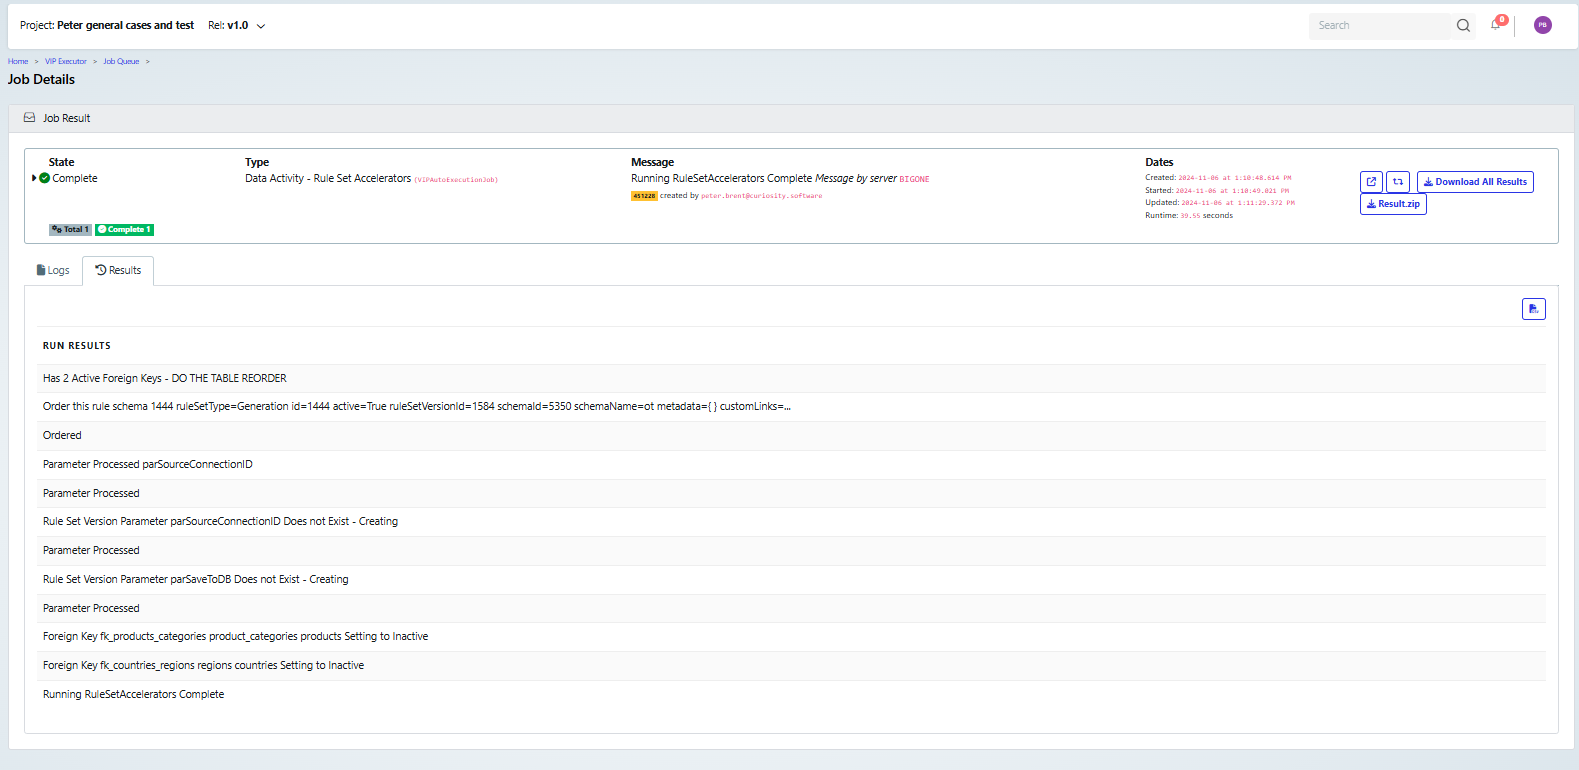
Once it has been executed and completed, the job details will look something like the following screen shot
Move the data from source to Target
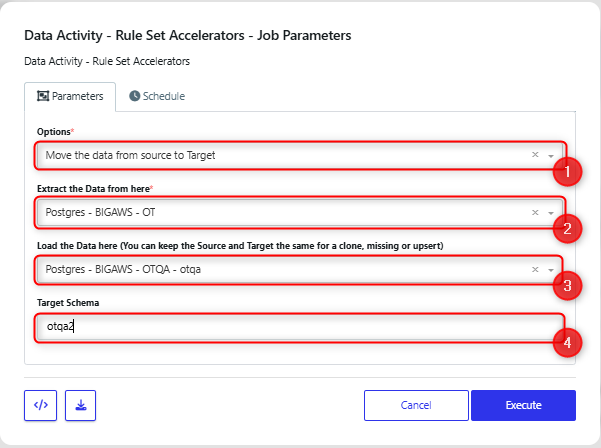
In the dialog, choose:
‘Move the data from source to Target’ from the drop-down option list (1)
The database to copy data from (2).
The database to put the data into (3).
The schema that the data should be written into (4)
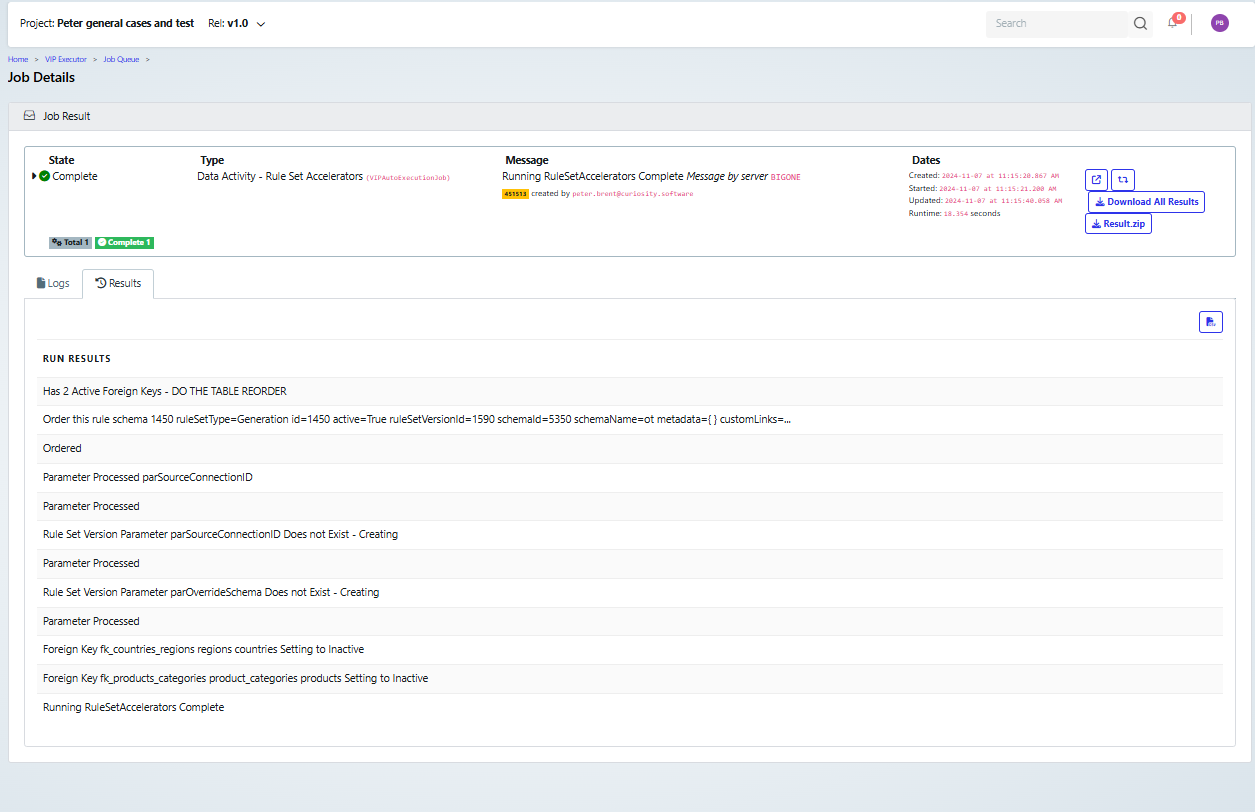
 Once it has been executed and completed, the job details will look something like the following screen shot:
Convert the RuleSet to a Upsert (update) any Matching Data between Schemas
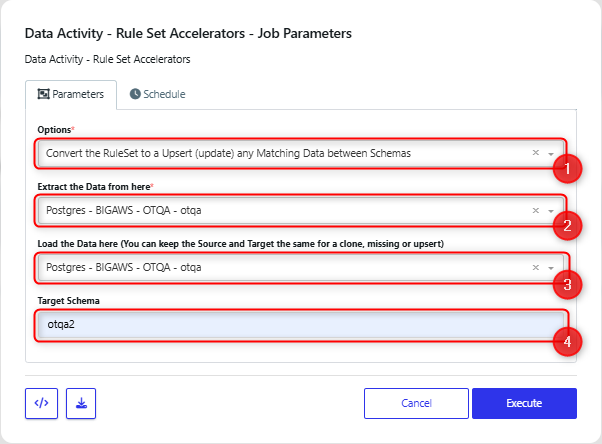
In the dialog, choose:
‘Convert the RuleSet to a Upsert (update) any Matching Data between Schemas’ from the drop-down option list (1)
The database to copy data from (2).
The target database (3).
The schema that the data will be updated in (4)
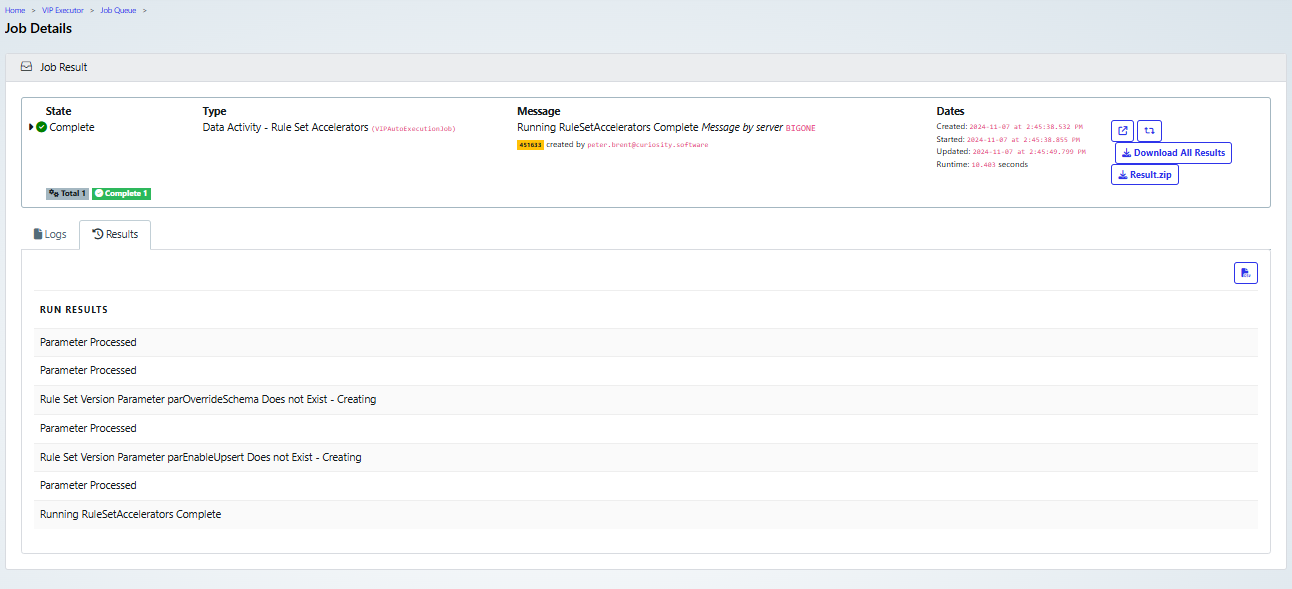
Once it has been executed and completed, the job details will look something like the following screenshot
Convert the RuleSet to a Clone
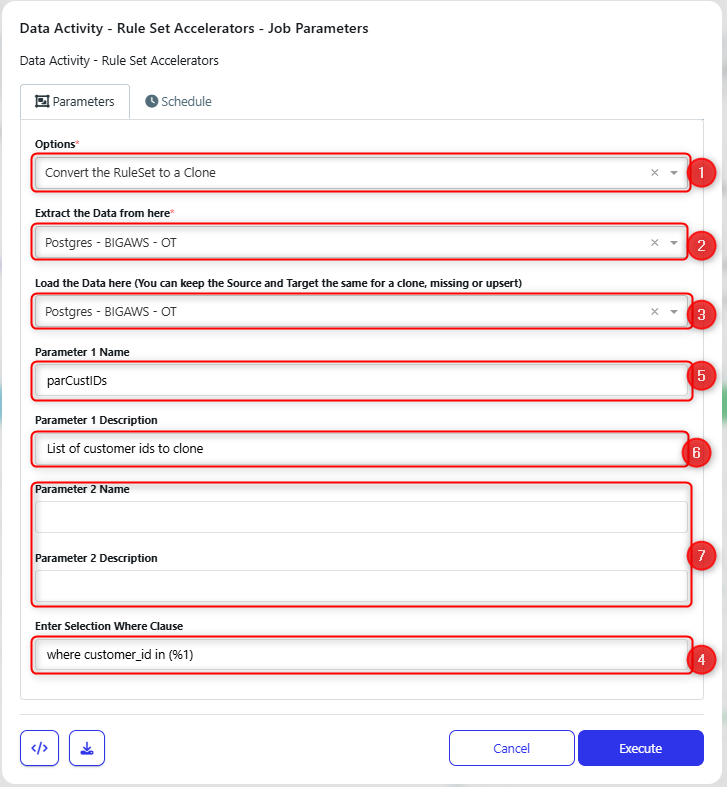
In the Dialog box:
Set the option to be ‘Convert the RuleSet to a Clone (1).
Choose the database to clone the data from (2).
Choose the database to send the cloned data to. This could be the same database, as in this example (3).
Set the where clause to select the data to be cloned (4).
The placeholder for this is: where id in(%1).
You will need to edit this so that the correct data is chosen. In this example, data will be selected where the customer_id is in a list given by a parameter (defined below).
Set the name for the parameter that will be used in the where clause (5).
Set a description for the parameter, note that this will appear on the submit form (6).
If you need to use an additional parameter then that can be defined (7) and would be used in the where clause as %2. For example, if the primary key that you were using was composed of two columns then you would could set parameters to store the values for these and update the where clause to include both of them.
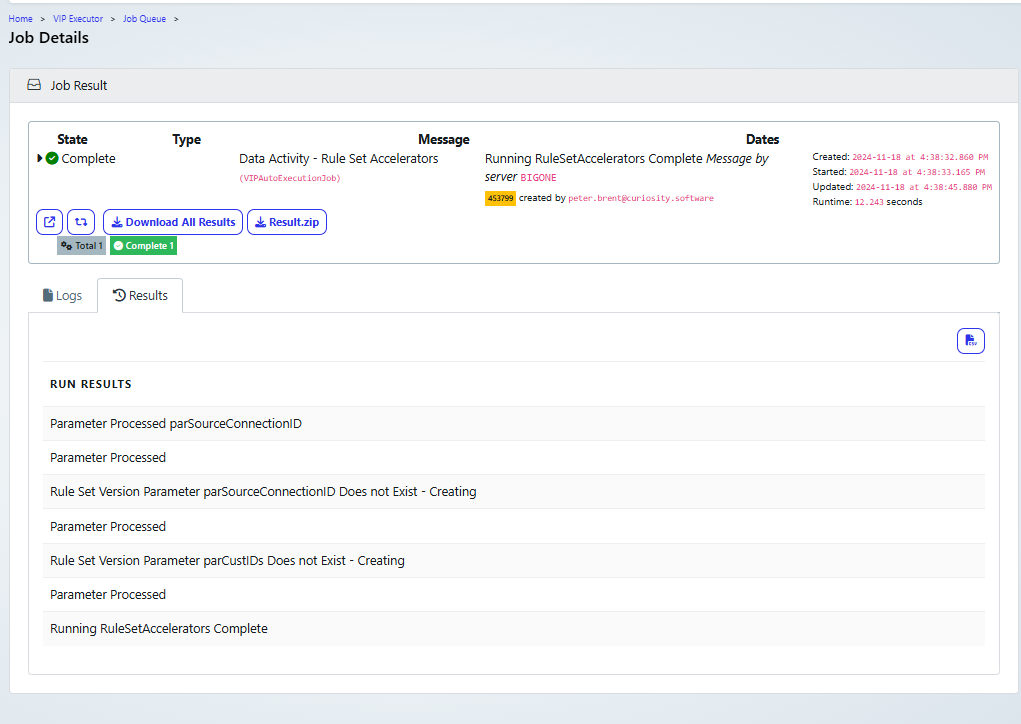
Once it has executed successfully, the job result will look something like the following screenshot:
Convert the RuleSet to a Subset
When you are creating a subset in a new database schema, it will fail if you haven’t already added the reference tables that it has dependencies on. For example an order table may have a dependency on a product table. So you need to ensure that the reference tables have already been copied into the new database. For this, you could use the “Move the data from source to Target” as a separate step in your process.
The advantage of using this method, rather than the subset activity is that this subset can be put into another database, as we have connections to both the source and target databases.
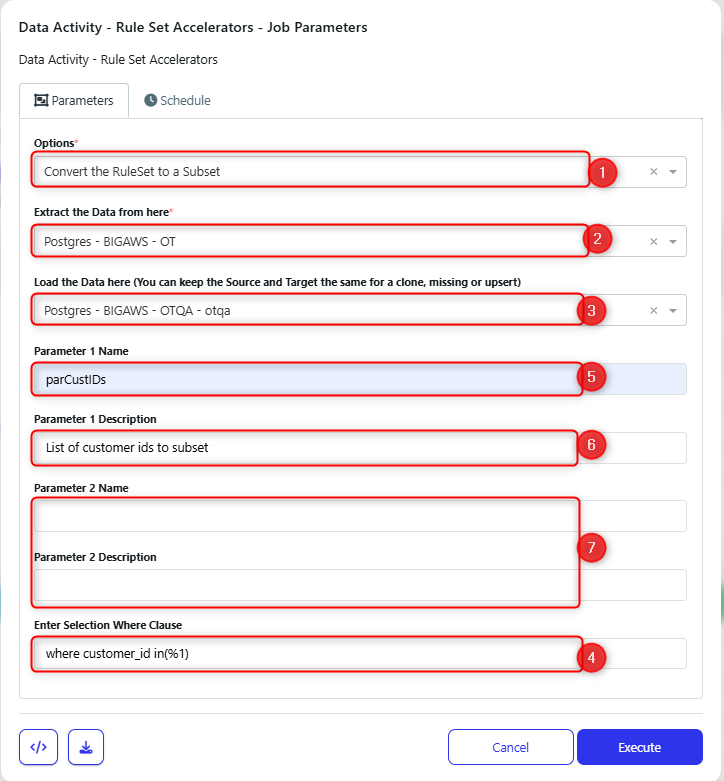
In the Dialog box:
Set the option to be ‘Convert the RuleSet to a Subset(1)
Choose the database to subset the data from (2)
Choose the database to send the data to (3)
Set the where clause to select the data to be included in the subset(4)
The placeholder for this is: where id in(%1)
So you will need to edit this so that the correct data is chosen. In the example, data will be selected where the customer_id is in a list given by a parameter (defined below)
Set the name for the parameter that will be used in the where clause (5)
Set a description for the parameter, note that this will appear on the submit form (6)
If you need to use an additional parameter then that can be defined (7) and would be used in the where clause as %2. For example, if the primary key that you were using was composed of two columns then you would need to set parameters to store the values for these and update the where clause to include both of them.
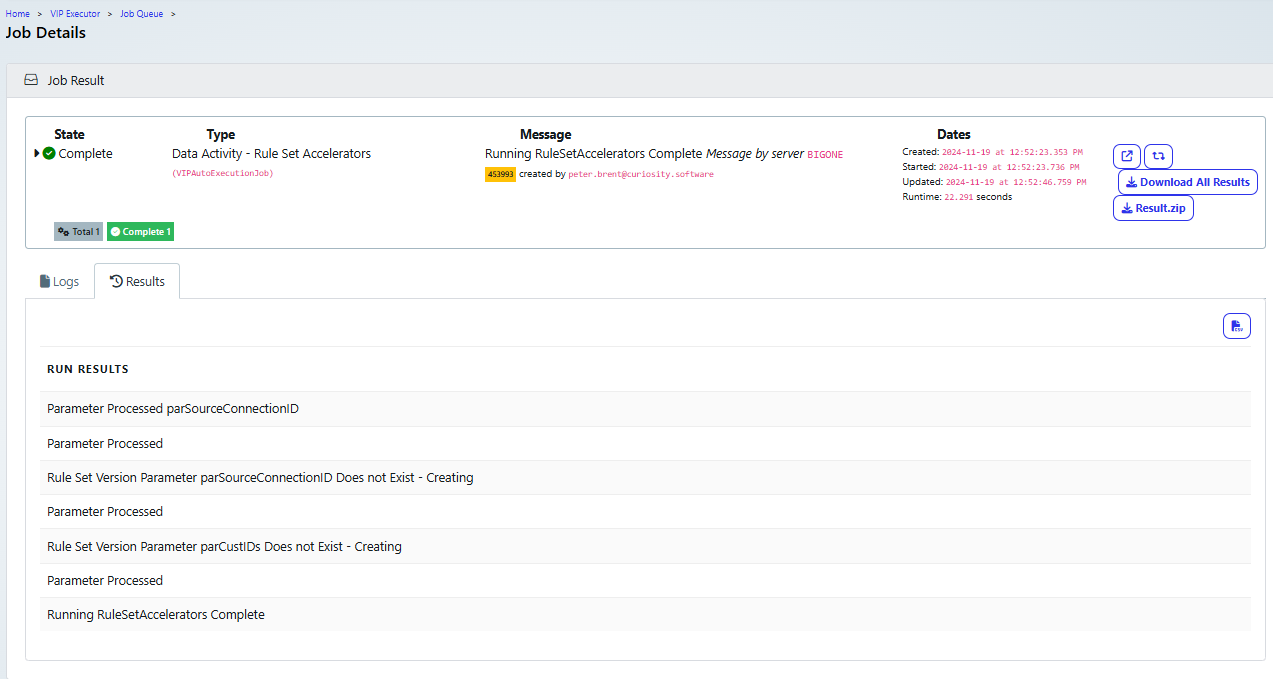
Once it has executed successfully, the job result will look something like the following screenshot:
Convert the RuleSet to a Move any Missing Data between Schemas
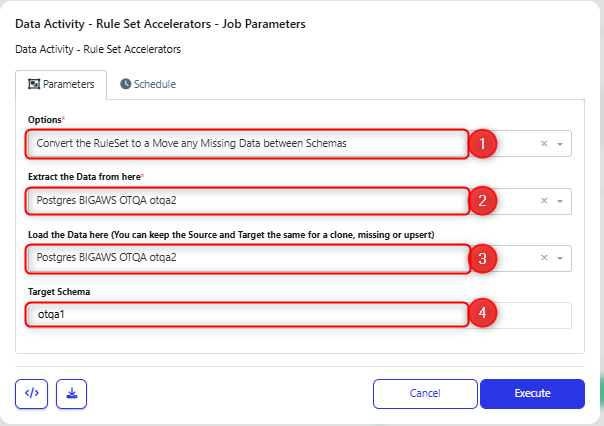
In the Dialog box:
Set the option to be ‘Convert the RuleSet to a Move any Missing Data between Schemas (1).
Choose the database to update the data from (2).
Choose the database to send the data to (3).
Choose the target schema for the data update (4).
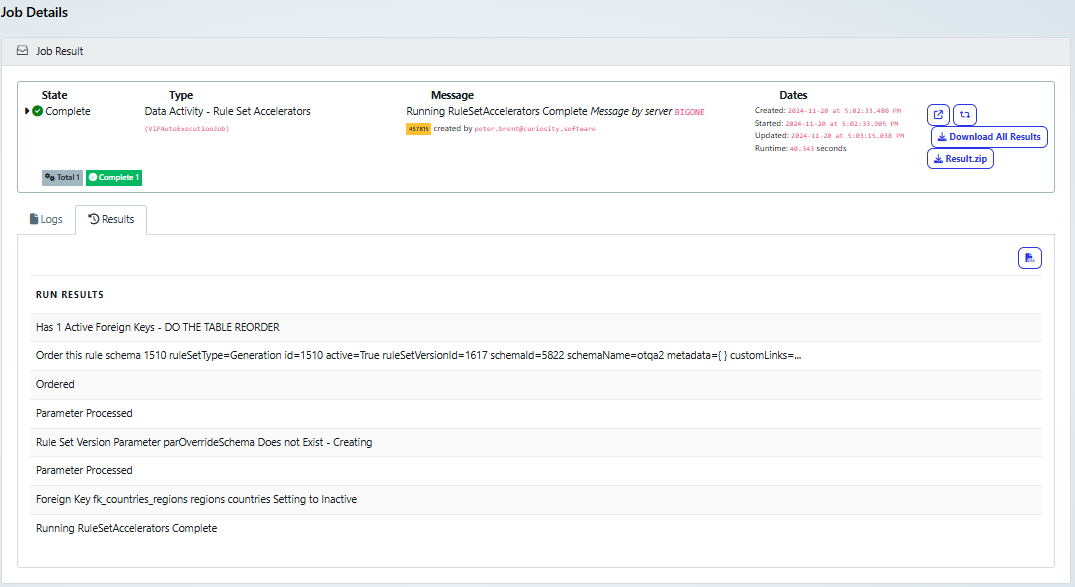
Once it has executed successfully, the job result will look something like the following screenshot:
Review the generated ruleset
Once the job has completed, you can refresh the ruleset, and confirm that it has been updated. You will see that user defined variables have been added and rules for the table columns have been updated.
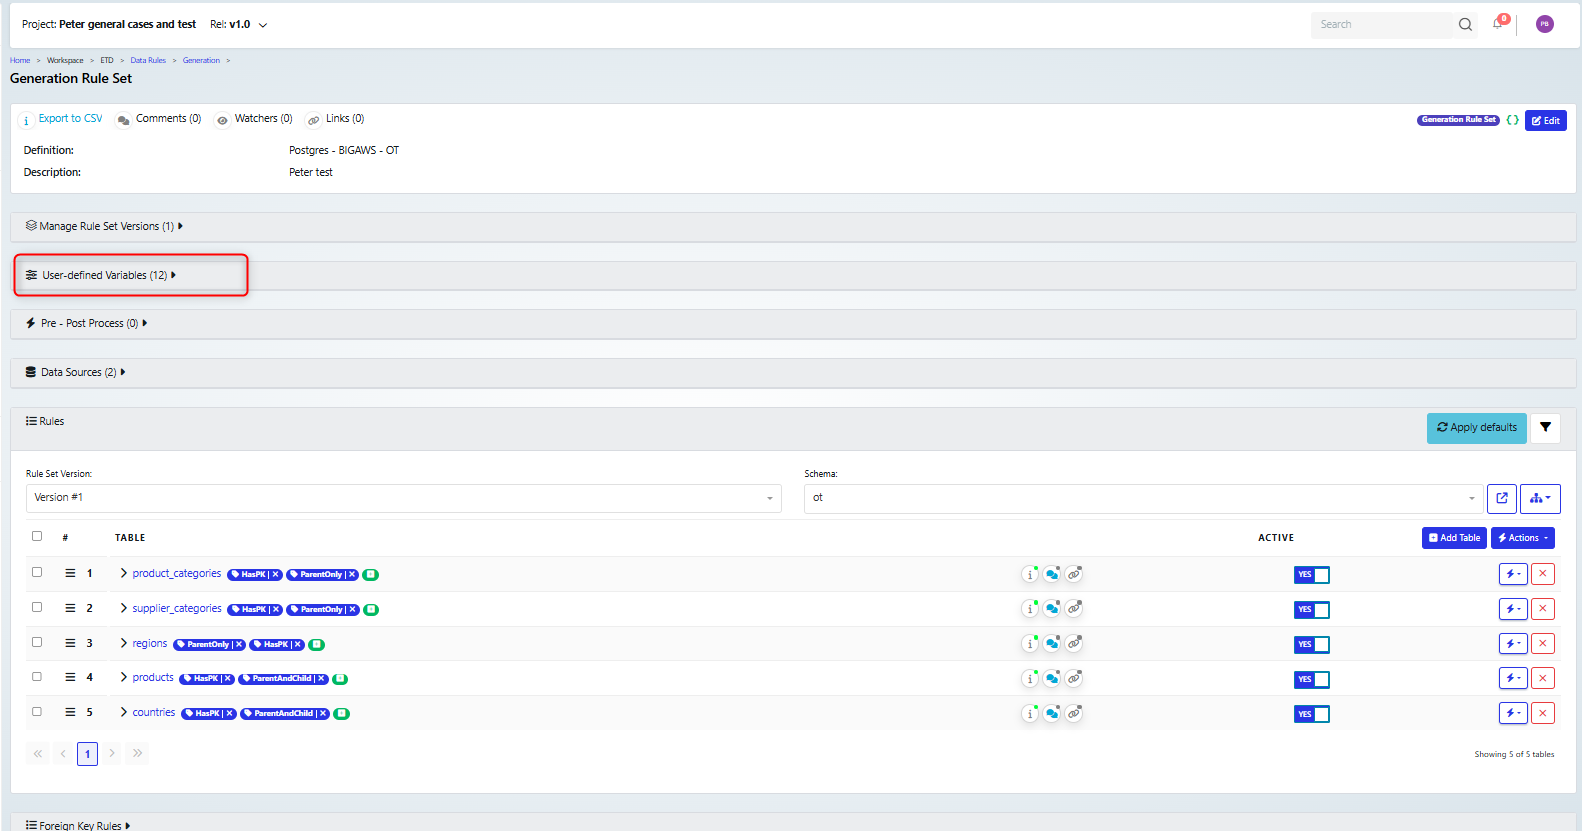
Note that a number of user defined parameters have been set up.
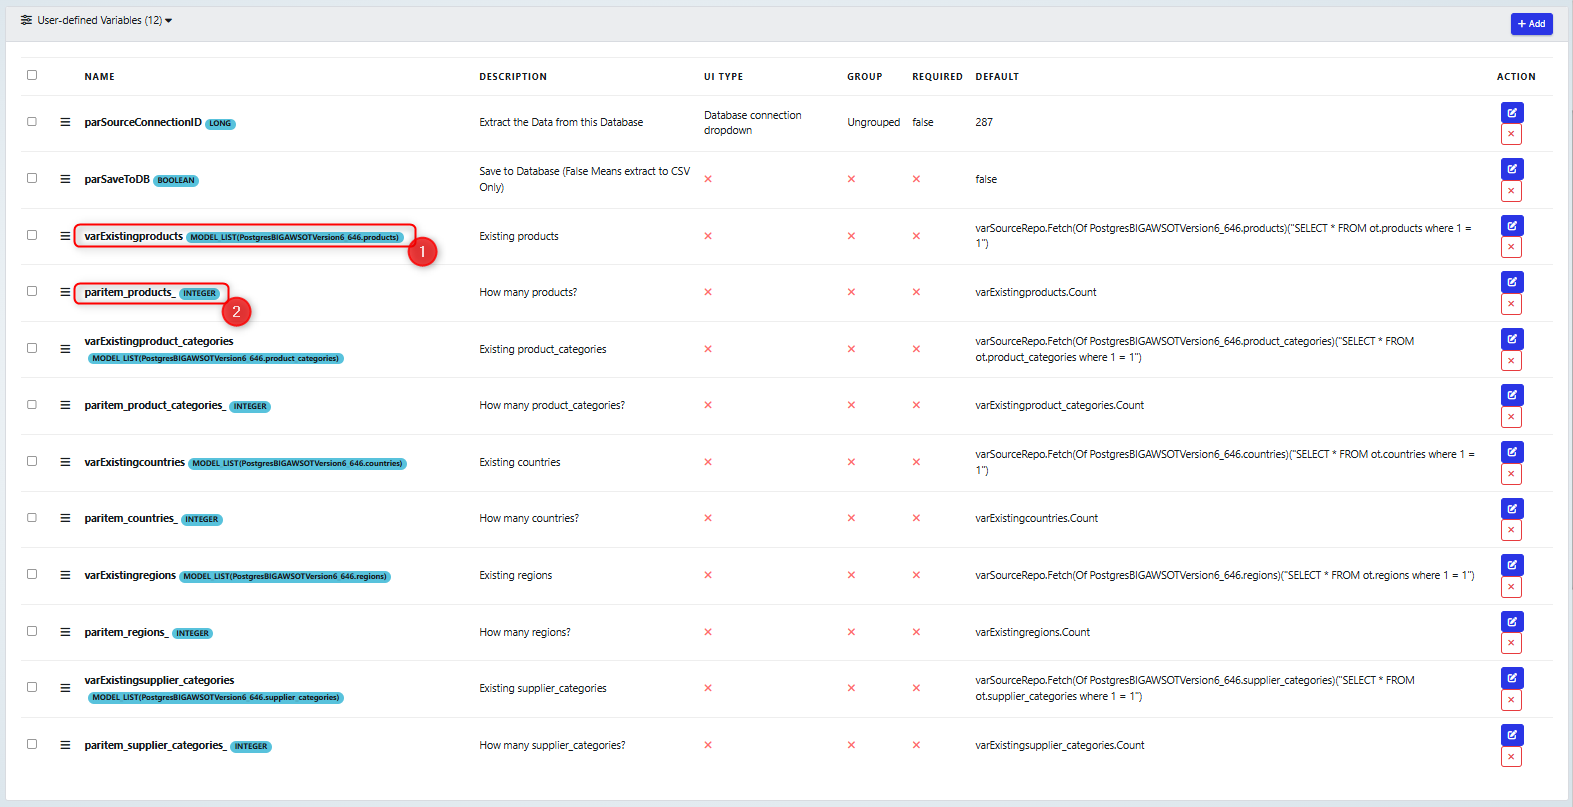
These will be used in the data extraction, so we have variables which will map to each of the tables, for example the Products table (1)and a count for each table (2)
Note on rule-set variables for the clone and subset accelerators
Note that in these examples, we are cloning or subsetting from three tables:
customers
orders
order_items
We are selecting on customer_id, and so a variable has been set up parCustIDs, which will contain the list of customers to clone. So the select for the list of customer records varExistingcustomers, is set to:
"SELECT * FROM ot.customers where customer_id in (" & parCustIDs & ")"
Since the orders table depends on the customer_id, then the variable for that table (varExistingorders) is set to only select records that are linked to customers selected in the customer table:
("SELECT * FROM ot.orders WHERE customer_id = " & varExistingcustomers(_customers_ -1).customer_id
And then order_items are only selected (varExistingorder_items) if they are in orders that are linked to the customers selected:
SELECT * FROM ot.order_items WHERE order_id = " & varExistingorders(_orders_ -1).order_id
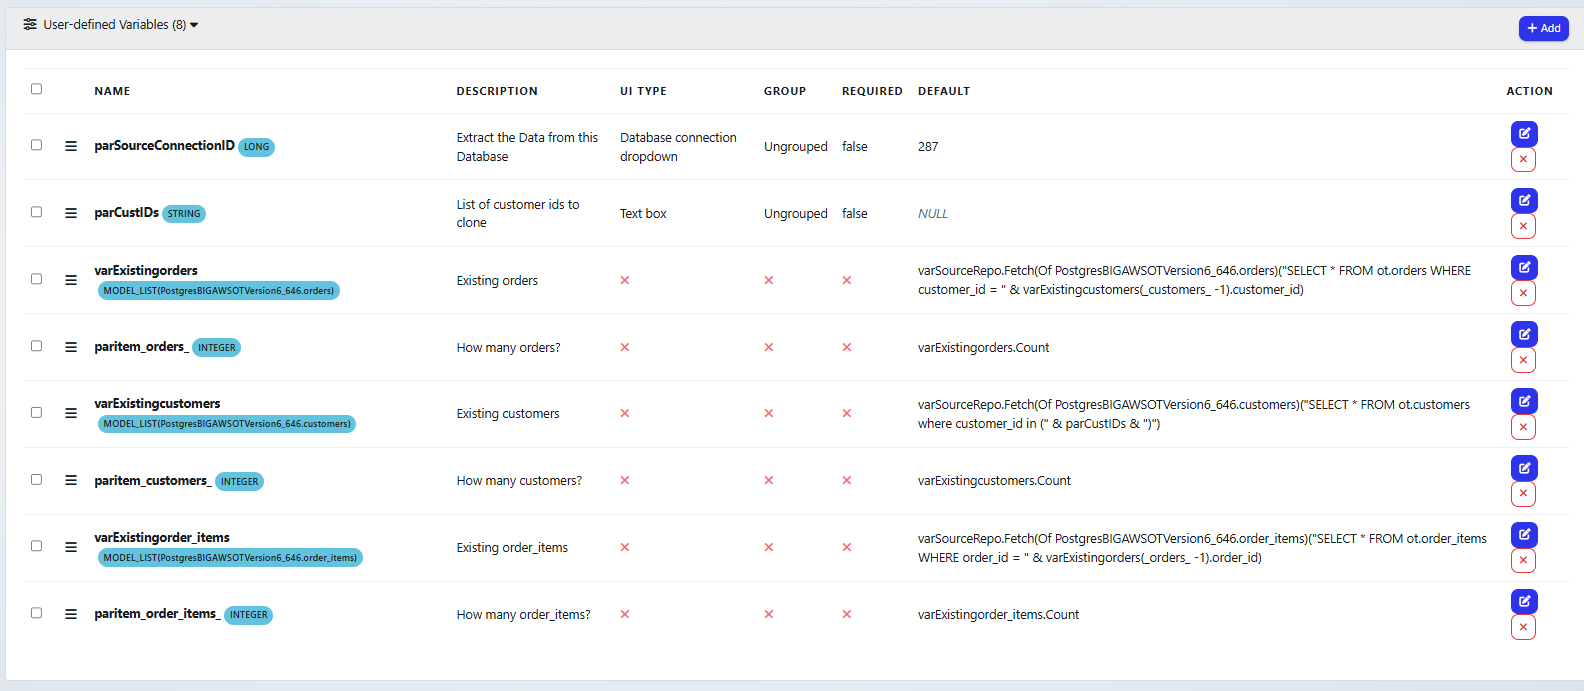
Note that if a table had been included in the data generation that was not a child of the customer table, then no data will be cloned from that table.
If you check the list of tables:
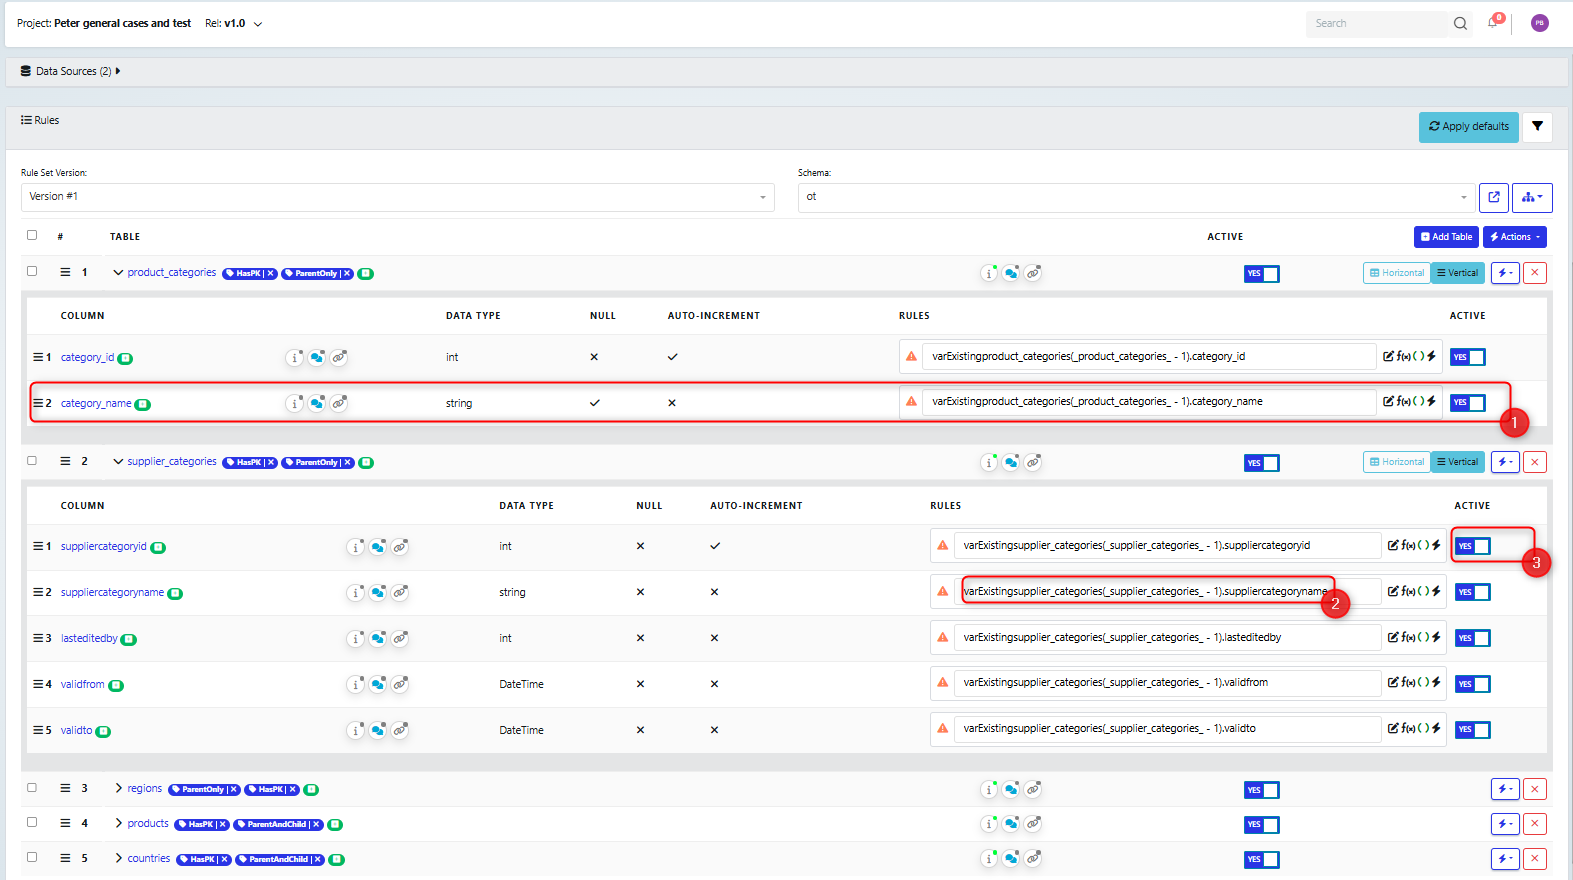
The Rules for each column have been updated to reference the defined variables (1),(2). Note that you can alter these dependant on your requirements, for example, if you are cloning data, then you may want to append strings or even replace some values.
Note also that the id fields for the tables have been set to Active (3). This is to ensure that the extracted data matches that in the database. If you were extracting into another database, or taking a subset of data, this would be very important so you can ensure that the records can be aligned. However, if you are cloning data into the same tables, then this will need to be turned off, so that a new id is created.
Next you need to build the flow.
Create the activity flow
Click the Action: ‘Rebuild VIP Flow on Server’
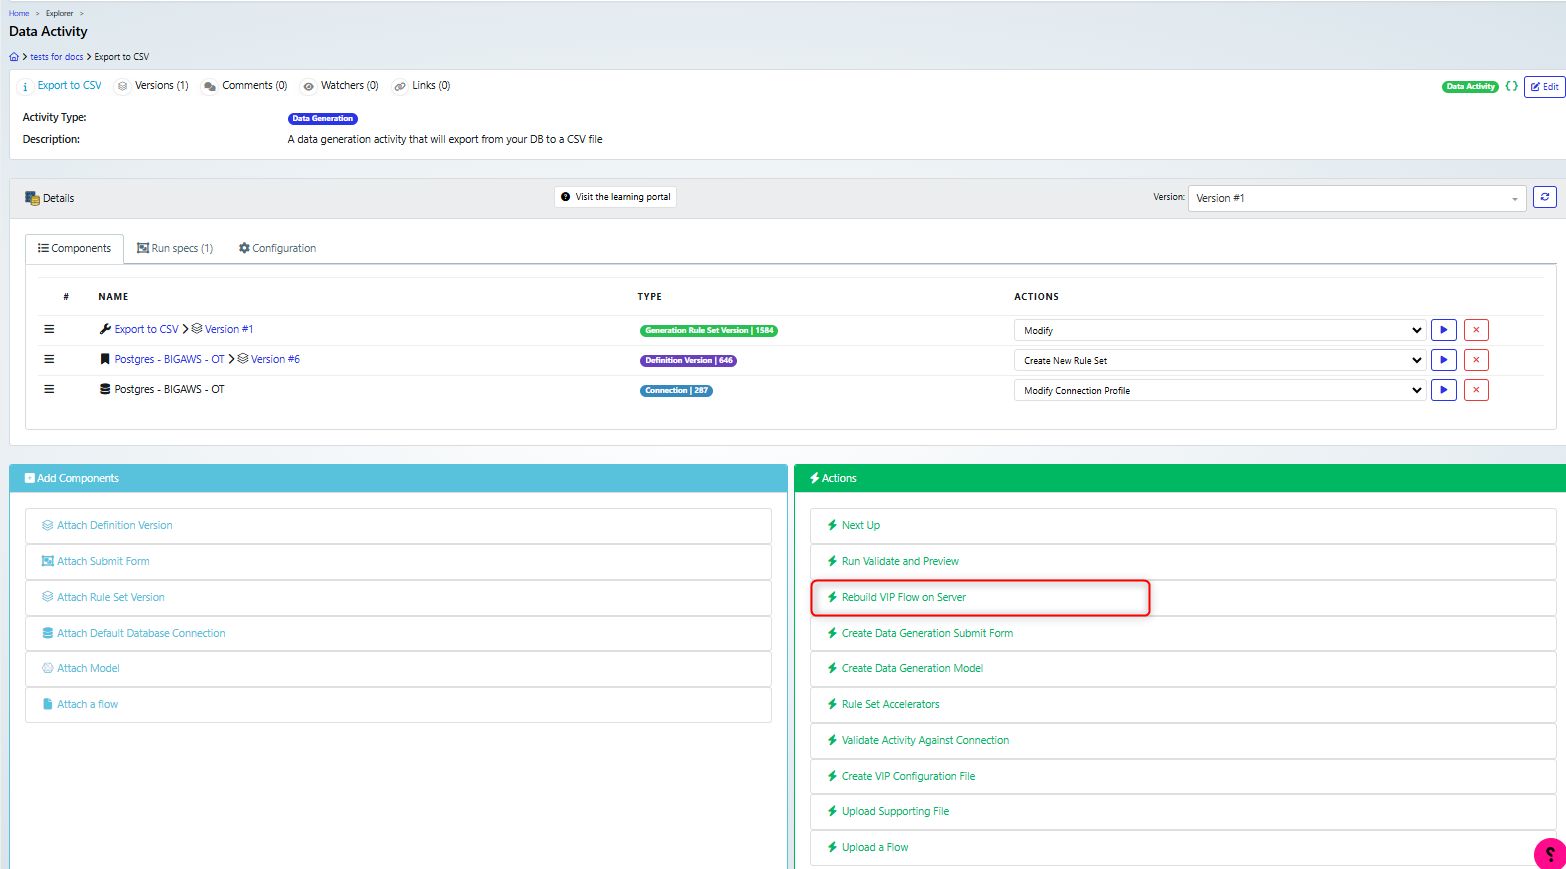
This will start a job on the server and will open a new browser window to track the job details
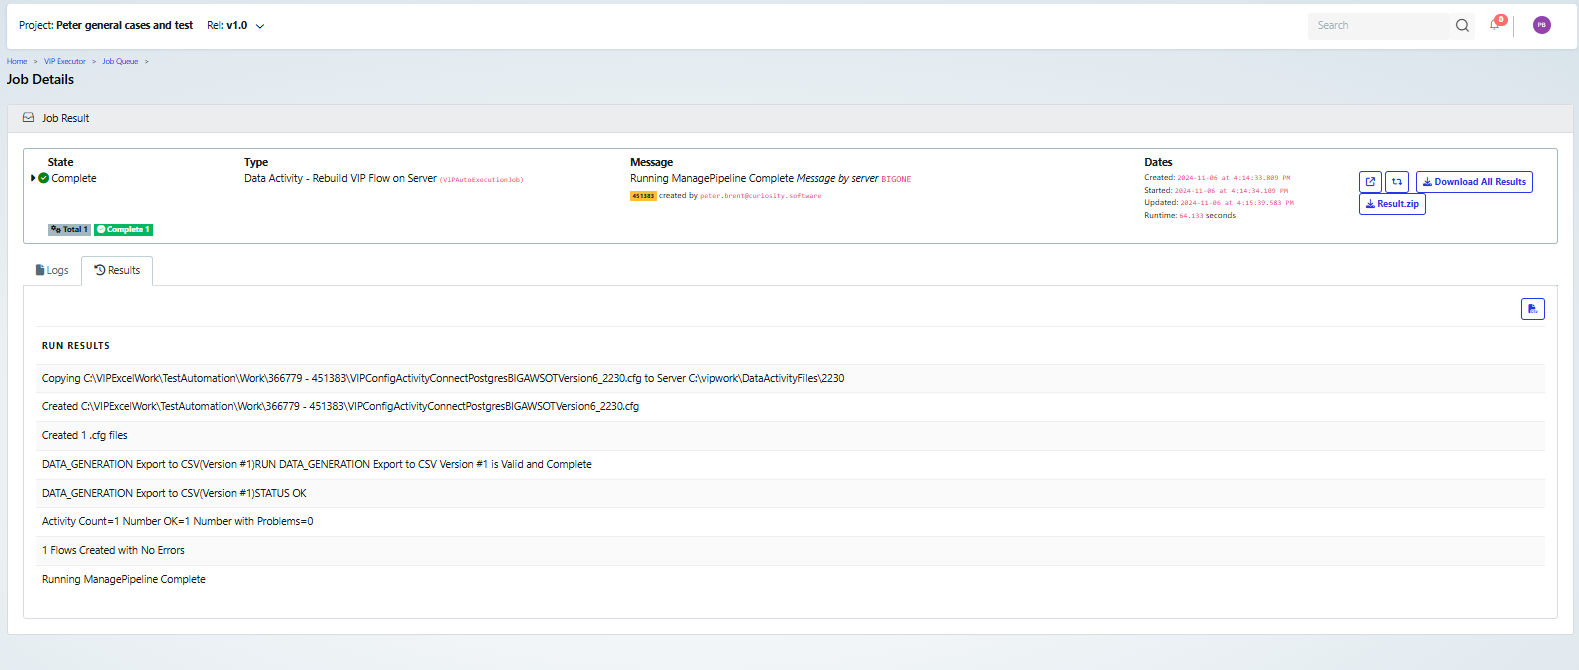
Once it has completed, you can refresh the data activity tab and see that two new components have been added, the raw file and the flow (1).
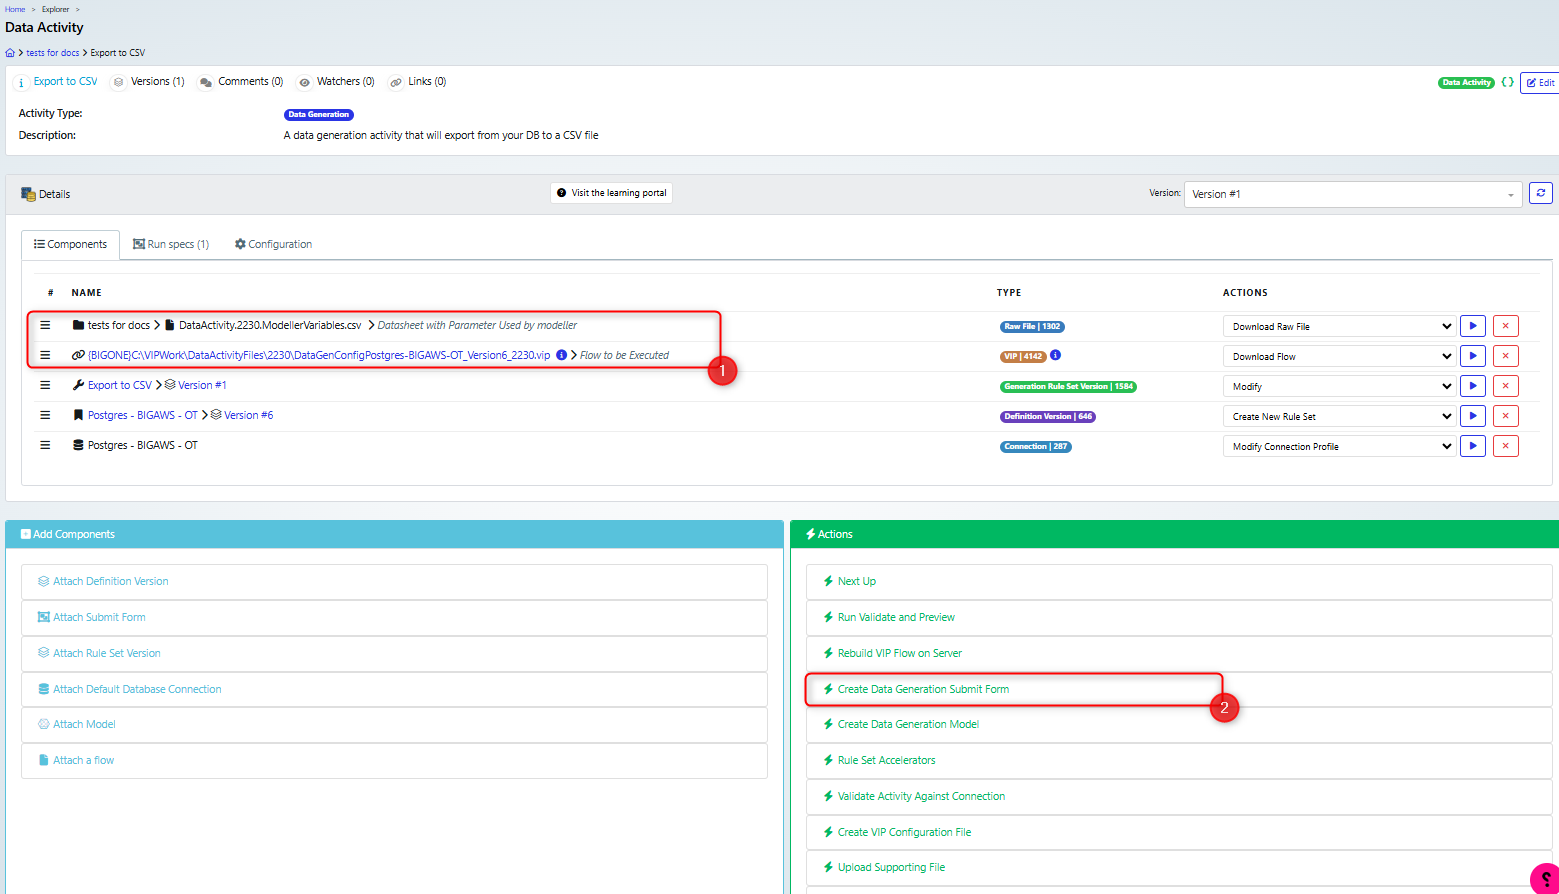
Next you need to create the Submit form, click ‘Create Data Generation Submit Form’ (2).
Create the Submit form
This will display the ‘Data Activity -Create Data Generation Submit Form - Job Parameters’ dialog:
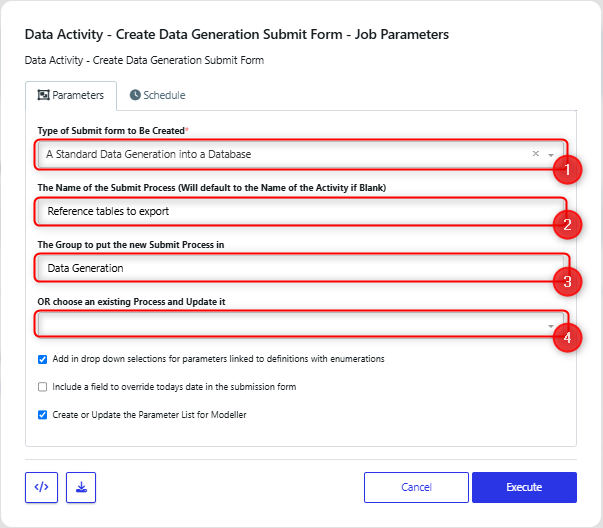
Set the ‘Type of Submit form to be created’ to ‘A Standard Data Generation in to a Database’ (1). Name your form (2) and its group (3) as appropriate. If you have already generated a form and want to update it, then you can use the ‘choose an existing Process and Update it’ (4) drop-down to select it. Clicking Execute starts the job and opens the Job Details in a new browser tab.
Once it has completed successfully, you can refresh the Data Activity tab to see the new form (1).
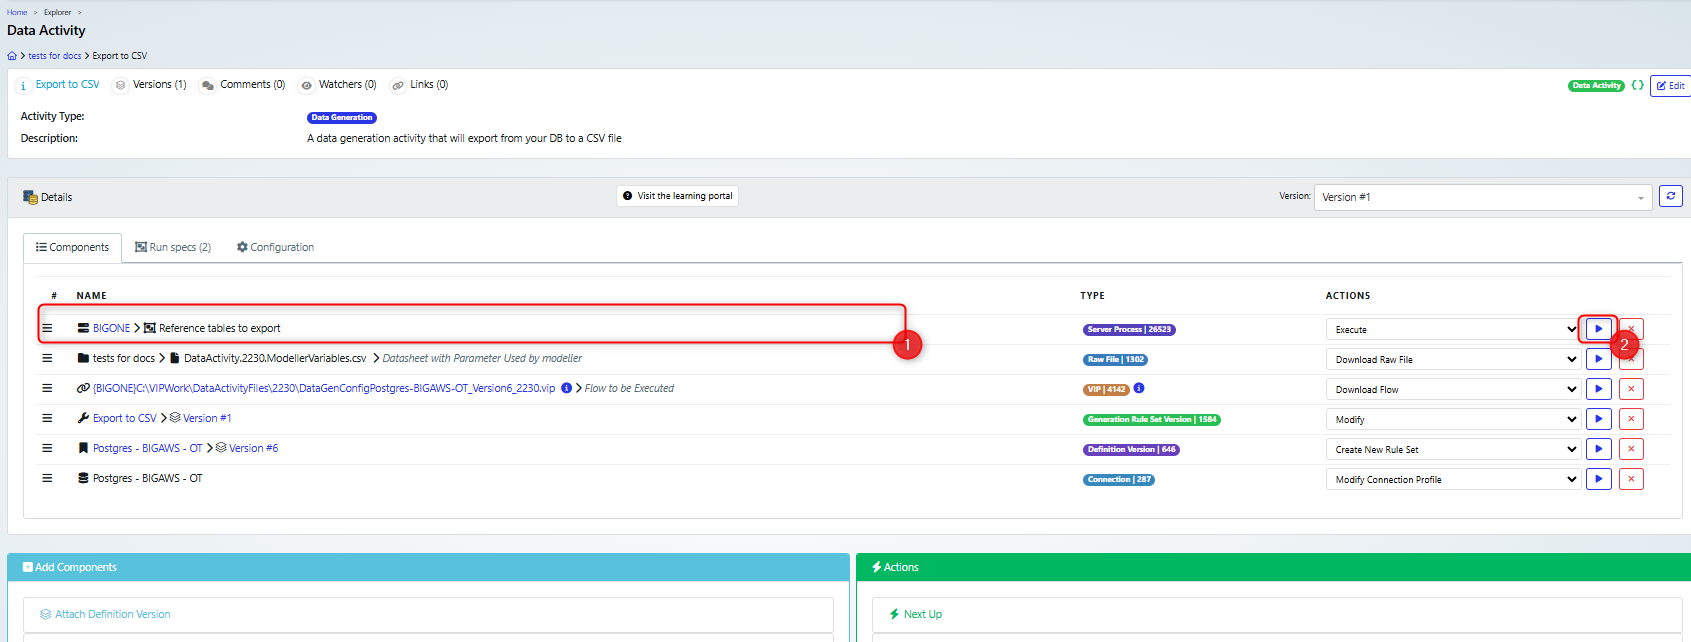
Typically you will execute the form next (2) .
Execute the form and review the output
This will show the ‘Reference tables to export - Job Parameters’ dialog. Click execute, to start the job and the job details will be shown in a new Browser window.
Note that the dialog will look different and have different outcomes based on the type of accelerator you are using. These different dialog boxes and outcomes are described in the collapsible sections below.
Extract the Data to a CSV
Note that in this case you do not need to make any changes to the job parameters and can execute the form.
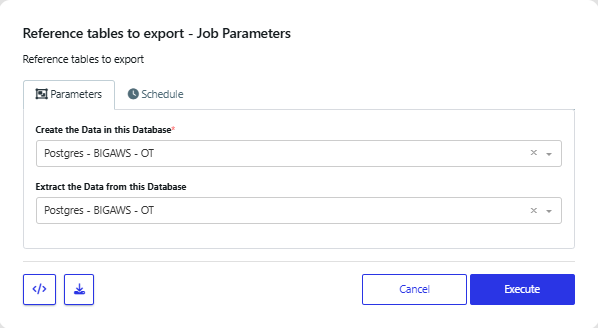 Once it completes successfully, you can download the results, which will contain the CSV files.
 Then you can review them.

Move the data from source to Target
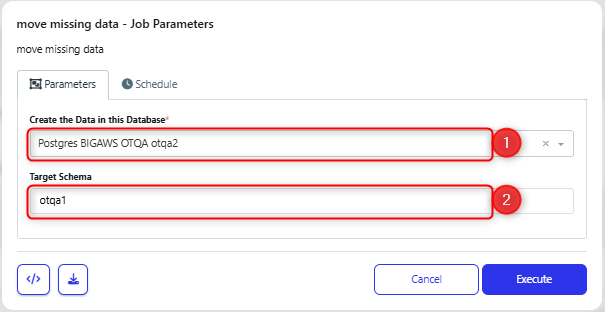
In this case, you should ensure that the ‘Create the Data in this Database’ and Target Schema are set correctly.
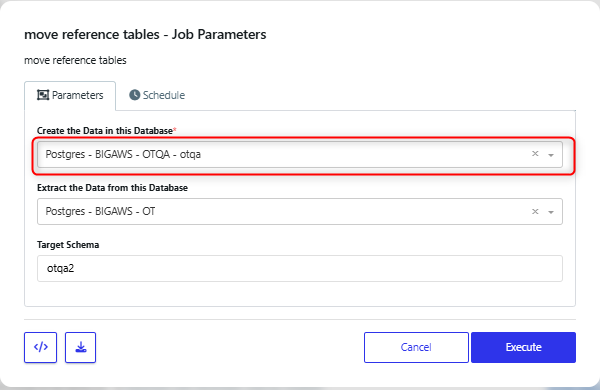
Once the job has completed, you can check that it ran correctly in the job details.
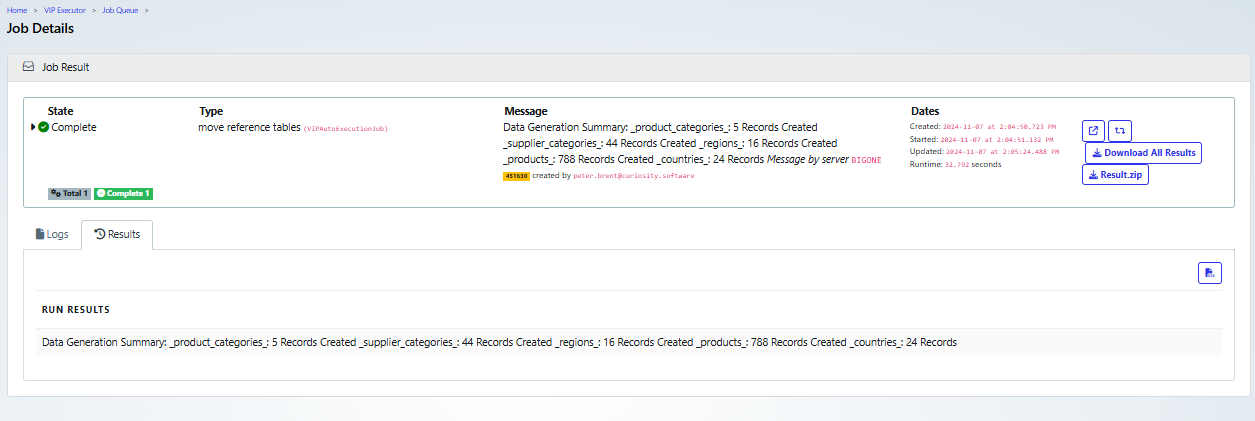
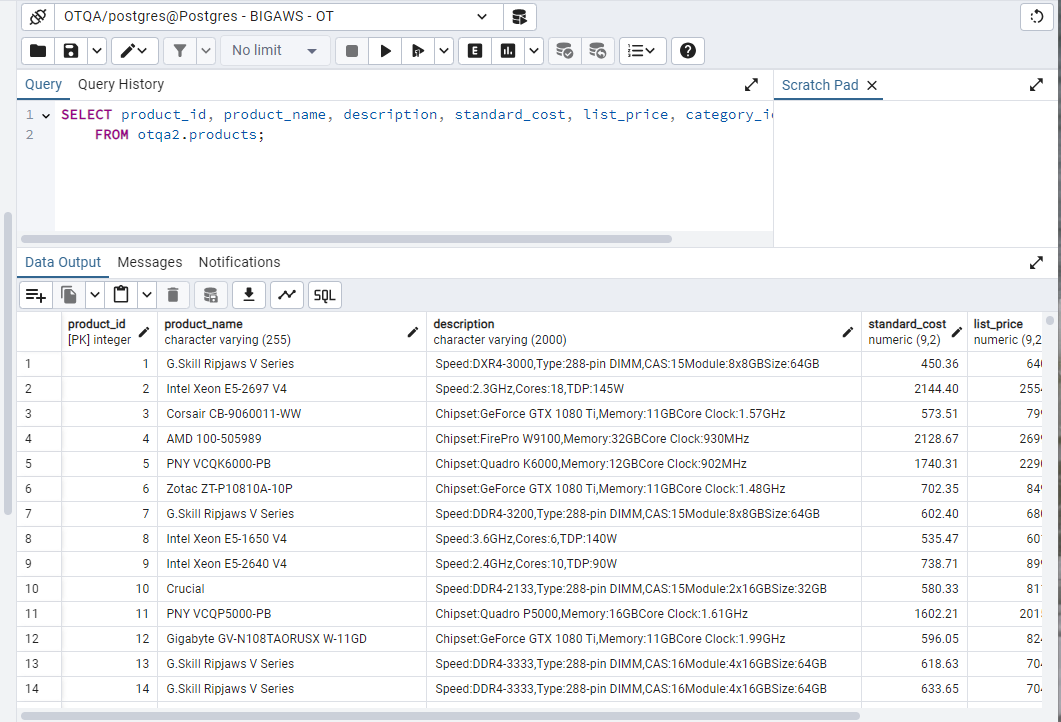
Then check the database, to ensure that the data has been added. In this example we used pgadmin to run the select on the table.
Convert the RuleSet to a Upsert (update) any Matching Data between Schemas
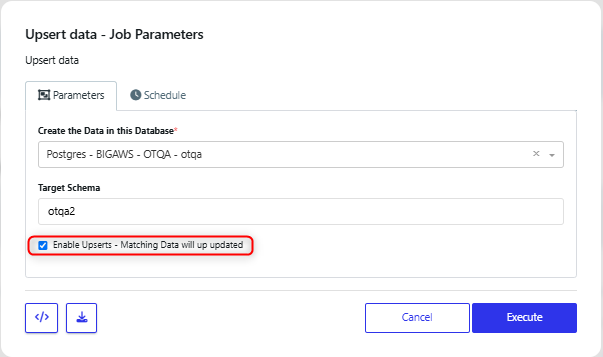
In this case, note that ‘Enable Upserts’ is checked.
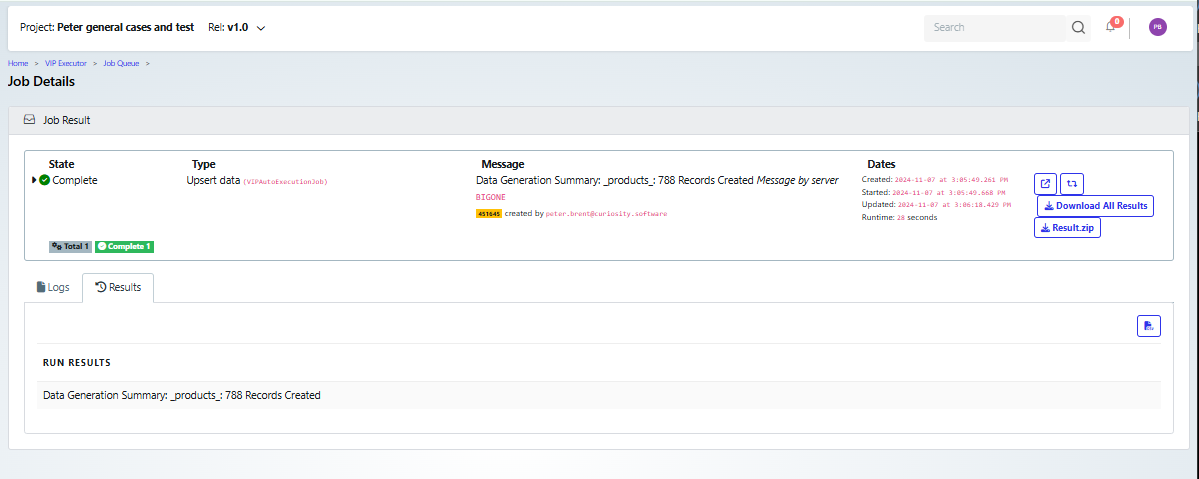
Once the job has completed, review the details to confirm that it ran successfully.
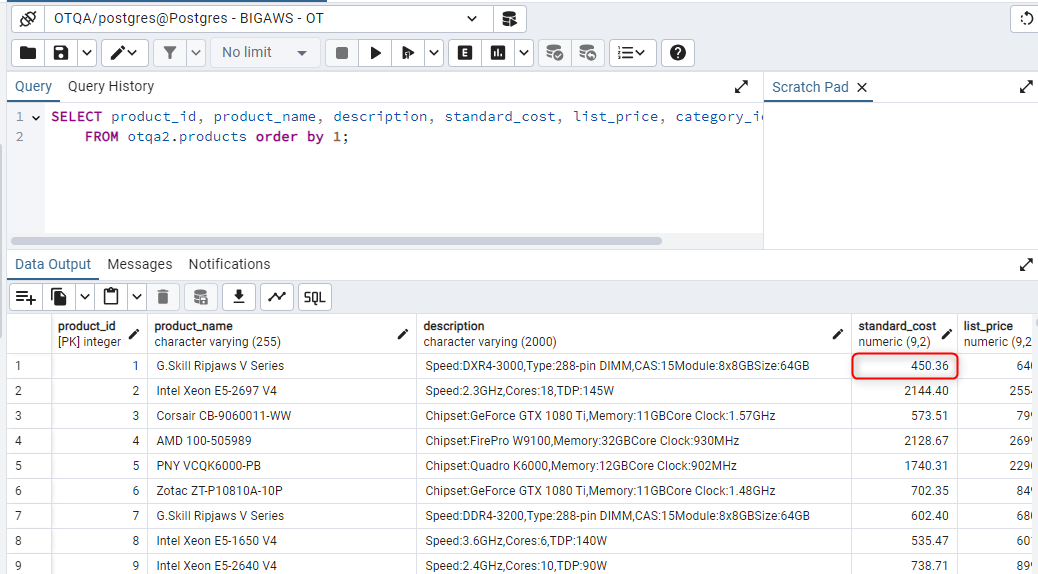
Then, you can check the database to confirm that values were updated.
Before executing the activity, note that the cost of the first product was 100.0
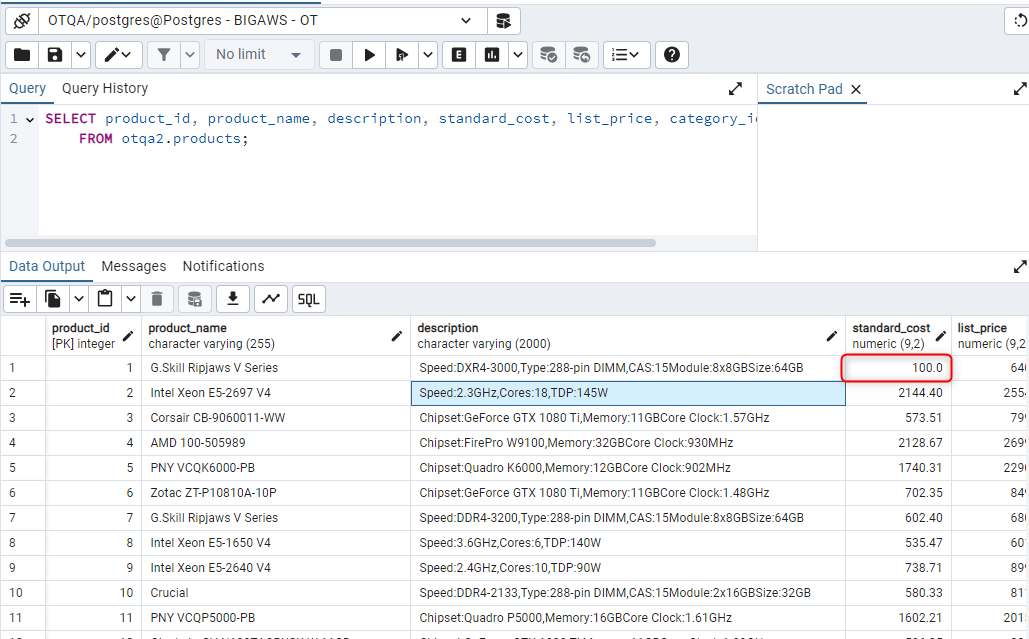
After executing the activity, the cost of the first product has updated to 450.36, as it is set in the source database.
Convert the RuleSet to a Clone
You can check that the database that will be written to (1), and cloned from (2) are correct. The additional parameters will depend upon what parameters were created when the accelerator was run. In this example, we have one parameter, which requires a list of the customer ids to be cloned (3).
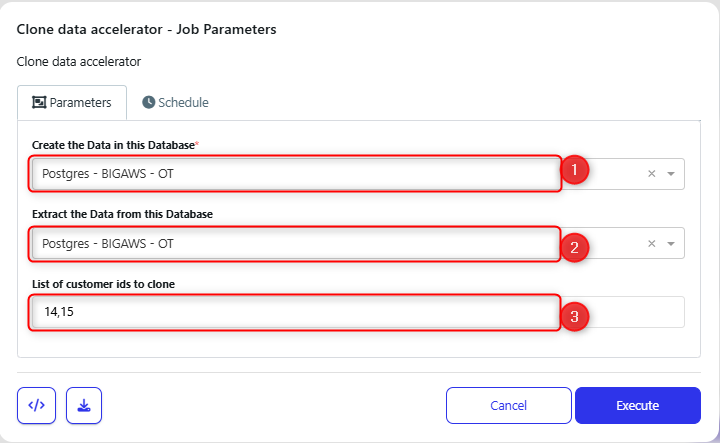
In this case we will be copying the customer, orders and order_items records, for the following customers:
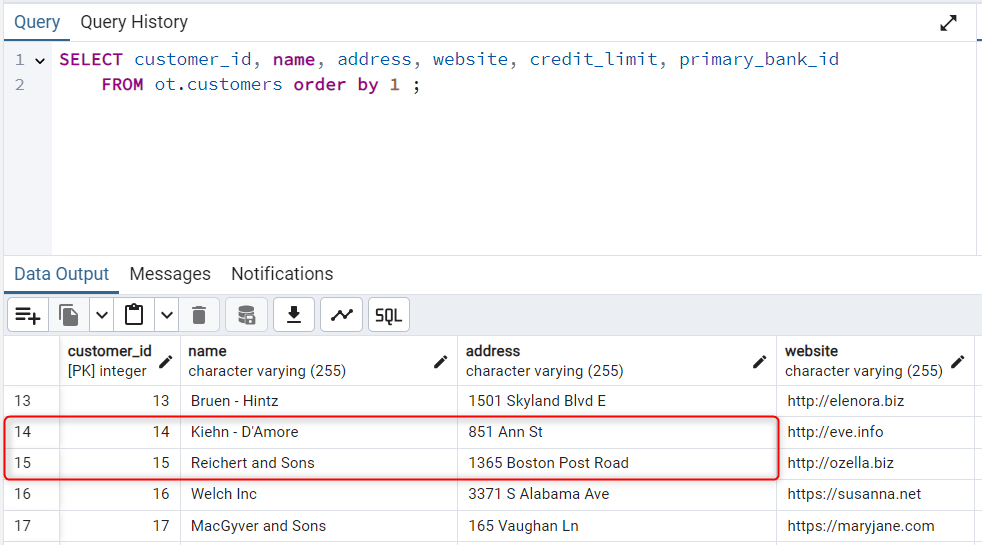
into the same database.
Once the job has completed, review the details to confirm that it ran successfully.
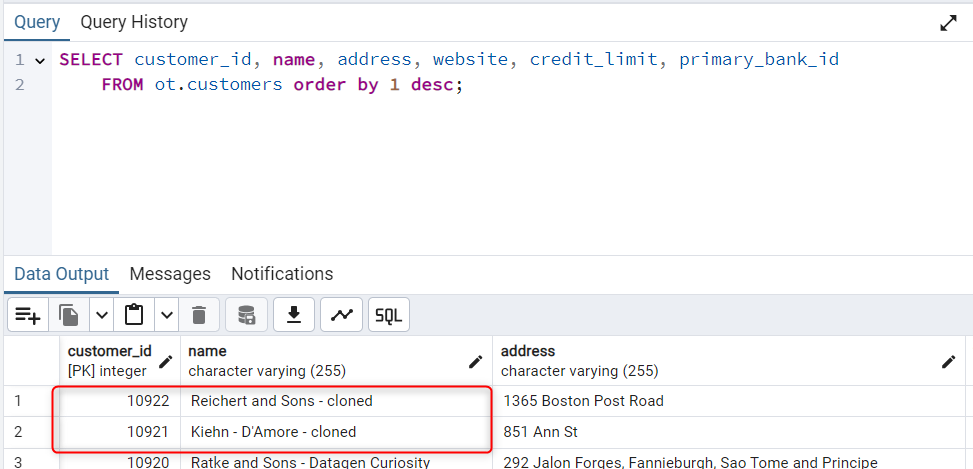
In this case, two customer records were created, but they did not have any linked orders and so no orders were created.

We can review the new records in the database. In this case we appended “-cloned” in the rule for the customers.name column.
Convert the RuleSet to a Subset
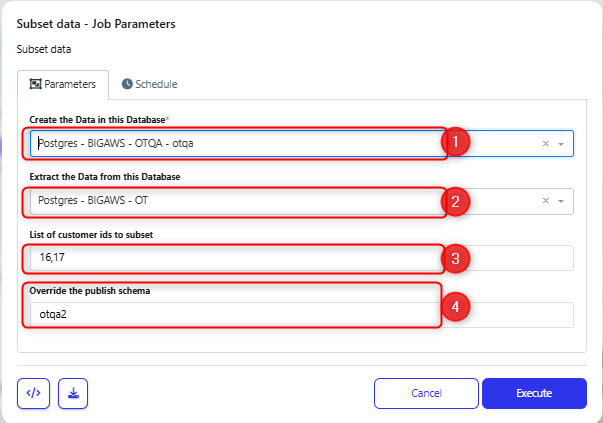
You can check that the database that will be written to (1), and copied from (2) are correct.
Additional parameters will depend upon what parameters were created when the accelerator was run. In this example, we have one parameter, which requires a list of the customer ids to be cloned (3).
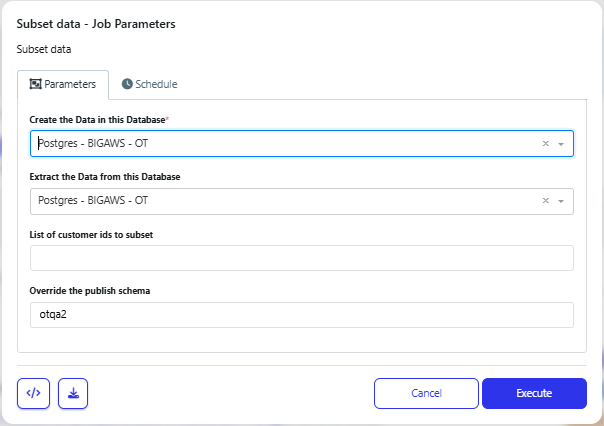
Finally, in this case, as the schema name that we want to write to is different to the name of the source schema, we need to be able to change the schema that we will publish to. There is already a parameter set up for publish schema. We can expose that parameter on the form, so that the user can change which schema to write the data to (4). There are more details on how to update the submit form in the appendix: Modifying the fields on the submit form.
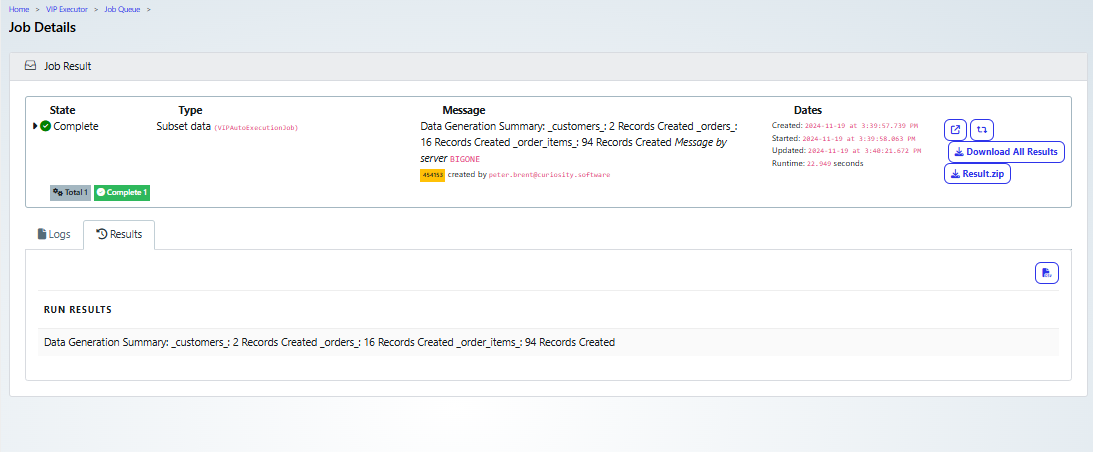
Once the job has completed, review the details to confirm that it ran successfully.
In this case, two customer records were created, along with 16 orders and 94 order_items.
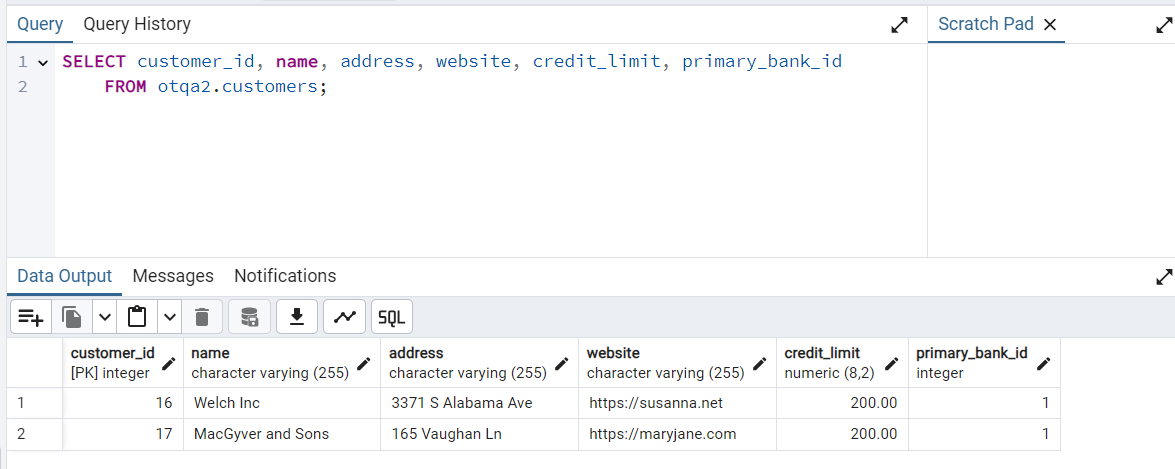
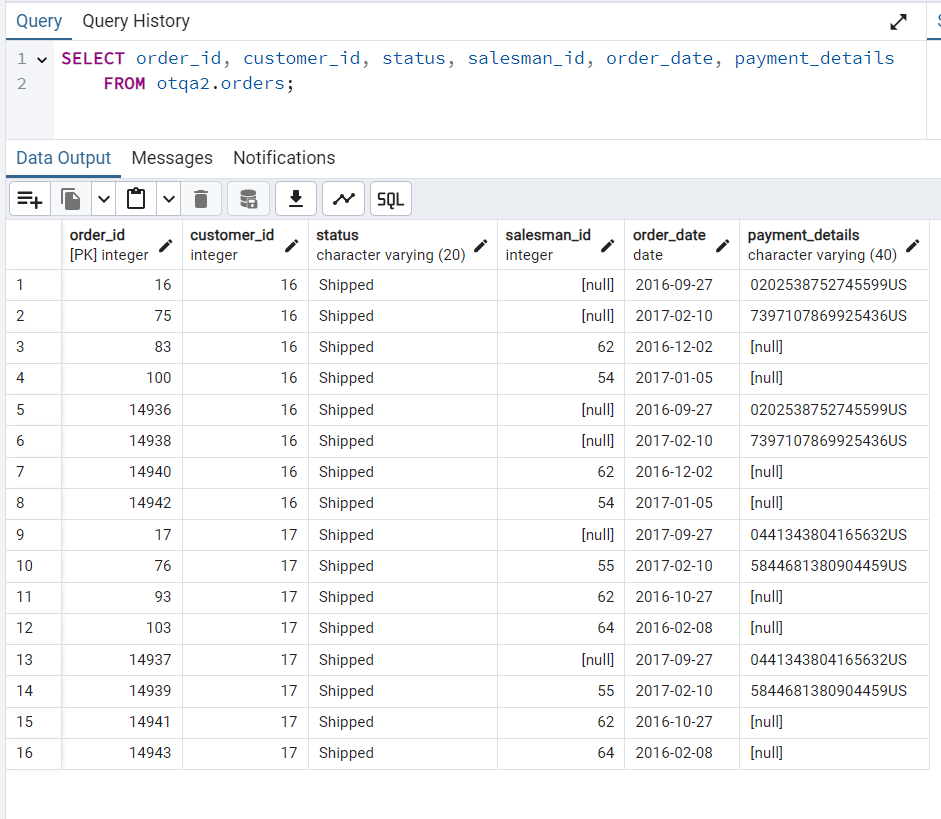
We can confirm this by checking the database, which previously had no records in the customers and orders tables.
Convert the RuleSet to a Move any Missing Data between Schemas
Confirm that the database (1) and target Schema (2) are correct.
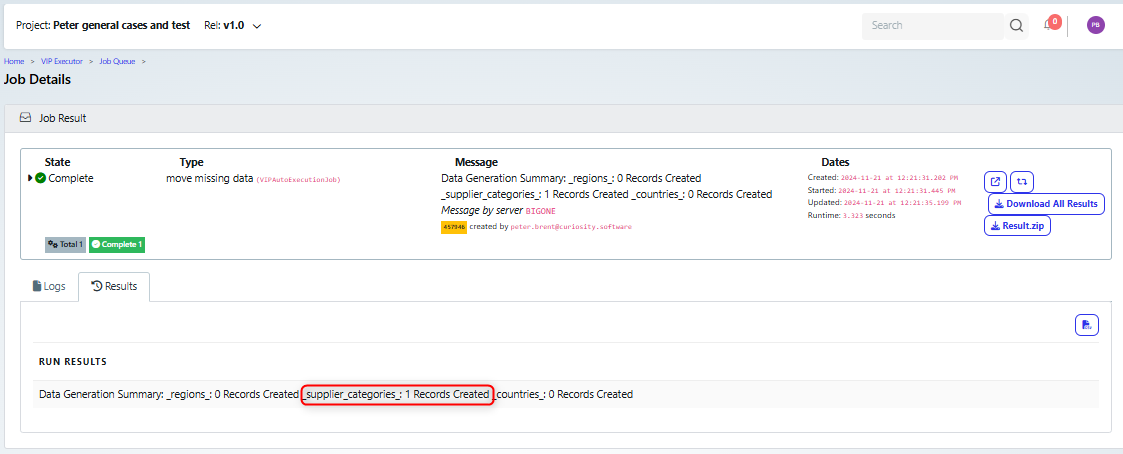
Once the job has completed, review the details to confirm that it ran successfully.
In this case, one supplier_categories record was copied.
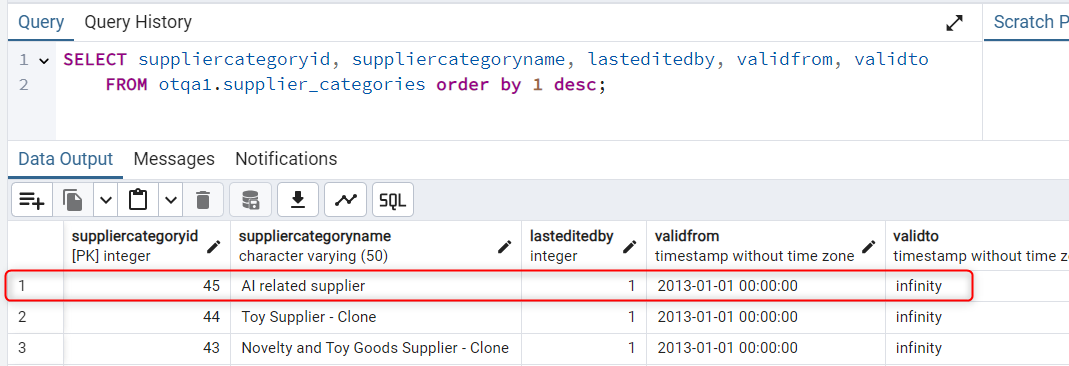
If we check the database, then
Before the form is executed, there is no ‘'AI related supplier’:

After, a new record has been copied from the source database:
Use case variations
Masking some column data
In the event that you want to hide some data, you can open the rule set and update the appropriate columns. In this example we hide the list price and standard cost.
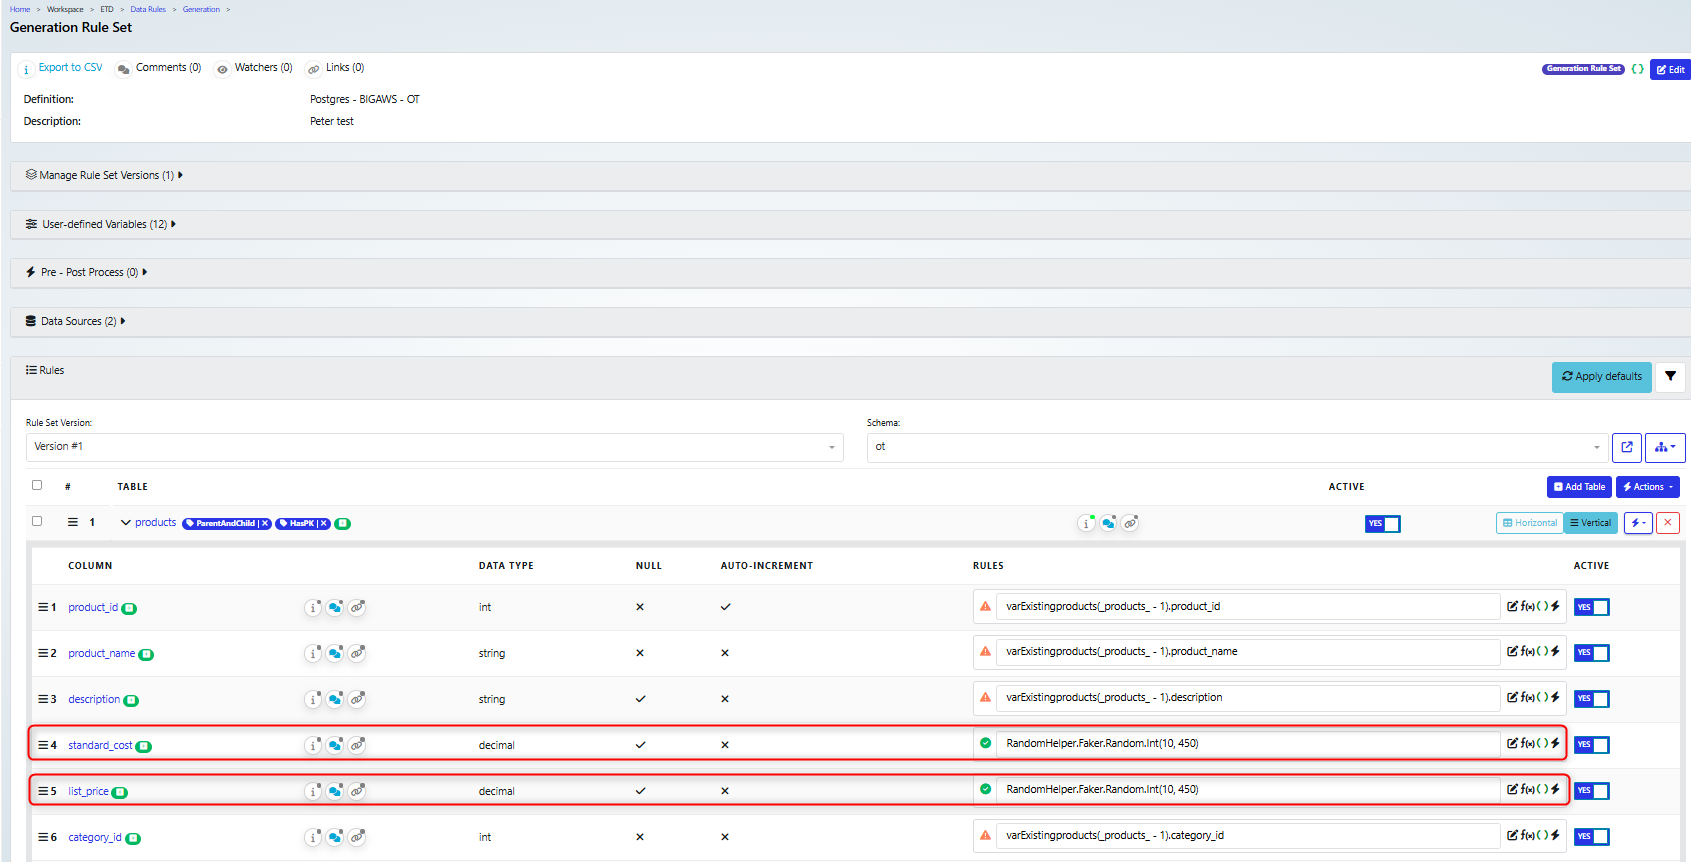
We have replaced the generated rule for standard_cost and list_price with the function:
RandomHelper.Faker.Random.Int(10, 450)
which will replace the product price/cost with a random value.
Once you have made a change to the rule set, you need to recreate the activity flow
Then you can execute the form and download the new results. In this case, the products.csv file now has random integers in the cost and price columns
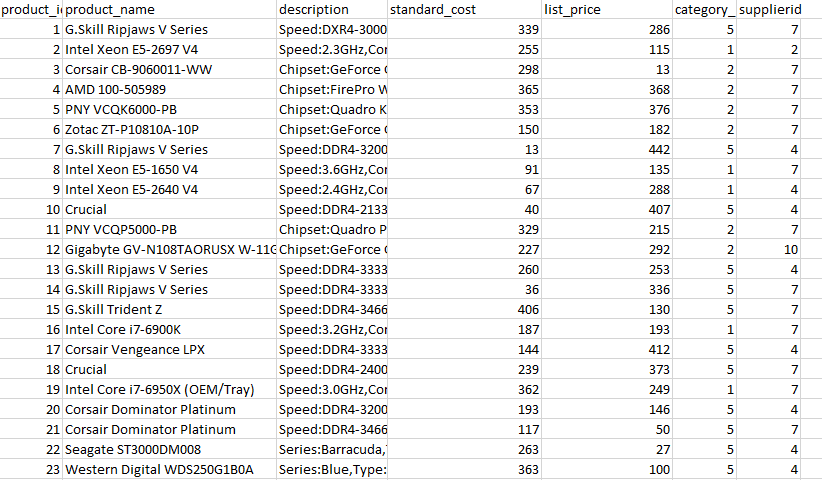
Limiting the data from a table
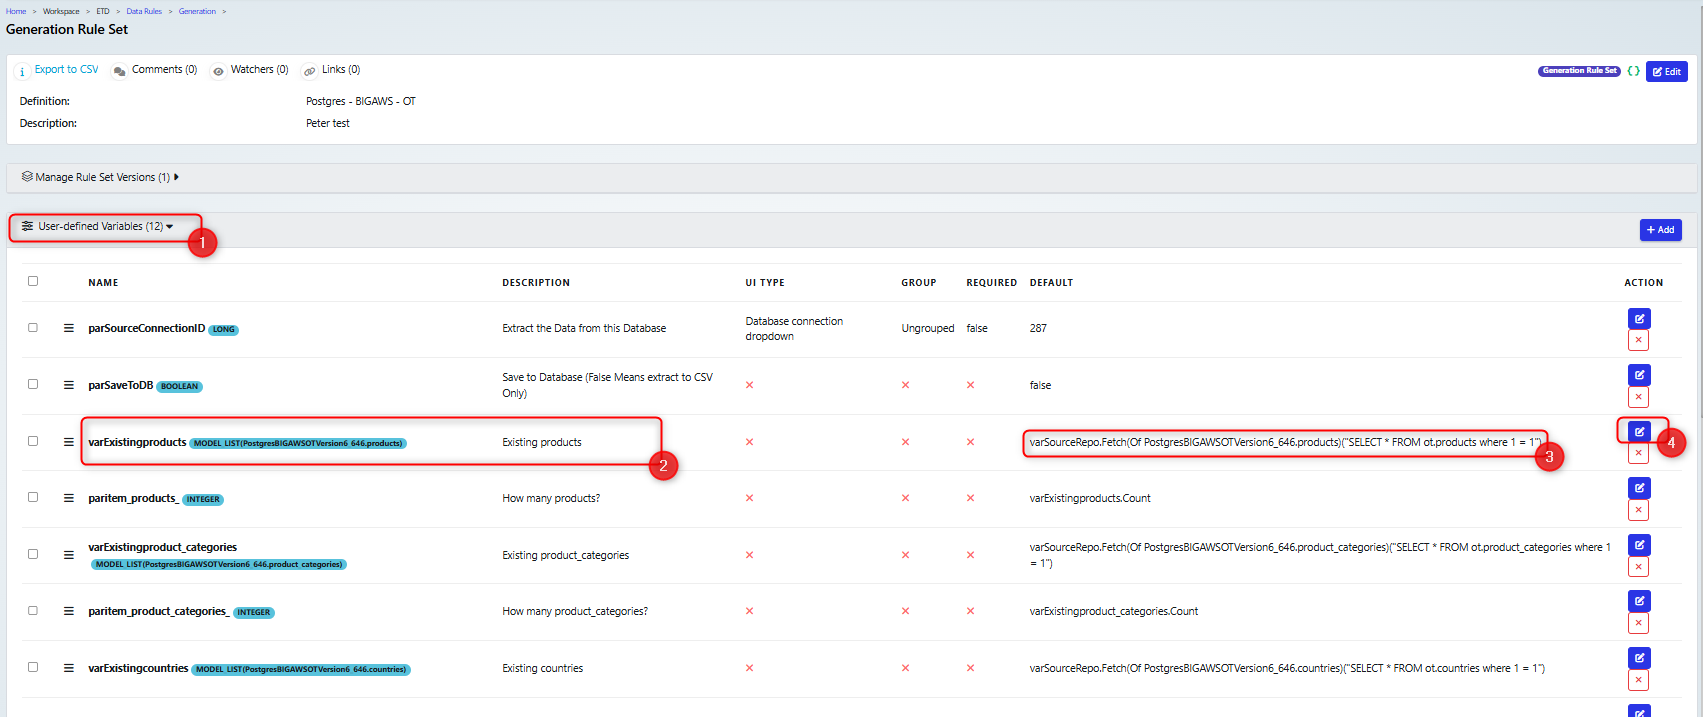
By default the accelerator will set up the activity to export all the data from the listed table. However, you may wish to limit that, for example, in our case there is a large number of products and so we want to limit the export to show a sample.
The data that will be exported is defined in the appropriate User Defined Variable, that the accelerator has set up. For example, if the table name is ‘products’ then the variable name will be ‘varExistingproducts’ . So in order to change the data that is exported, you can edit the User Defined Variables (1). Select the appropriate variable (2). Note the current SQL selects all the records (3). Click the edit button (4) to change the variable.
Then the default value can be updated
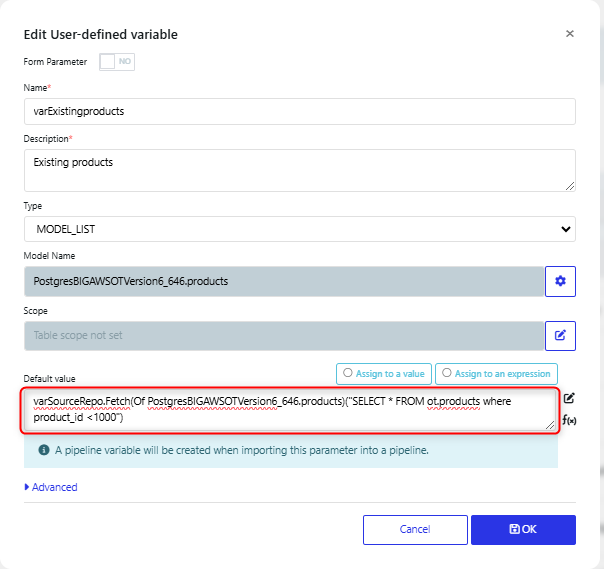
In this case, we have changed it from:
varSourceRepo.Fetch(Of PostgresBIGAWSOTVersion6_646.products)("SELECT * FROM ot.products where 1 = 1")
to:
varSourceRepo.Fetch(Of PostgresBIGAWSOTVersion6_646.products)("SELECT * FROM ot.products where product_id <1000")
Note that the select is now limited to product_id <1000. You can set your own where clause for the select, as needed.
Once you have made a change to the rule set, you need to recreate the activity flow.
Then you can execute the form and download the new results. In this case, the products.csv file now is truncated to product_id<1000

Appendix: A look at the ruleset variables.
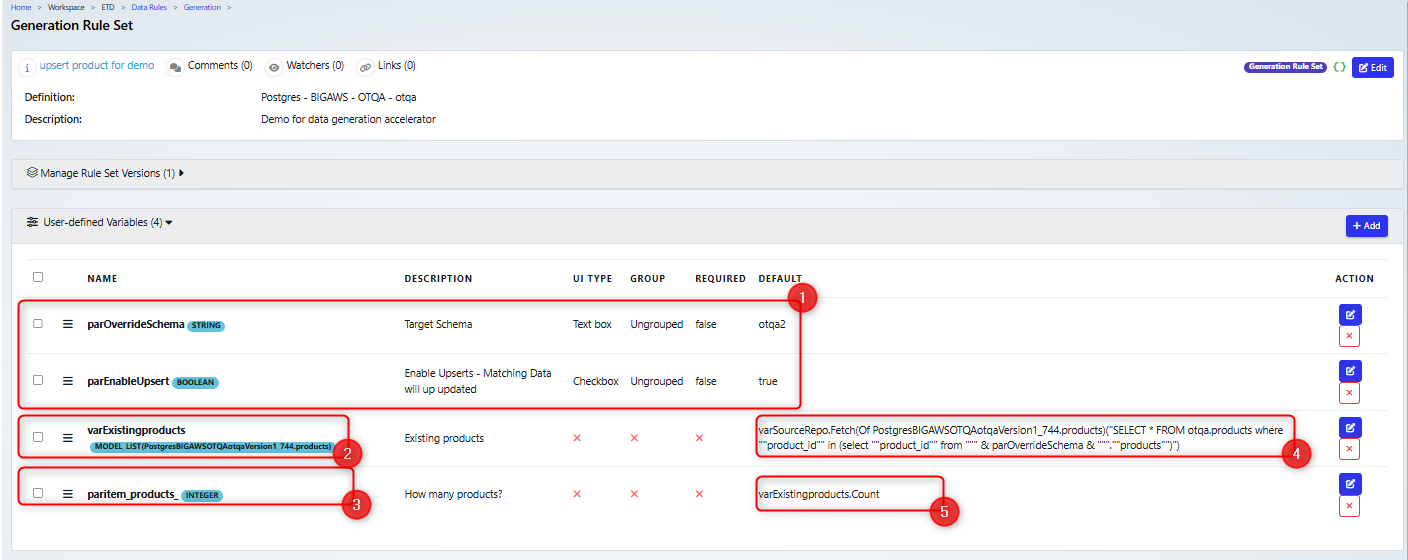
If you take a closer look at the variables that are set up by the accelerator, you can see that they are some that are linked to the submit form (1). As this example is for the Upsert accelerator form, there is ‘parEnableUpsert’ which is used to track if the Enable Upsert box is checked (See the Upsert submit form section).
There are also variables used to select the records from the database (2) and a count of those values (3). There will be one of each of these for every table that is being selected from the database.
As this example is from an Upsert, then the records that are selected (4) are those where there is a matching record in the target database.
Appendix: Modifying the fields on the submit form
This can be useful if you need to update a submit form, for example making changes to the meta data for the form, or to change the parameters that are available on the form.
In the example below we will make the target schema available for altering on a subset data generation activity.
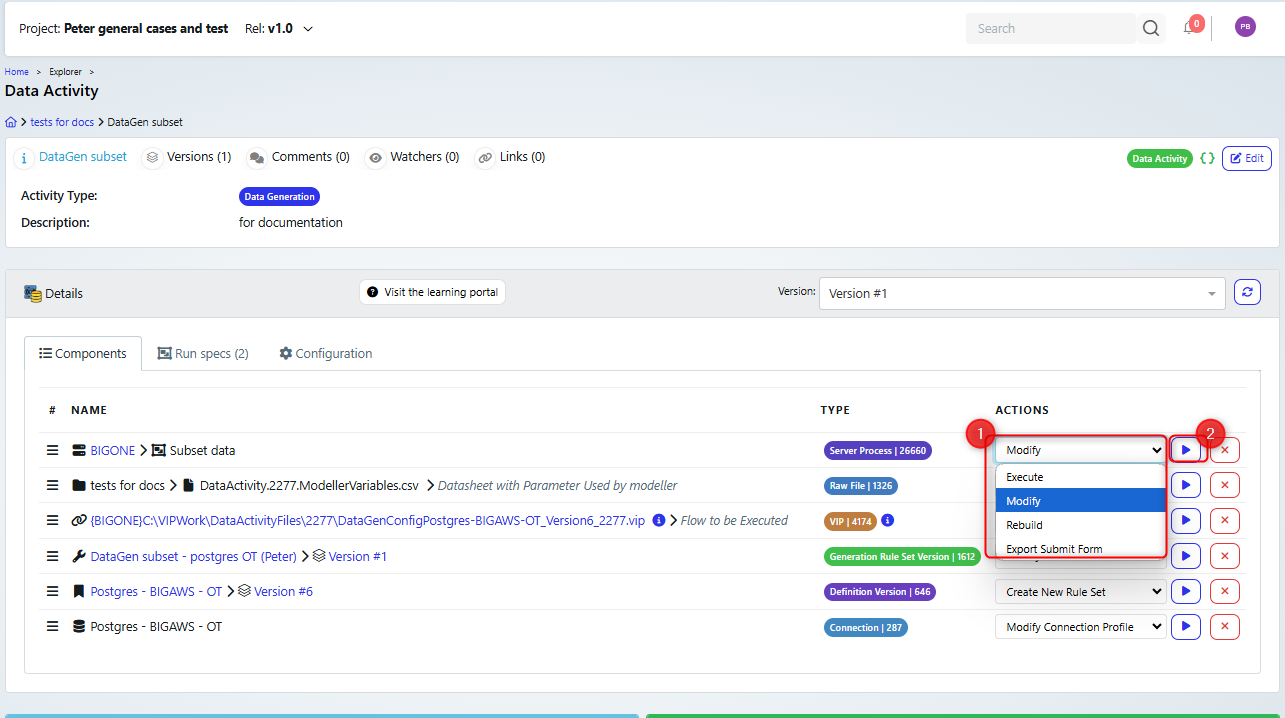
On the Data generation activity, select the Modify Action for the Server process (1) then run it (2).
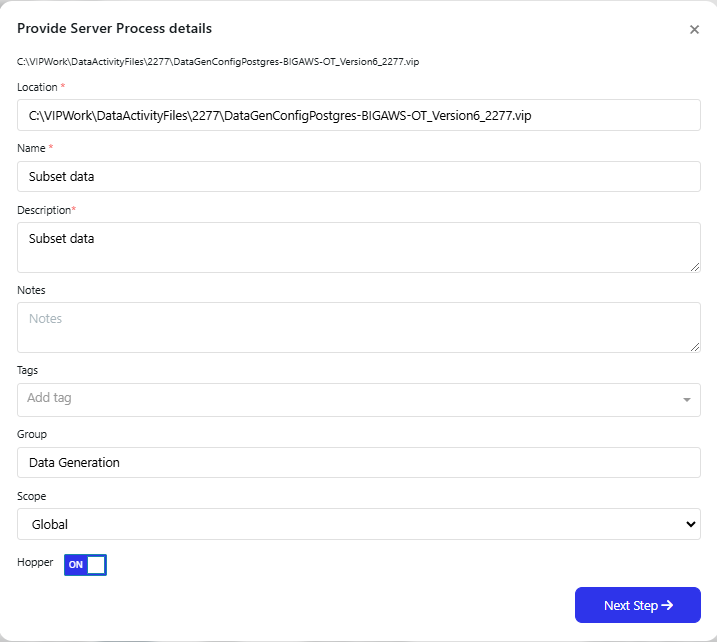
You can step through the first two pages of the dialog, unless you need to update any of these values:
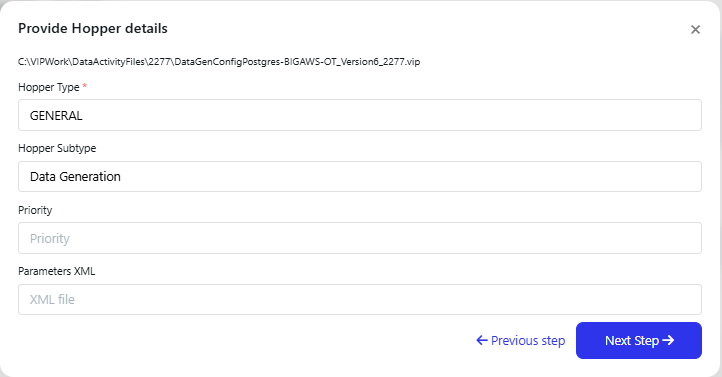
On the Provide Process Parameter details page, you can select additional parameters to present to the user.
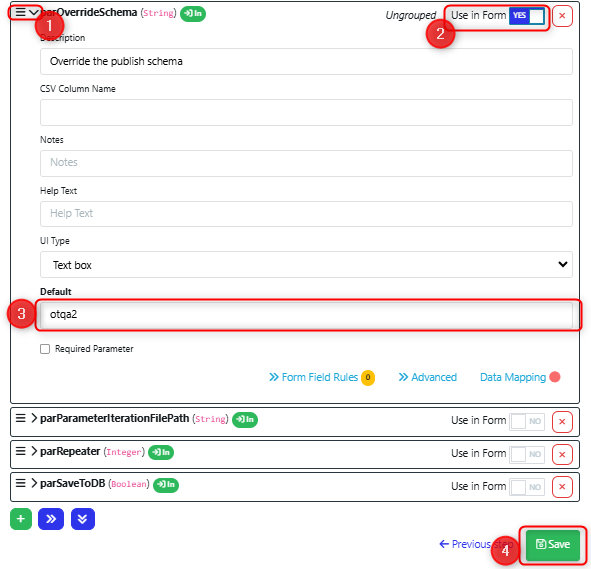
For example we want to add the parOverrideSchema parameter to the form.
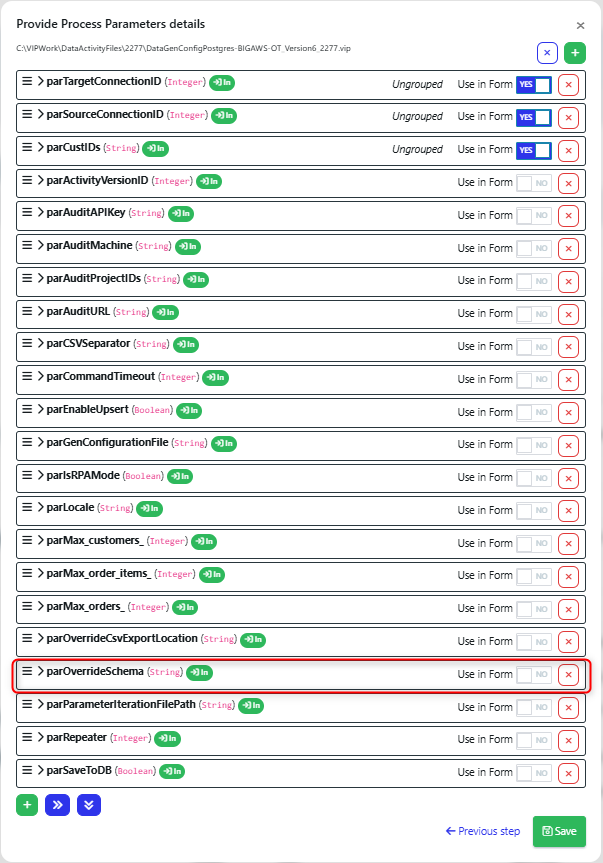
So we can use the side arrow to expose the data for the parameter (1).
Change the “Use in Form” value to YES (2).
In this example we have set a default value for the parameter (3).
Then we will save the changes (4).
Before the update is made, the form looks like this:
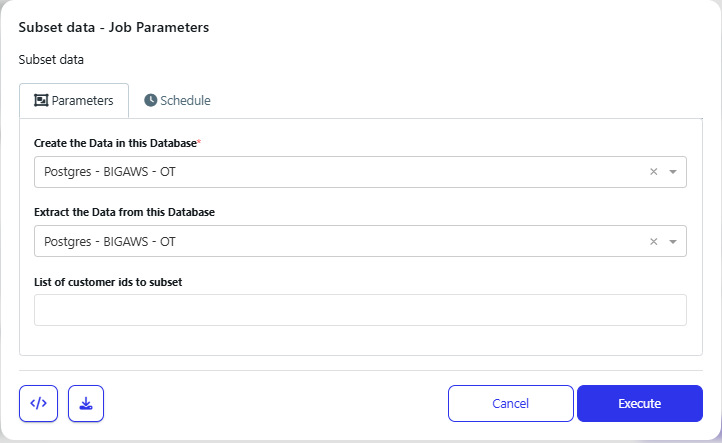
After the change, the form now includes “Override the publish schema”
