What is it, and why would I use it?
These functions allow you to carry out calculations or checks that may require values from some or all the records you are creating in a data generation activity. For example, if you are creating an order with a number of order items, then you can use this method to calculate the total value of the order items and then save it with the order. Alternatively, if you want to ensure that all order items have different suppliers then you can use this method to check that condition is fulfilled, and if not, update the supplier.
Create or choose the data generation activity
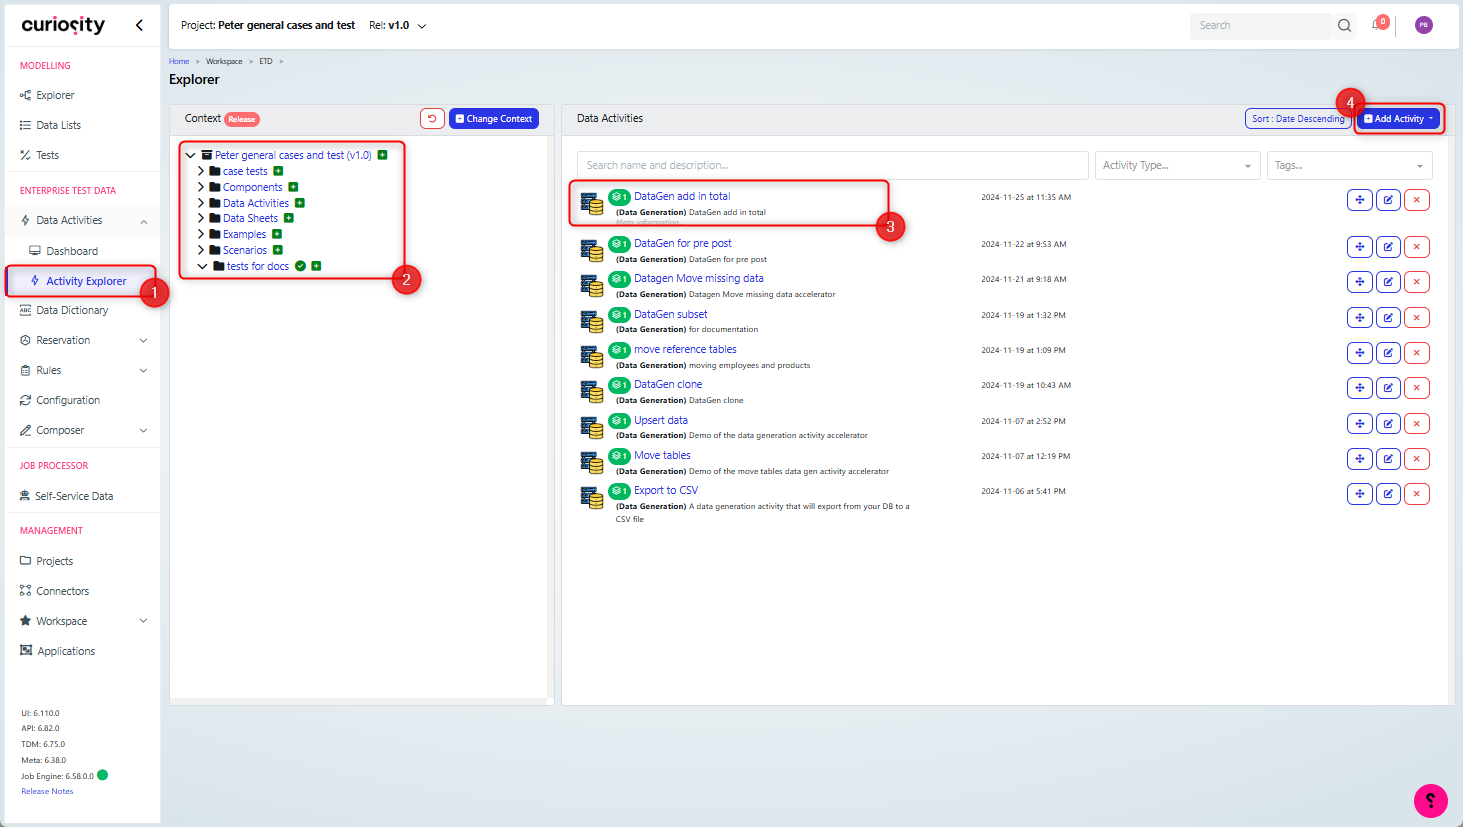
In the Curiosity Platform, navigate to the Data Activities/Activity Explorer pane (1). Then either choose an existing Data Generation activity (2),(3) or add a new one (4).
The Data Generation Activity will require a database connection, definition and rule set to have been added to the activity (1). These can be added using the Add components (2), (3) and the definition action (4). There are more details on setting up a data generation activity in the Synthetic Data Generation guide.
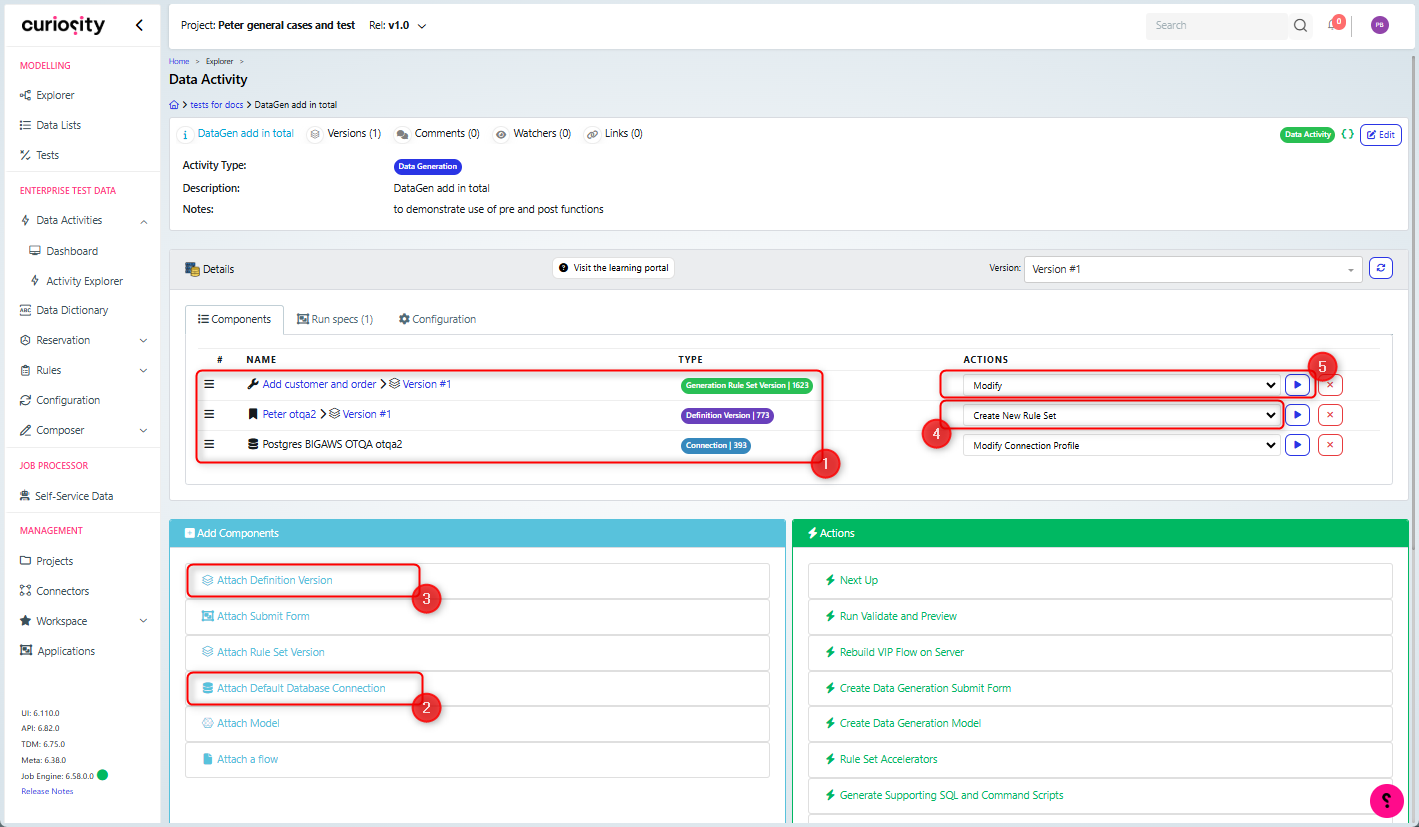
Next you need to modify the ruleset in order to add the pre - post process (5).
Add Pre - Post Process
On the ruleset page for the data generation activity:
Expand the Pre- Post Process section (1)
Click add to create one (2)
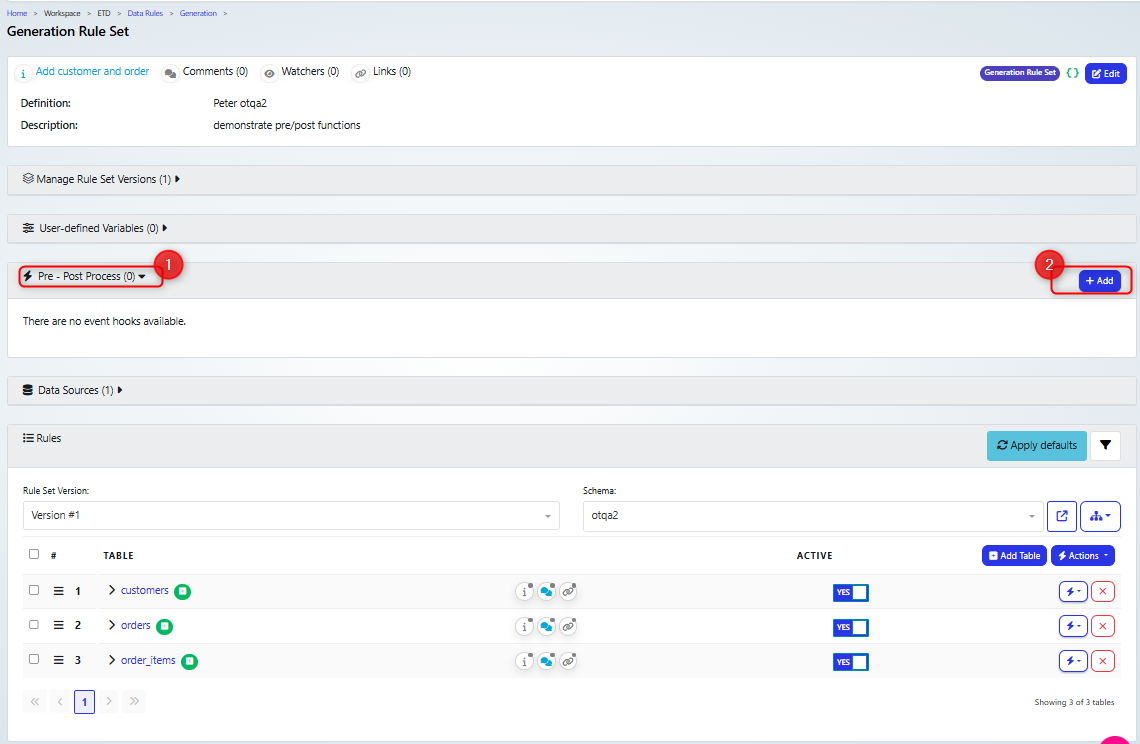
This will display the new process dialog box, so you can name the process

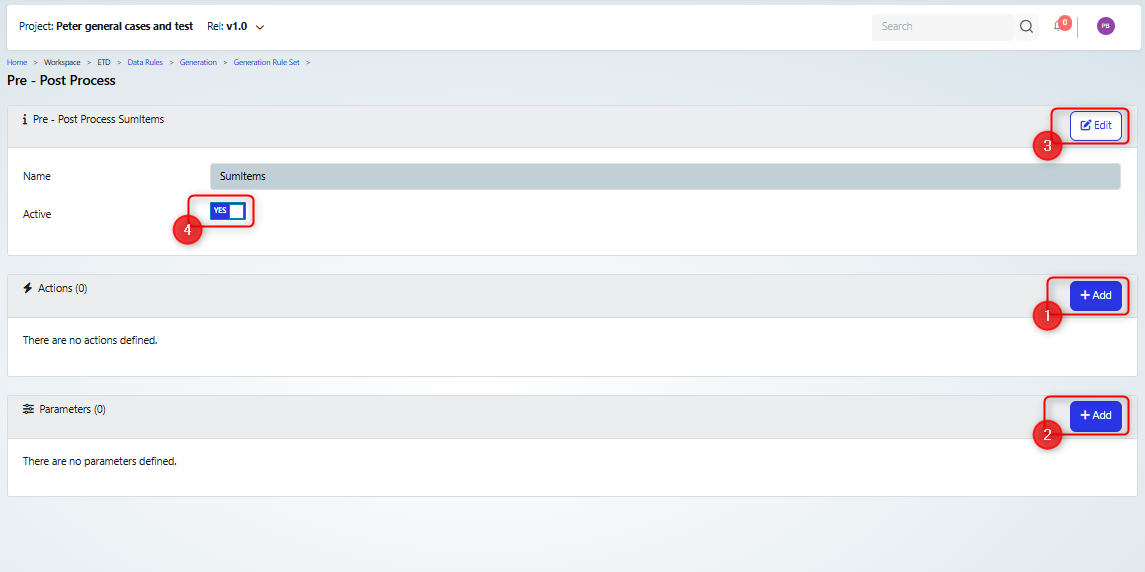
Once you click ok, the Pre - Post Process screen will be displayed.
This has sections for:
Actions, you can add an action that the process will carry out(1)
Parameters, you can add a new parameter (2)
You can also edit the meta data for the process (3) and set it as active (4).
Configure the Pre - Post Process
Adding an Action
Clicking the Add Action will display the new Action dialog, in which you need to fill in fields, which are described below.
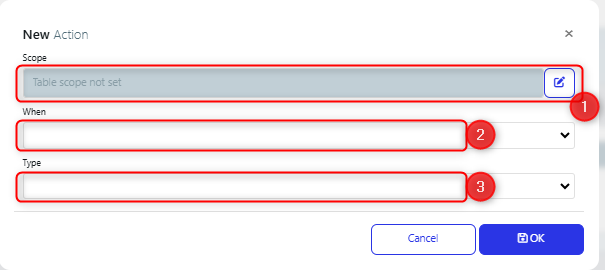
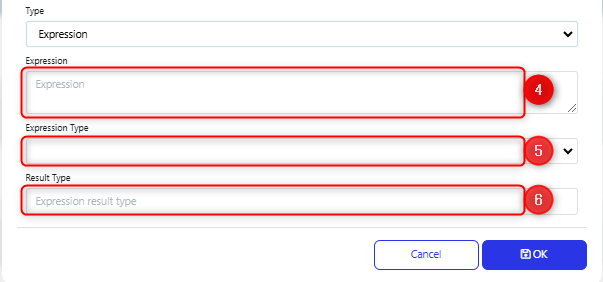
Note that additional fields are presented once the Type of process is selected, these are also described below.

Scope (1)
This specifies what tables the process is available to.
When you select a table, the process will have access to that table and any values that have been set up for its parent records.
When (2)
This drop-down sets the stage at which the process will be run and has the following options (listed in the order in which they would run)
In the example usage, we are referring to a database with the following tables:
Supplier
Customer
Order, each row is linked to one customer and so has a customerID
OrderItem, is a child of Order has one supplier, so each row has an orderID and a supplierID
We are creating Customers, Orders and orderItems
Value | Description | Example usage |
|---|---|---|
BEFORE | Run the process before any data for the table in scope or its children have been calculated. | If you need each customer to have orders from the same supplier, you can assign suppliers to each customer before the order data is generated. |
BEFORESAVE | Run the process after the data in the table in scope and its children has been calculated, but before it is saved to the database, and so you could overwrite it. | If you require that a customer has different a supplier for each orderItem in an order, then you can have a process that runs at this stage. It would check that the orderItems linked to an order each has a different supplier, and if not, set it to a different one. |
AFTERSAVE | Run the process as soon as the data for the table defined in the scope has been saved to the database. (but before any child tables are saved) | |
AFTER | Run the process as soon as the data for the table defined in the scope and its child tables has been saved to the database. | If you need to include the total value of all the order items in an order record. Then you could sum them once the values have been saved, then update the order by running a process at this stage and saving the result, to update the order record. |
Type (3)
This is the type of process and, dependant on the type chosen, additional fields will be presented.
Expression - This allows you to set up an expression that will modify the data or specify a data record that should be saved.
VIP Flow - This will allow you to choose a VIP flow, that will run on the VIP server you are using. Please speak to your account manager if you feel you need to use this type. However note that this is being superseded by the Pipeline functionality that is being introduced into Data Activities.
Expression (4)
The field where you set the expression, it is displayed if type is set to Expression.
If Expression type: is ASSIGN, the format is:
<VALUE TO SET> = <EXPRESSION>
Note that the <VALUE TO SET> can be a database column, which can then be updated in a new action, or a variable.
If Expression type is SAVE, the format is:
<VALUE TO SAVE>
This value will be saved. Typically this would be a reference to a database record, for example var_orders_ which would be a reference to a record in the table orders.
Any variables used in the pre - post functions will need to be defined as user defined variables for the ruleset.
The expression field does not have a data painter available and so you will need to ensure that you have entered the expression correctly.
Expression Type (5)
This is displayed if type is set to Expression.
This has two values:
ASSIGN to assign the result of the expression in a field.
SAVE - to save the value, so that the database will be updated.
Result Type (6)
This is displayed if type is set to Expression.
Enter the type of value for result. If the value being set is a Nullable field, then you should add ? to the end. For example:
DECIMAL?
is a decimal field that is nullable,
INT
is an integer that is not nullable.
VIP Flow (7)
This is displayed if type is set to VIP FLow.
Enter the VIP Flow to use.
Adding a parameter
Parameters are only required, if you use a VIP Flow, then the parameter names will need to match those used in the flow.
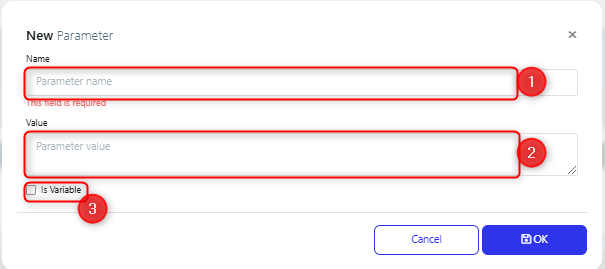
This will display the New Parameter dialog, where you:
Set the name of the parameter (1)
Set its value (2),
If the value is a variable the check the variable box (3)
Final steps
Once you have created your functions, you need to go through the usual steps after having created or updated a ruleset:
Rebuild VIP Flow on Server (1).
Create Data Generation Submit Form (2), if not already done.
Run the form (3)
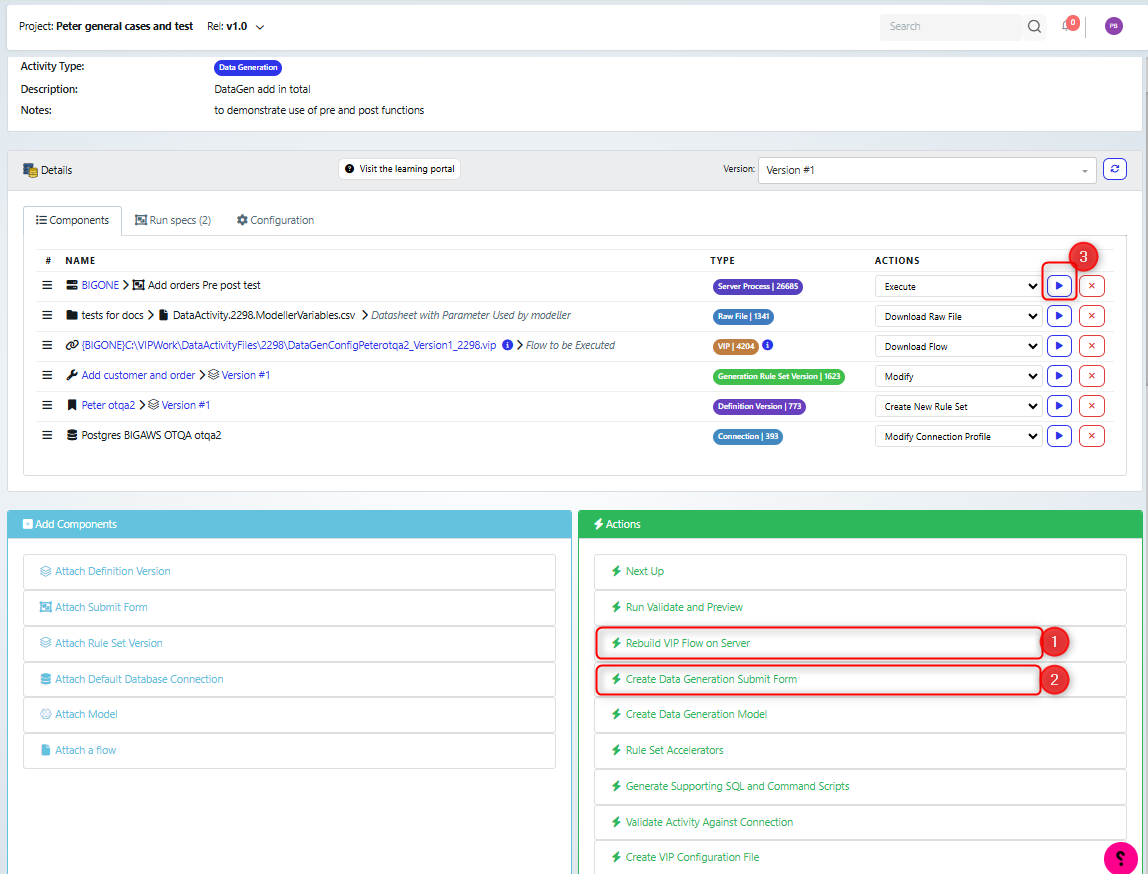
Anytime you make a change to either the ruleset or the pre- post functions, you will need to rebuild the VIP flow.
Example
In the following example, we have created three actions, that will run after the data is saved (1). Note that each has the scope of order_items (2) because it is a child of orders, it will have access to the value of the orders.order_id value.
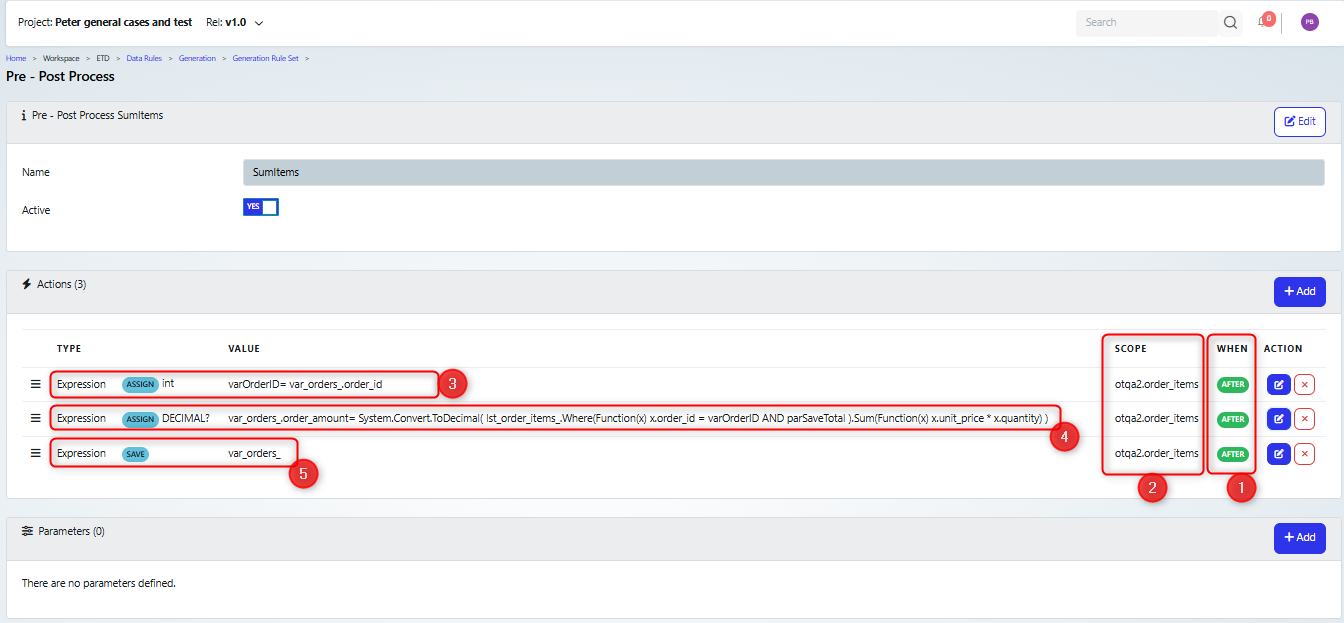
The first is assigning the value of order_id to a variable (3). This has been included to show the use of variables.
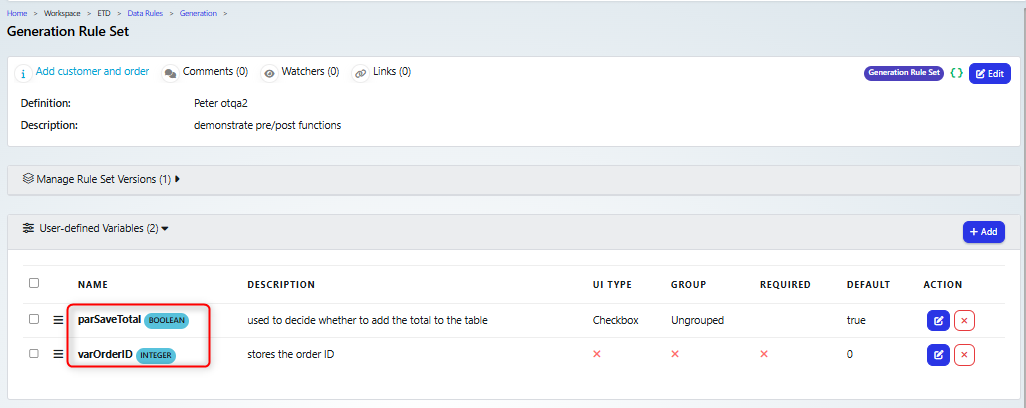
For this example, two variables are in use:
varOrderID - which stores the value of the order ID.
parSaveTotal - which is used to set whether the total should be saved.
These have both been defined in the User-defined Variables section of the ruleset page.
Next we are setting up the order_amount for the order to be the sum of the order items (4).
In the expression:
var_orders_.order_amount= System.Convert.ToDecimal( lst_order_items_.Where(Function(x) x.order_id = varOrderID AND parSaveTotal).Sum(Function(x) x.unit_price * x.quantity) )
we are setting the order_amount for the orders table. The format for the variable that points to the table record is (the _ characters are important):
var_<TABLENAME>_
to update a column, the format is:
var_<TABLENAME>_.<COLUMNNAME>
So in our example, it is:
var_orders_.order_amount
We are using the System.Convert.ToDecimal function to ensure the response is a decimal.
We sum over the order_items by using the list variable for the order items table:
lst_order_items_
using a Where function to limit the order_items to the ones where order_id matches the varOrderID variable. Note that parSaveTotal has been included so that we can determine at runtime whether to include the sum or set it to 0. The the Sum function will add the selected values.
For this action, the result type is set to:
DECIMAL?
because the order_amount is a nullable field.
Finally we save the updated orders record, which now contains the updated order_amount (5).
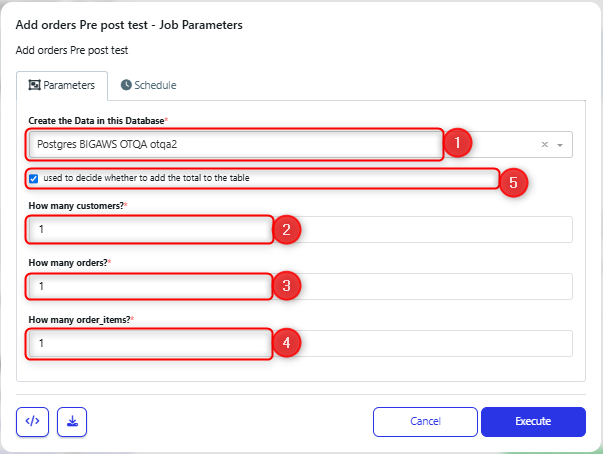
For the example we have set up, the execute form will look something like the screenshot below. As well as the usual fields for setting the database (1) and the number of records (2),(3),(4), we have included a checkbox that sets the value of the parSaveTotal parameter.
