What are they and why use them
They allow you to create a function that will carry out a test or action that is not readily catered for in the existing set, to meet your specific requirements.
In this manual we have used the example of creating a function that will be used in a masking data activity. However the functions may be used for other activities as well, by setting the correct context (this will be highlighted later).
For example: Creating a function to give a RiskScore on a financial transaction, based on a couple of inputs: Transaction Type and Amount, as listed in the table below.
Transaction type | Amount | Risk |
|---|---|---|
ATM | >500 | 90 |
DirectDebit | <100 | 10 |
Other | >5000 | 100 |
Other | >2000 | 95 |
Other | >1000 | 80 |
Other | <50 | 20 |
Default | (all) | 50 |
Coding your custom function
If you use Visual studio, you will need to create a new .NET project, using the Class Library (2)
Note that the view may be different dependant on your version of Visual Studio.
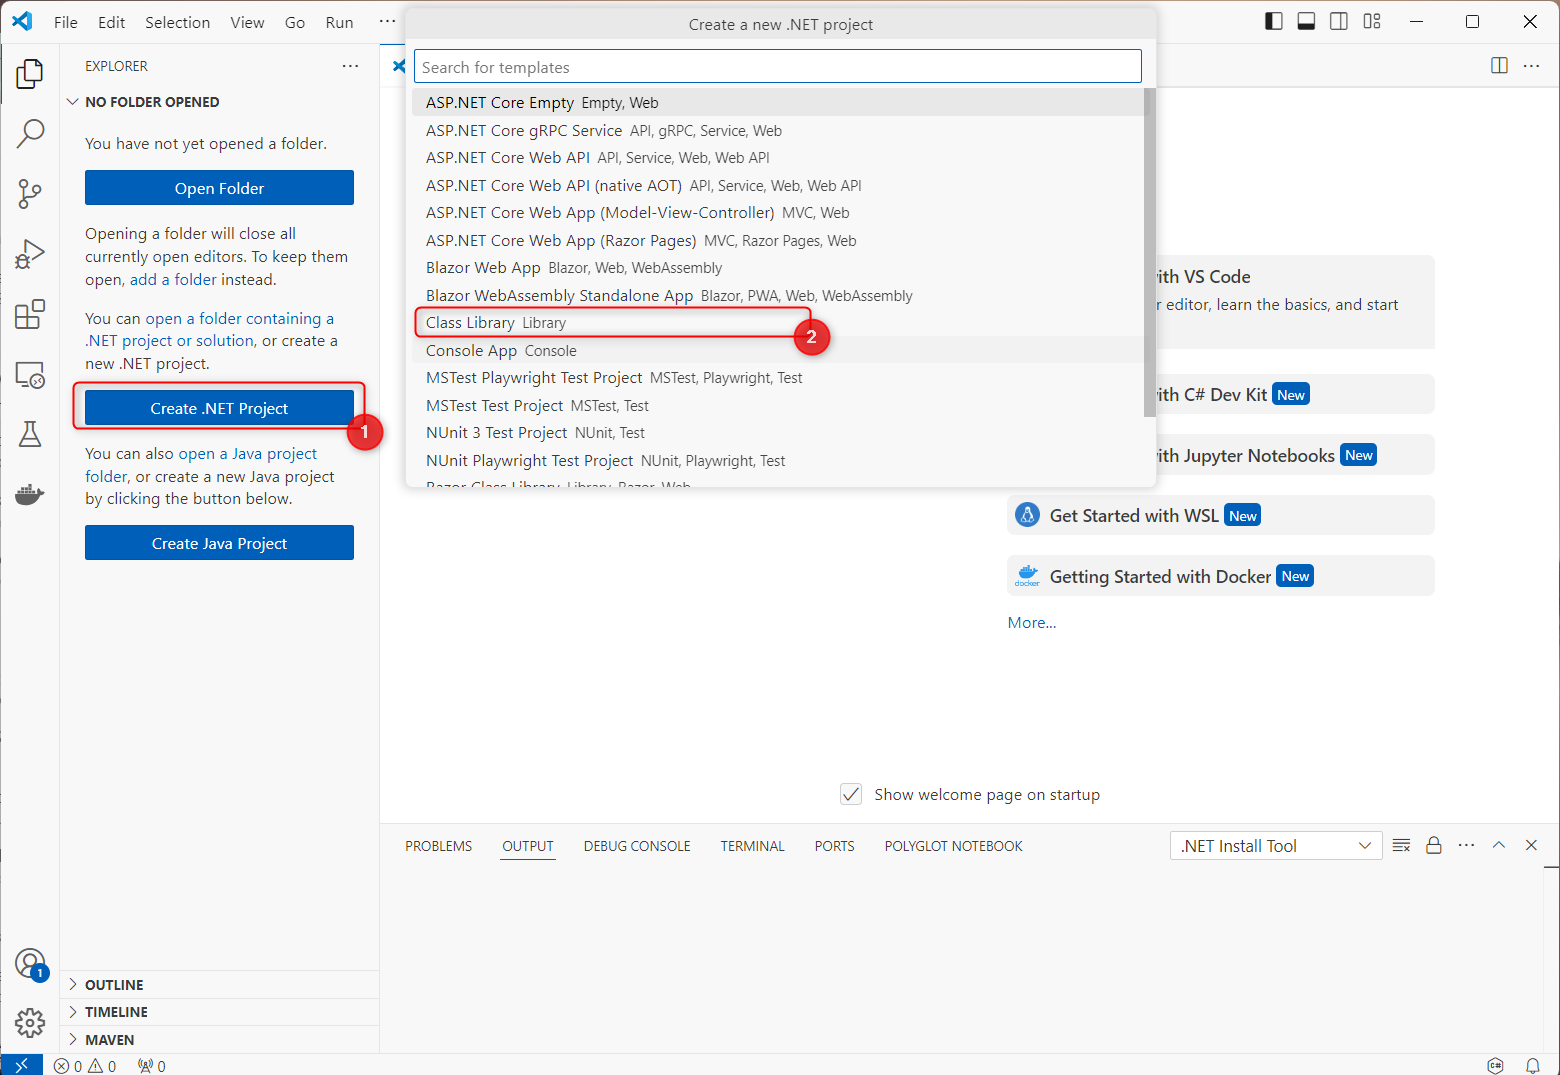
When you name your project, you need to choose .NET framework 4.8 for the Framework, as this aligns with the enterprise test data framework.
Click Create, to create the class
Having created the project, you can delete the default class and add your own public static class. For example: RiskCalculator
Note that the class name does need to be unique.
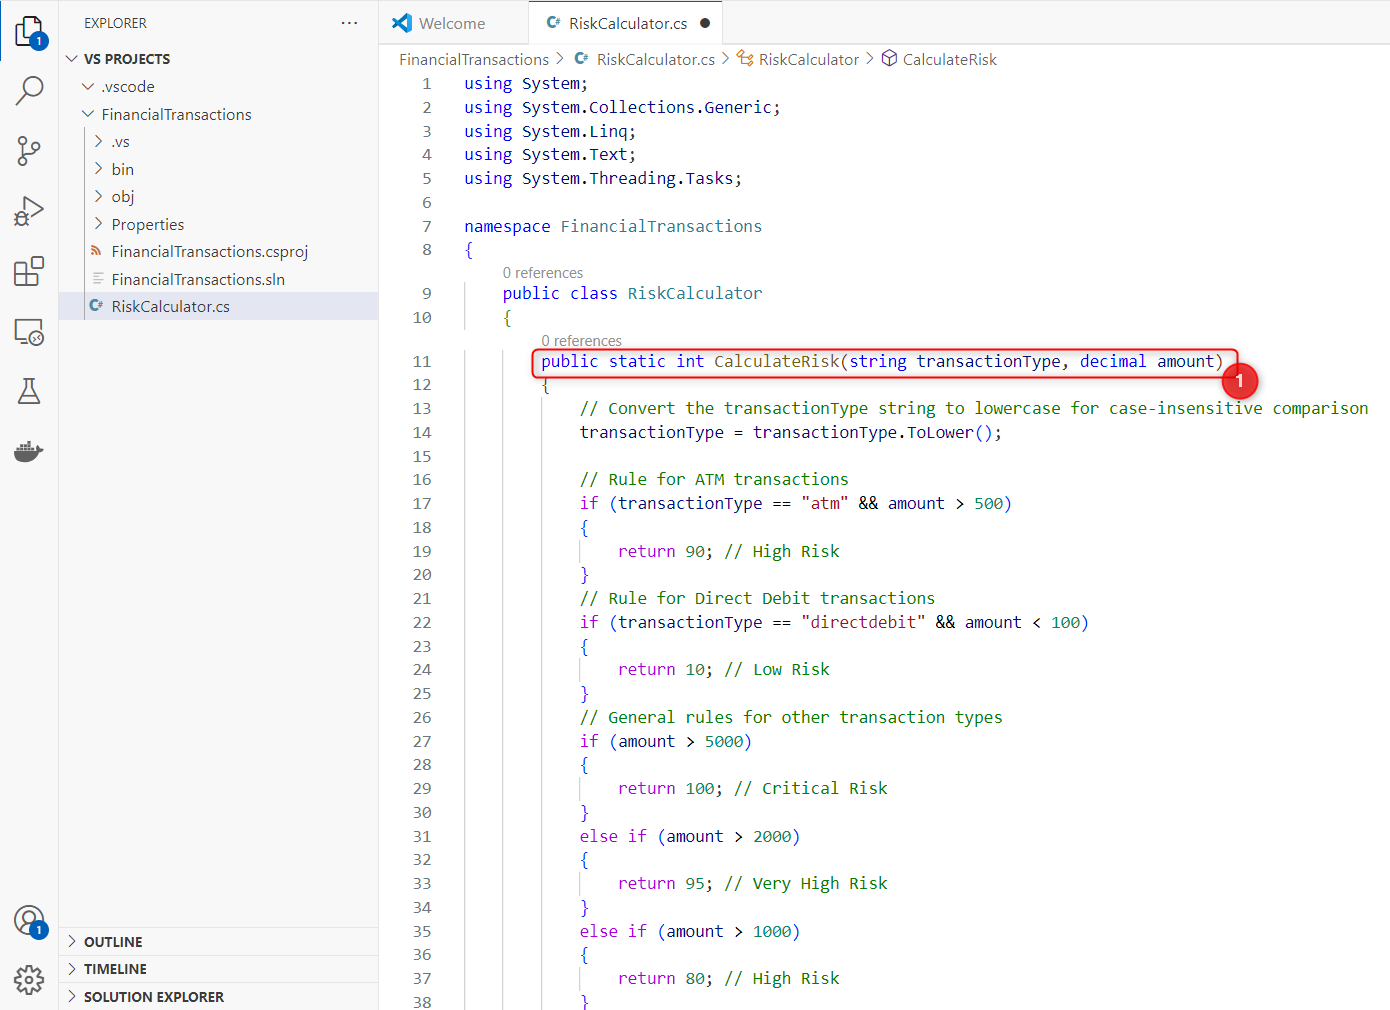
You will add your function to that class, for example, a function to calculate risk score: CalculateRisk (1). In this example we require two inputs: transactionType (string) and amount (decimal). When we import the function into the Curiosity Platform, we will set values for these.
Note that the function must be public, static and compile correctly.
Build and Deploy your custom function
Once you have written your class, you need to create the dll file for your project. This will need to be imported into the VIP server, as follows:
Stop the VIP server:
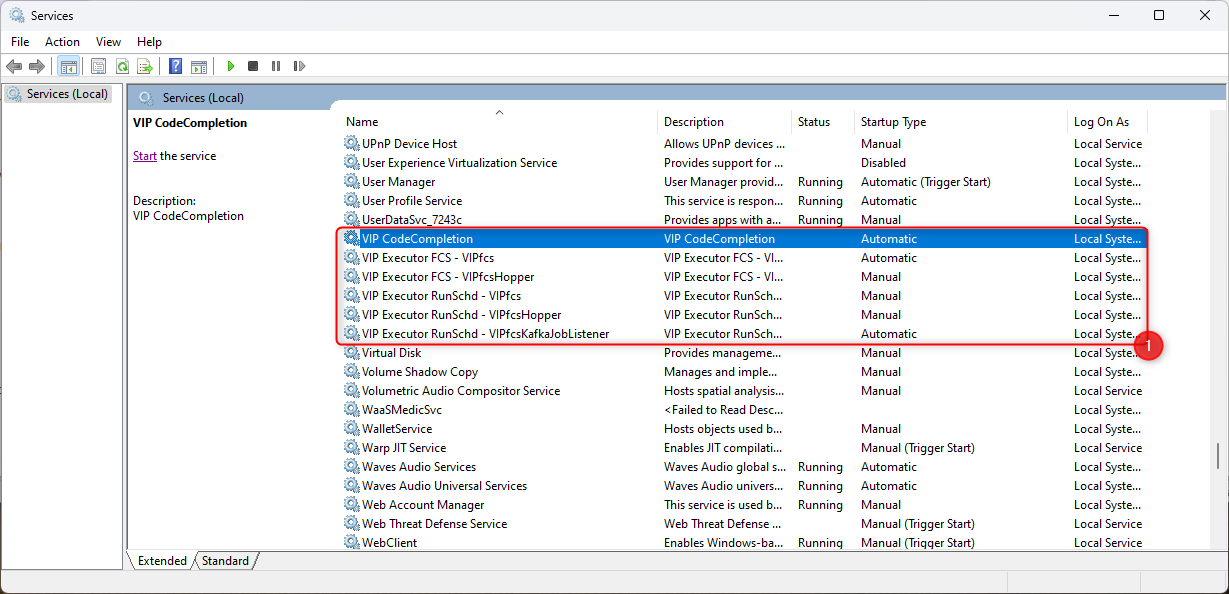
Open the Services window by pressing the <WINDOWS button>and ‘r’ key together then entering: services.msc
Stop the VIP services (1)
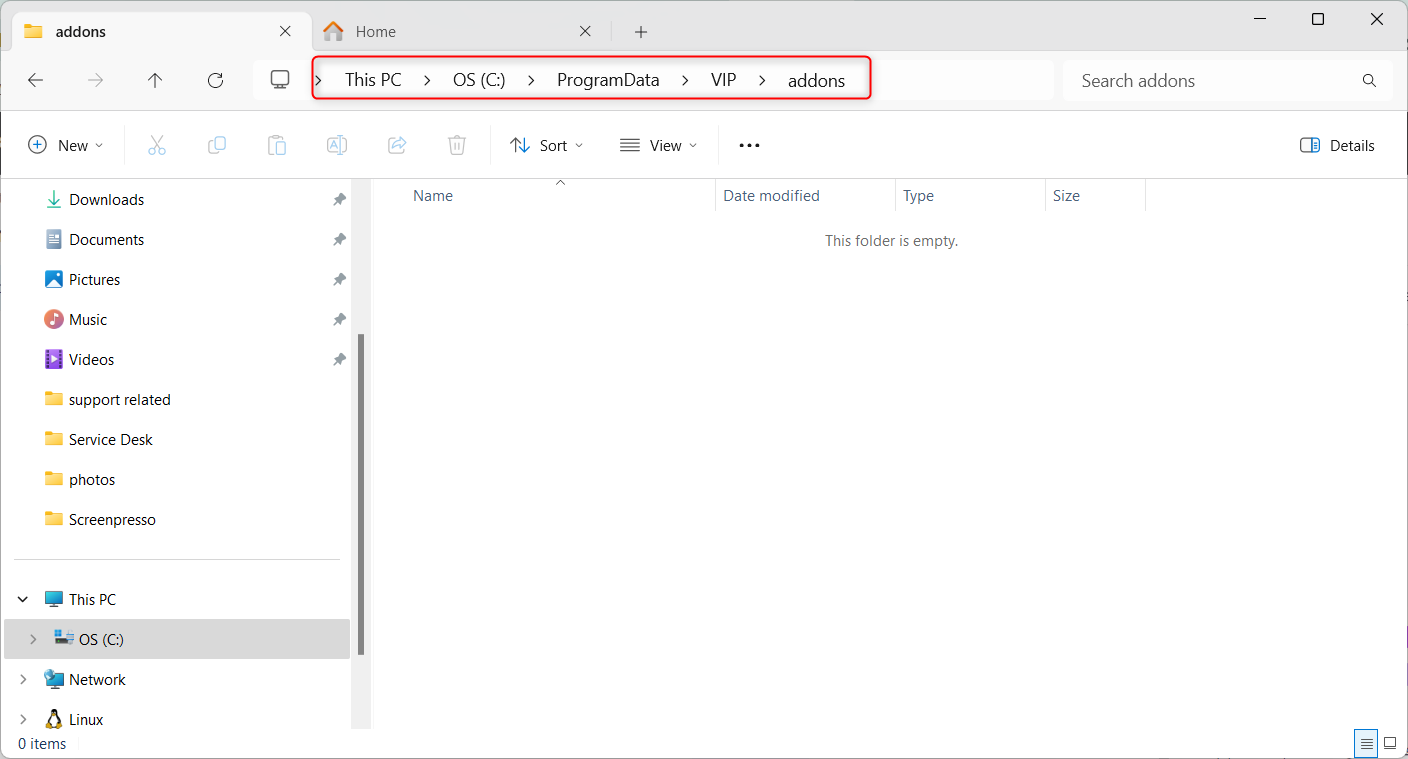
Copy/paste the DLL file for your function into the addons directory for VIP in %programdata%
Then restart the VIP Server, by restarting the Windows services previously stopped.
Register your custom function
Now you need to register the custom function in the Curiosity Platform, using the following steps.
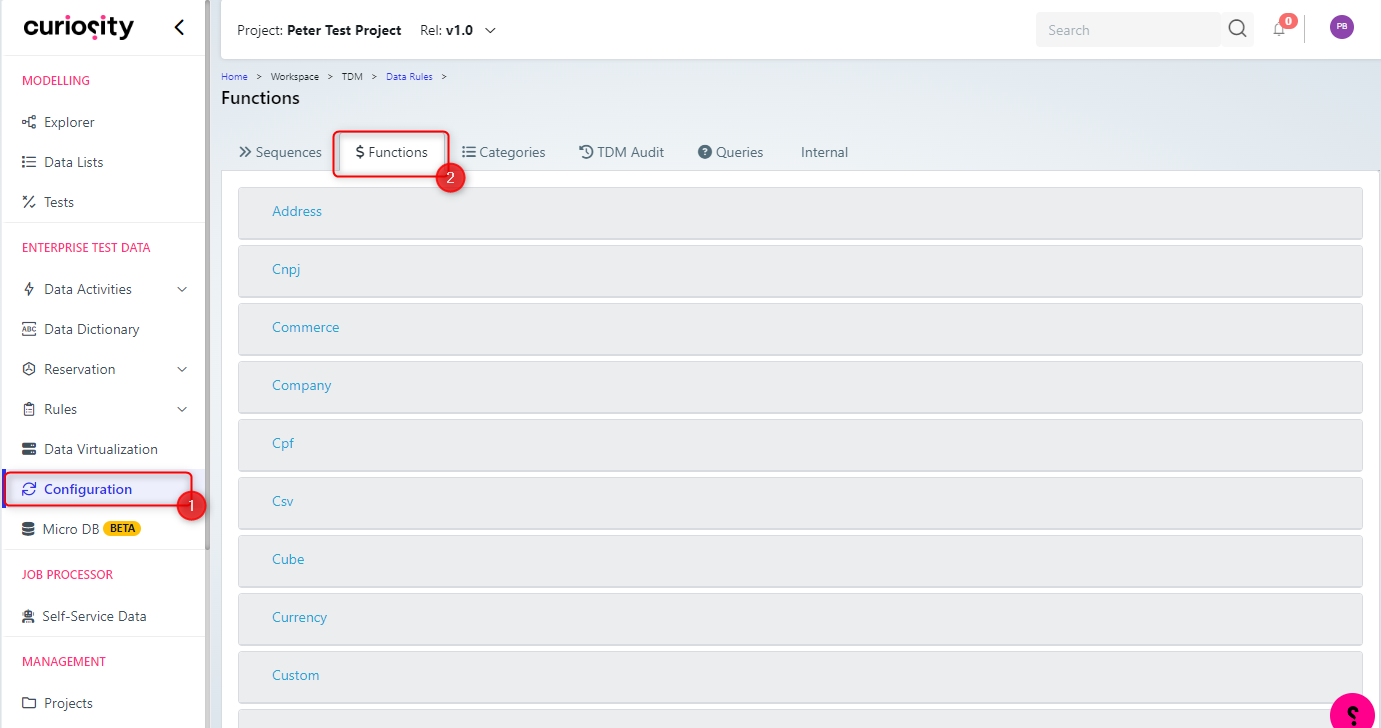
On the Curiosity Platform, navigate to the Configuration menu item (1) and open the Functions tab (2).
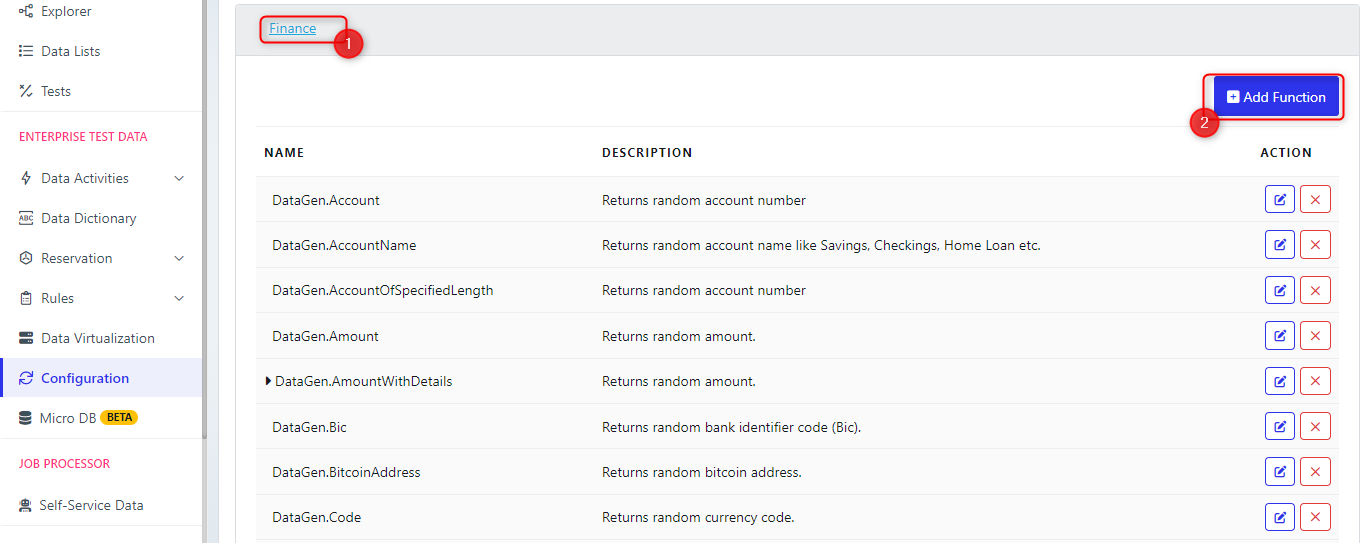
Expand the section you will add the function to (1), for example, Finance. Then click the Add Function Button (2)
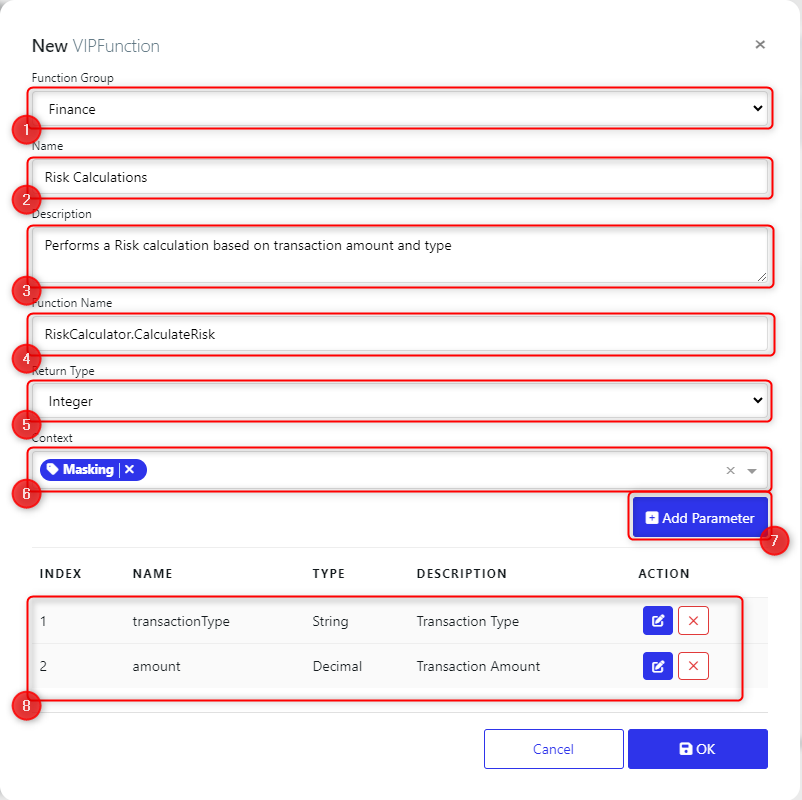
On the dialog box fill in the fields and click OK to save the function.
Name (2): To identify your function, for example ‘Risk Calculator’
Description (3)
Function Name (4): This needs to be in the format Class.Function for example, RiskCalculator.CalculateRisk, based on the previous code example.
Return Type (5) for your function, choose the appropriate one from the drop-down list.
Context (6): this is the areas that the function will be available for. In this example we have set it to be available for masking. Note that you can choose different contexts and have multiple contexts for a function. For example you could choose FileGeneration or Modeller, in which case the function would be available for those actions as well.
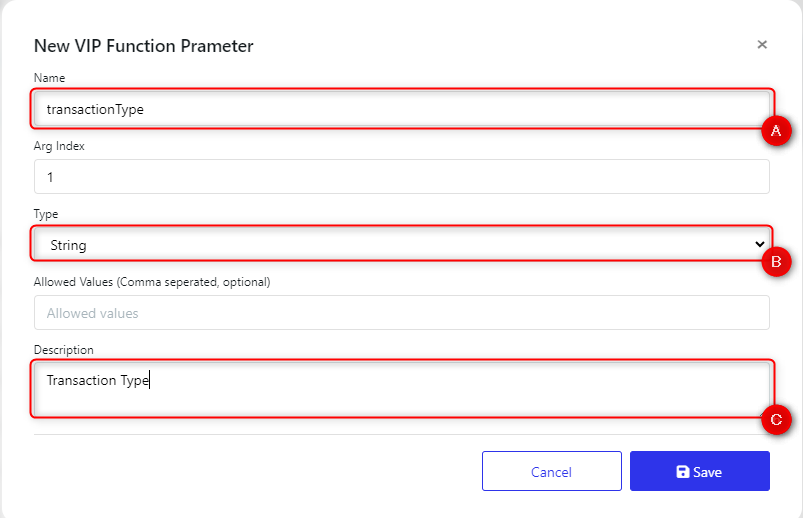
Add Parameter (7): Click this to add the parameters for the function. You need to add each of the parameters set as an input for the function, in our example, this is transactionType and amount. This displays a dialog box, where you can add the parameter Name (A), Type (B) and Description (C). These will appear in the parameter list (8).
Note that the Function Group that you previously picked appears in (1).
Then this function will appear on the functions list

Using your custom function
Now that you have created and added your custom function, you can now use it. In our example we have set it up to be available for masking.
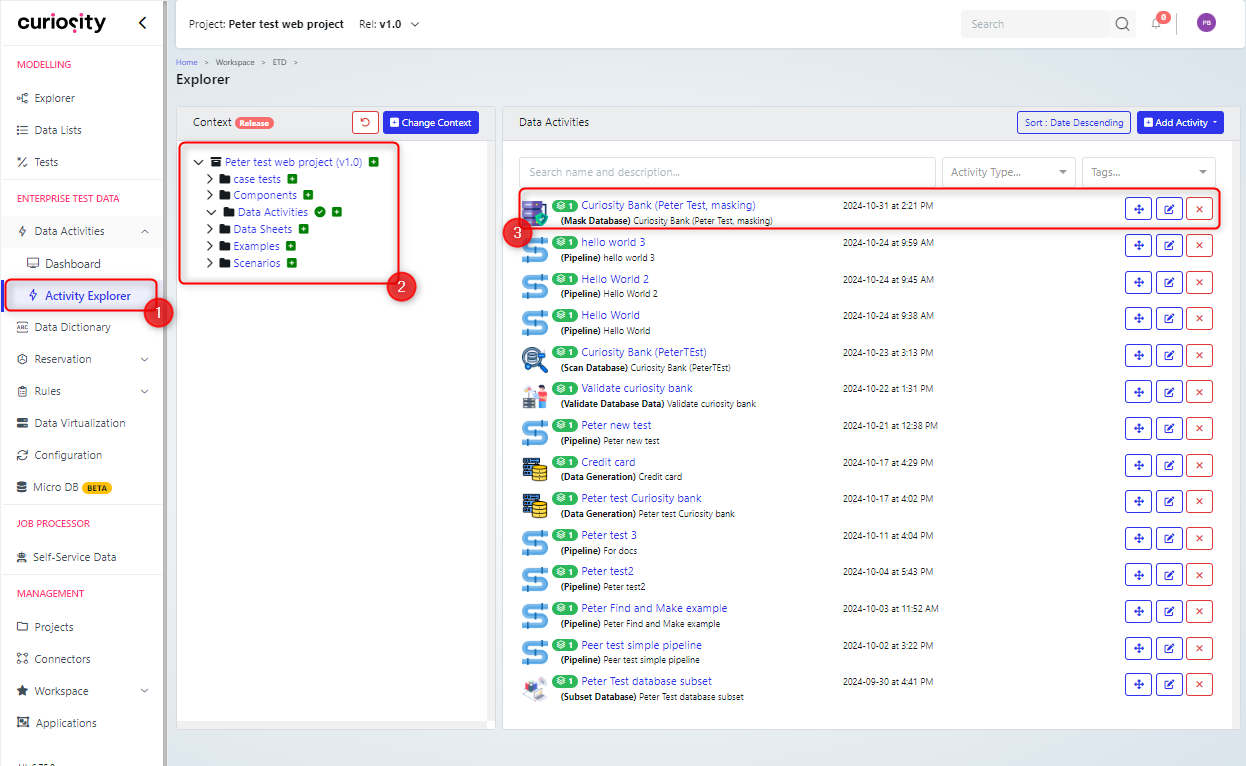
In the Curiosity Platform, navigate to Activity Explorer (1), choose the appropriate folder (2) and open the data masking activity (3) that the function will be used in.
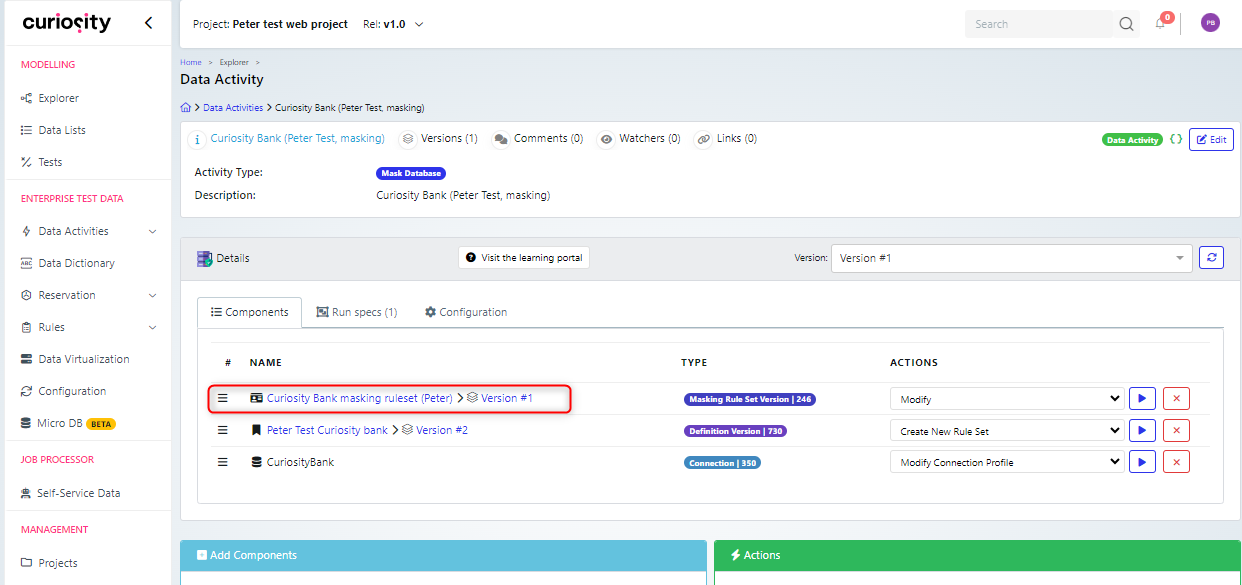
Open the ruleset for the data activity
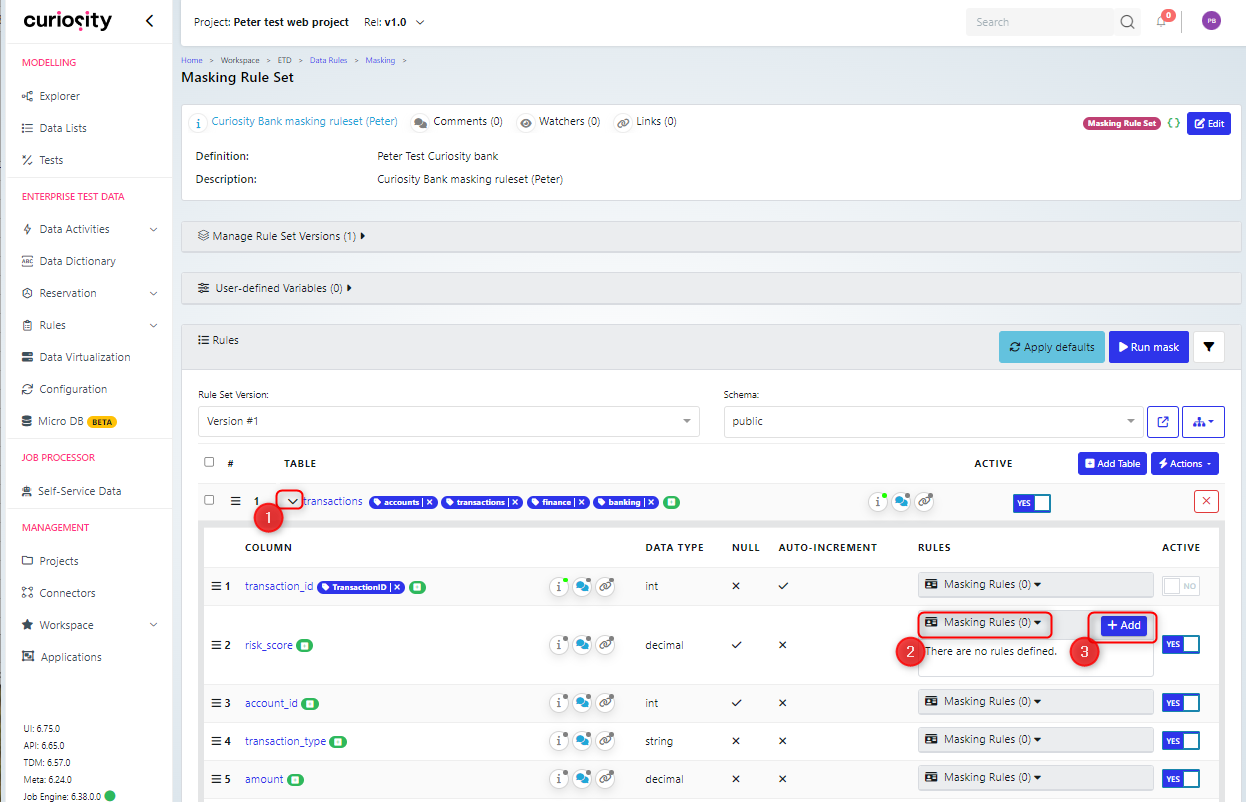
Expand the list of columns for the table that you need to use the function in (1). Then expand the rules area for the column that you will add the function to (2) and click ‘Add’ (3) to add a new rule.
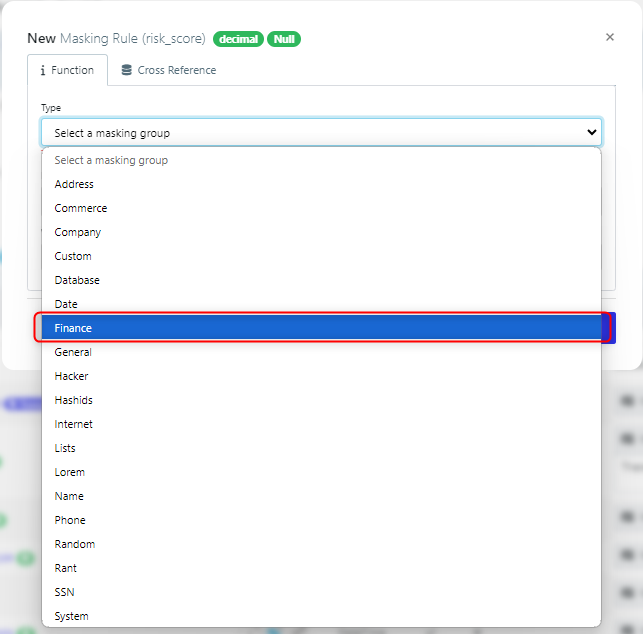
In the dialog box:
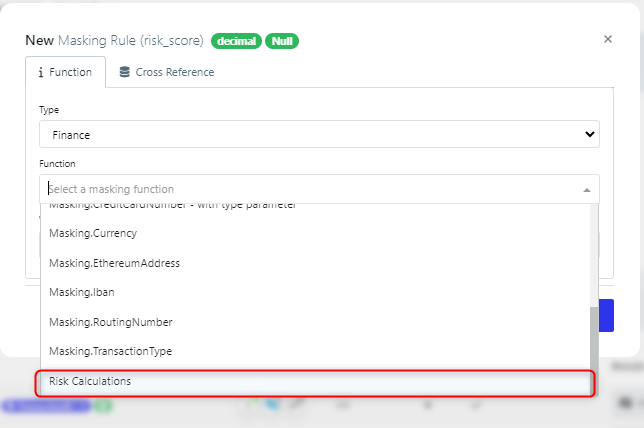
Pick the appropriate function group and function.
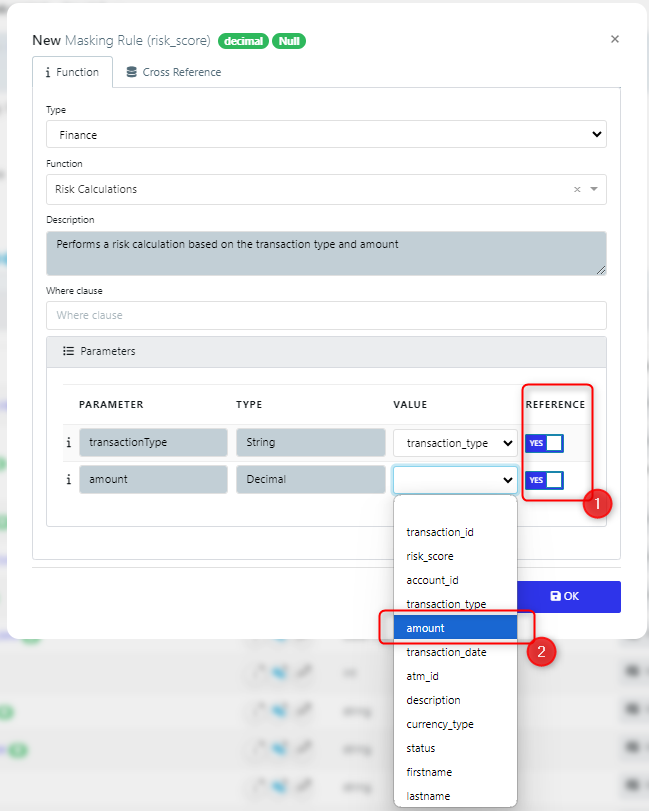
Set the parameters for the function, by setting the reference toggle to ‘Yes’ (1) and choosing the relevant value from the other columns (2). Note that if you set the reference toggle to ‘No’ then you can hard-code a value for that parameter.
Then your column rule will look something like this (1) and you do have the option to edit the rule (2).
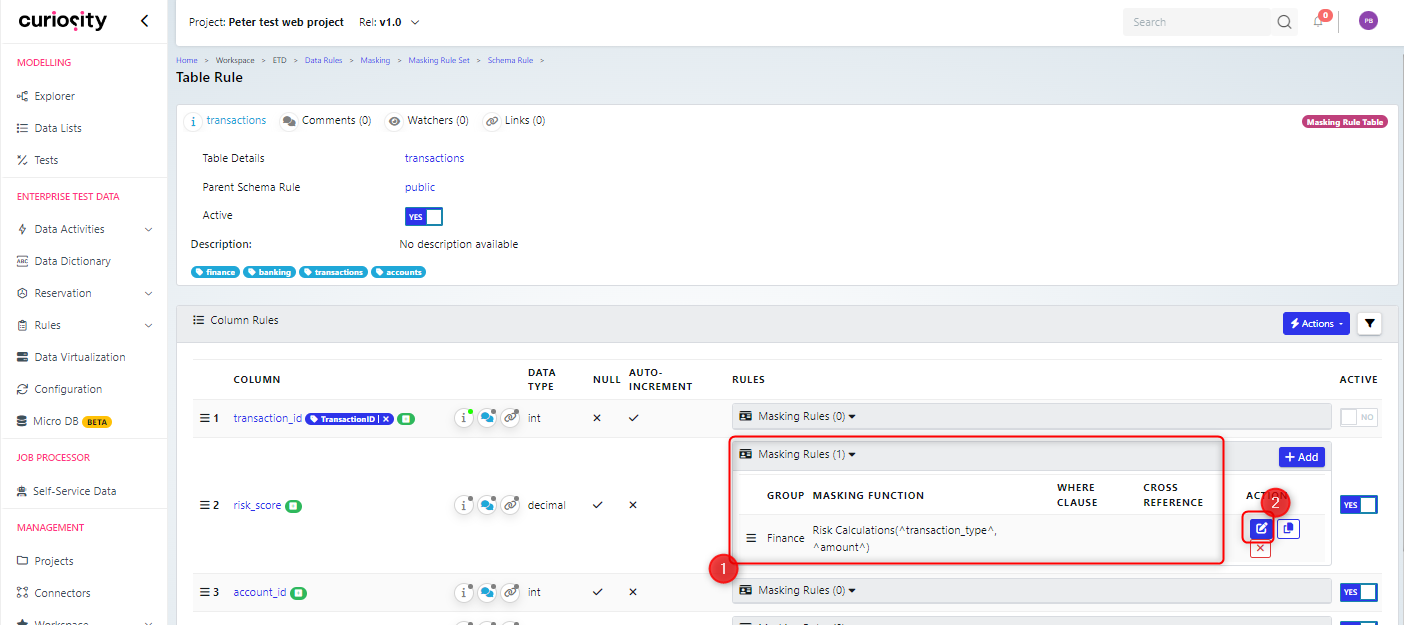
Now when you mask data using this activity, the function will be called to set the column value. In this example, the risk_score for the transactions table will be based upon the transaction type and amount and set according to the function we created.