There are eight basic actions that can be dragged and dropped to the canvas using the mouse:
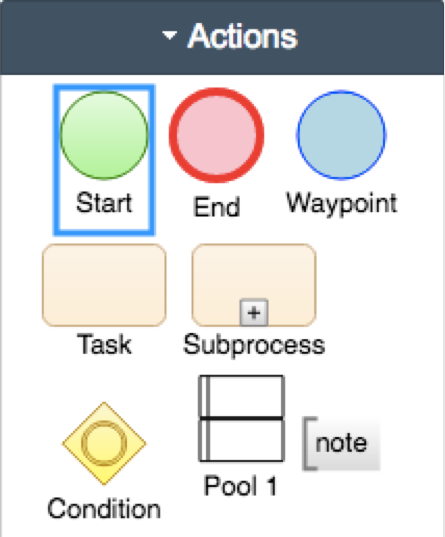
Circular actions represent an "Event", or something that happens rather than being performed. Rounded blocks represent an activity, or something that is done by a user or the system itself. The diamond Condition is used to create alternative paths through the flow.
The eight actions function as follow:
- Start: A Start event is a trigger that occurs at the start of a process.
- End: The End event is the event that terminates the process.
- Waypoint: A waypoint is used between a Start and End point in a path, and enables test automation to be overlaid at that point in the model.
- Task: A Task is an activity performed either by a user, or internally by the system.
- Subprocess: Subprocesses are used to quickly embed and re-use models within a master model.
- Condition: A Condition marks a fork in the paths through a systems logic, for example a decision or a point where data can be entered.
- Pool: Pools and lanes are used to visually divide a logical model. They do not affect the logic specified by other Actions.
- Note: Notes are used to add comments to a model. They do not affect the logic specified by other Actions.
Editing Actions on the Canvas
Certain actions dragged to the canvas can be renamed, defined, or resized. All actions can be moved.
Quick Actions
A toolbar of quick actions can be accessed by hovering over the block being edited:
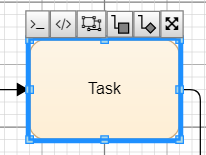
- Test Data displays the test data sidebar for a given block.
- Test Automation displays the test automation sidebar for a given block.
- Copy Block is used to copy a block.
- Add Task creates a Task block, connected by an edge to the block being edited.
- Add Condition creates a Condition block, connected by an edge to the block being edited.
- Move Block is used to move a block, by clicking and dragging the move block option.
Shortcuts
On the right-hand side of the Quality Modeller canvas, there are a series of shortcuts:
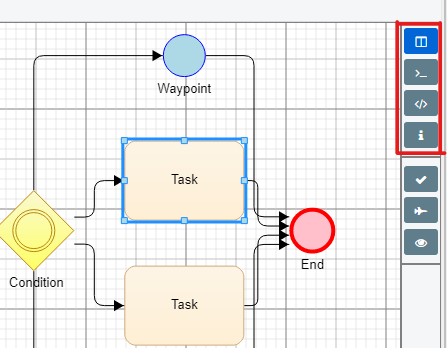
- Project Explorer is where test automation functions and dynamic data jobs are housed.
- Test Data displays the test data sidebar for a given block.
- Test Automation displays the test automation sidebar for a given block.
- Block Properties allows you to edit a block’s properties, see more below.
Block Properties
In this menu, there are a number of properties that can be edited for a given block.
- Summary: The name given to the block.
- Description: The description given to the block.
- Expected Result: The expected result associated to the output of the block.
- Requirement: An associated requirement step that enables the creation of requirements and user stories.
- Data Type: This option allows blocks to be tagged with either a ‘Valid’ or ‘Invalid’ data type. This results in a red ‘Invalid Data’ tag on any test case that passes through the 'Invalid' data block.
- Colour: Opens the colour pallet.
- Test Step Toggle: For generating test cases and exporting them to external tools, if this is toggled on then the block will be considered a test step and vice versa.
- Requirement Step Toggle: For generating requirements and user stories and exporting them to external tools, if this is toggled on then the block will be considered a test step and vice versa.
Renaming Blocks
To rename Start and End points, Waypoints, Pools and Lanes, double-click the relevant caption and type the new name. Alternatively, hover over a block and select the text option in the quick actions toolbar.
To define the logic denoted by a Condition, Task or Subprocess block, double-click the text in the block and type the new definition. Alternatively, hover over a block and select the text option in the quick actions toolbar.
Resizing Blocks
To resize task blocks and lanes, click on the relevant block or lane, and then click and drag the light blue boxes to the required size.
Saving Models
To save a model to a new or current version, click the "Save" option above the File tab of the Model editor:

To save a new model, select the "Save As" option. The new model will appear in the Test Models Workspace, and can have further versions associated with it.
Using commands in the menu bar and keyboard shortcuts
The Home tab of the menu also provides common actions for editing models.
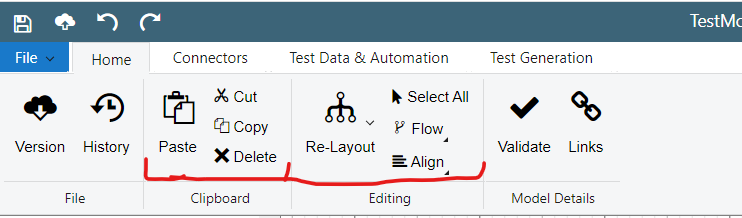
Standard Windows keyboard shortcuts can also be used, and Cut, Copy, Paste and Delete are also available by right-clicking on a block or set of blocks.
Note: As Quality Modeller is a browser-based application, keyboard shortcuts are always the Windows version, using Command instead of Control if on a Mac. For instance, even when using Quality Modeller on Mac, "Redo" is always performed by Command + Y, and not Command + Y, and not Command + Shift + Z.
Individual blocks, sections of a model, and subprocesses can be deleted, copied, and pasted. To select multiple blocks, hold shift and click the relevant blocks. Alternatively, click the canvas and drag the mouse to select a relevant section of the model.