This describes how to link Quality Modeller (QM) to TestRail, using the TestRail Integration Connector. This will allow you to import data from TestRail and export tests you have built in QM into TestRail.
It is aimed at users of QM who have access to a TestRail instance.
Requirements
Your company TestRail base URI (Note that we do support the on-premise version of TestRail as well)
A valid TestRail username. This will be the email address of your user
A TestRail API Key (the appendix includes details on how to obtain this in TestRail)
Setting up the connection

On the left hand menu of the Curiosity Dashboard:
Click connectors, in the Management section.
Click the Add Connection button (Top right of the screen).
In the Configuration dialog box, fill in the fields as listed in the Configuration dialog box fields section.
Click save or cancel to save or discard the new connection.
Configuration dialog box fields
Button | Action |
|---|---|
Validate | This checks the URL is a valid one in the connection field |
Cancel | dismiss this dialog box without saving |
Save | Save the new connection. |
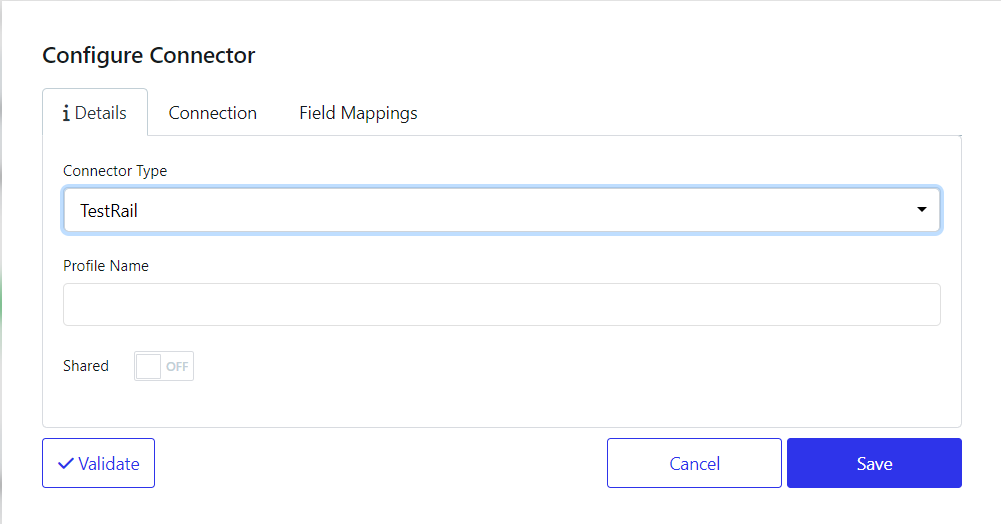
Details tab
This tab allows you to choose the connector type and name it.
Field | Usage/Action |
|---|---|
Connector Type | This is a drop-down list that can be filtered by typing. |
Profile Name | The name for your connection |
Shared | Toggle this option ON to make this connection visible to other Workspace users. By default, it is OFF |
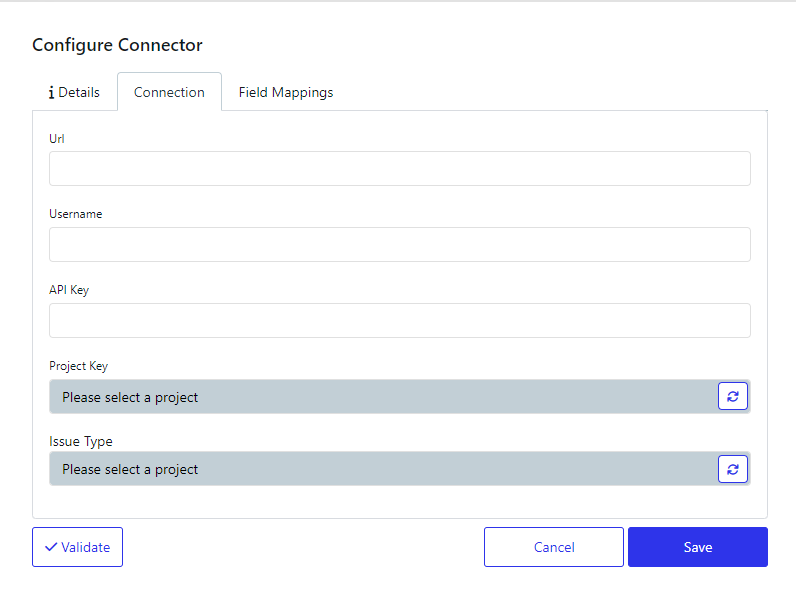
Connection tab
This tab allows you to set the configuration for the TestRail connection
Field | Usage/Action |
|---|---|
Url | The base URL for your TestRail instance. |
Username | The email address of the user. |
API Key | The TestRail API Key. |
Project Key | A drop down list of the available projects in TestRail. |
Issue Type | A drop down list of the issue types/suites available in TestRail for the selected project. |
| Refresh button |

Field Mappings tab
This tab allows you to map TestRail fields, either to a fixed value or to a Model field.
There are a number of different types of field types available in TestRail and these are listed in the mapped field type section.
If new fields are required, then these should be added in your TestRail application and then they can be imported into QM.
Note: any changes made here on an existing connector will be saved to the connector, even if the cancel button is clicked.

Field/Column | Usage/Action |
|---|---|
| Click this to add a field that is not set up in TestRail, but will only be used in modeller. |
| Click this to refresh the list of fields from those in TestRail. |
Field (column) | The label in TestRail for the field. |
System Name (column) | The System Name in TestRail for the field. |
Required | If checked then the field is marked as required in TestRail and so cannot be deleted. |
Export Value | The value of the field that will be exported with the tests. |
Mapping | Locked: You set a fixed value for this field in the Export value field. This cannot be altered when exporting the tests into TestRail.
|
Delete | Delete the field mapping. |


Mapped value field types
A list of the currently available field types in TestRail
Field Type | Description | Sample Values |
|---|---|---|
Checkbox | Used to enter/store a boolean value. Checked is true. | checked |
Date | Used to enter/store a date value. Click the field to show the drop-down date picker. The date will appear in the field in MM/DD/YYYY format. | 10/31/2021 |
Dropdown | Used to allow choice of one option from a list of options. Click the field to display the dropdown and then click an option to select it. | orange |
Integer | Used to enter/store an integer number. | 2011 |
Milestone | A drop-down list, used to allow choice of a milestone from the milestones of the current project. Click the field to display the dropdown and then click an option to select it. | SubMilestone |
Multi-select | Used to allow choice of multiple options from a list. Click the field to show the drop-down menu and click options to select them or the x to deselect them. | option1 option2 option5 |
String | Used to enter/store a single line text value. | Curious? |
Text | Used to enter/store a multi-line text value. | Multi-Line |
Url (Link) | Used to enter/store a web address. This can be a public internet address or a local intranet web page. | |
User | A drop-down list, used to select a user from a list of users in the TestRail installation. Click the field to display the dropdown and then click an option to select it. Note: only admin users can access user IDs inside of TestRail | Gloria Lopez |
Exporting tests
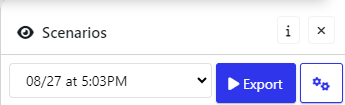
On the Scenarios window of your model, click the Export button. This will display the Exports dialog.
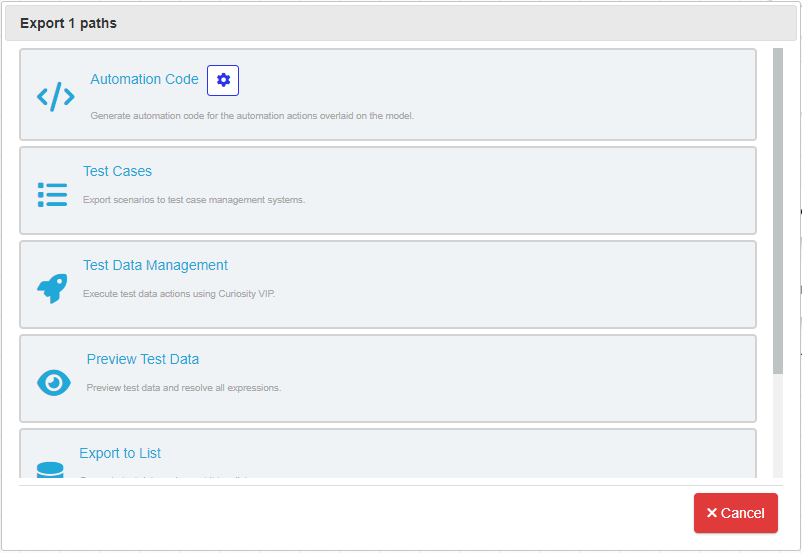
Click the 'Test Cases' option. This will allow you to specify where the test scenarios should be exported to.
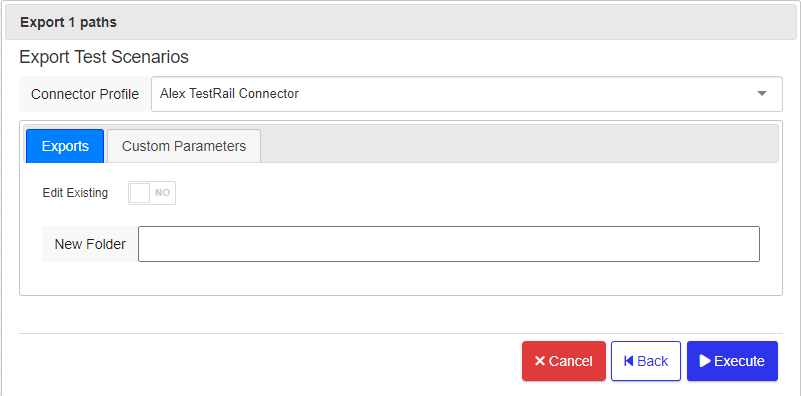
Fill in the Export Test Scenarios dialog. The fields and buttons are listed below.
Field/Button | Value/usage/action |
|---|---|
Connector Profile | A dropdown list of available connection profiles (this is set up in Setting up the connection). This should select your TestRail Connection. |
Exports tab | Details of the location for the test scenarios export. |
Custom Parameters tab | The fields that can be altered on export. These are fields where the Export Value is set to 'Export Override', see the Field Mappings tab section. |
Edit Existing | Yes: update scenarios in an existing folder in TestRail. |
New Folder/Folder list | Dependant on value of 'Edit Existing'. |
Cancel | Cancel this action. |
Back | Back to the previous screen which allows you to choose the export type. |
Execute | Export the scenarios. |
Once the fields are filled in appropriately, click the execute button.
Appendix
Creating a TestRail API Key
If you do not already have an API key for TestRail, you can generate one:
Open your TestRail dashboard and open My Settings
Select the API KEYS tab
Click Add Key and enter a name for the key
Click generate Key
Securely record the generated key, as it is only visible when generated and cannot be retrieved afterwards.
Note that in order to be able to generate an API key, your TestRail user has to be enabled to use it on the TestRail Administration dashboard →side panel → Site Settings → API
