What is it and why would I use it?
The data generation activity is a process that can create fictitious data that you can use in your tests. It: avoids the security problems of using customer data; allows for coverage of all user stories, including edge cases, rare events and new scenarios; and means that there is always data available for testing.
Terms and functions used
Database scan: A listing of the database structures such as schemas, tables and columns.
Database definition: A snapshot of the database, showing the relationships between database components such as tables, columns and keys.
Rule set: All the rules for generating new data in a data generation activity
VIP flow: a routine that will generate the synthetic data on the server.
Initial steps required to create and use a data generation activity
These steps have been included, in case you have not already created a database connection and definition.
Connect to the database
If you do not already have a database connection, then you can follow the steps here to create a new database connection by navigating to Data dictionary (1)→ databases tab (2) and clicking the New Connection Profile button (3).

Scan the database
This process will grab the schema of the database, so that it can be analysed in the next steps.
Navigate to Data dictionary (1)→ databases tab (2) and clicking the newly created connection (3).

There are two ways to run the scan, as listed below.

Run Scan (Native)
This option will run the scan directly from where Enterprise data instance is hosted and will open the job details page in a new tab.
Run Scan (VIP Server)
Use this option if you are using a data agent to access the database. Clicking this option will display the ‘Select Server’ Dialog box

You can select the Server (1) to run the scan on from the drop-down list.
There are two Process (2) options and the next screen viewed will depend on the process selected:
‘Get Schema Metadata’: This will grab the schema data

Note that you can schedule the job to run at a different time.
‘Schema report’: This will generate a report on the schema.

Once the scan is executed the browser tab will switch to the job details page, where you can track the process being executed.

View the scan
Once the scan job has completed, the resultant scan it will be visible on the profile page for the database connection.

Click the scan to see more details about the database scan

Click on the schema names to see the list of tables, and click those, to see the columns.
Create a definition
This creates a snapshot view of the database.
Navigate to Data dictionary (1)→ Definitions tab (2) and click New Definition (3).

Then follow the steps in the the page: Create a definition to add a database definition.
There are details on viewing a database definition in the article: Database Definition View Explained.
If you select your new definition on the Data dictionary → Definitions tab, then you will see a page where you can view:
tables (1) which you can navigate into
diagrams (2) of the tables, showing their relationships.

Set up a data activity to create synthetic data
Create the data generation activity
There is a data generation wizard, that can be started in two ways:
In the enterprise test data section, on the dashboard there is a link for the Data Generation activity.

Alternatively, navigate to the Activity explorer (1) → choose a folder (2), or add a sub-folder using the + button by the folder name → then click the Add Activity drop-down (3) and choose data generation.

Either of these methods will display the Data Generation wizard.
The Details page
You need to name (1) and describe (2) the activity, and can choose the application (3) and server (4) to run it.

The Definition Page
You need to choose the database definition to use (1).

Note that once it is selected, the version (2) will be set to the latest version of the definition and the connection (3) will be set to the relevant connection for the definition. Both of these values can be changed
The Rule Set page
This allows you to attach an existing rule set or create a new one. You can also skip the rule set creation at this stage and create it later.

If you choose an existing rule set, then only those linked to the definition chosen on the previous page will be displayed.
If you create a new rule set, then you can configure the rule set, there are more details on this later, in the Creating a rule set section.
The Form page
This allows you set set up the submit form. By default, Create Submit Form (1) will be checked, if you uncheck it, then form details part (2) will be removed. If Prepare Requisite infrastructure (3) is checked, then the VIP server will be built, this is necessary, if the form is being created.

Note that this will not be displayed if a rule set is not created or chosen.
There are more details on setting up a submit form in the Create a submit form section below.
The Location page
You need to set the location to store the data activity.

Note that it is not displayed, if you started the dialog through the activity explorer.
The summary page
This will list the actions to be carried out, so you can review them before finishing the wizard.

Once it has finished, you have the option to open it directly, or to navigate to it in the activity explorer at a later time (1). You can also view the jobs that created the VIP Flow and Submit form (2), if they were created.

Configuring the data generation activity
Once the activity is created, you can open it to modify it further, as needed.
The components that already exist (1) will depend on the options chosen in the wizard.

If you didn’t create or attach a ruleset then you should do so (2),see section Creating a rule set
You can configure the rule set (3), see section Configure the rule set
Whenever you update a ruleset, you should check that data is created as you expect by validating it (4), see section Run validate and Preview
If you make any changes to a rule set then you need to rebuild the VIP FLow (5), see section Rebuild VIP Flow on Server
If you haven’t already created a submit form then that can be done (6), see section Generate data
Creating a rule set
This action will let you set which tables you are going to generate data for, using the New Rule Set dialog box.
The Details tab lets you set the name and description for the rule set.

The Configuration Tab lets you set whether all tables will be used and whether id columns are active

Then the Tables tab will allow you to select which tables the data generation will be based on.
Note that once you have selected one or more tables (1), you need to click the Add Tables button (2), in order to add them to the rule set.

When you create the rule set, you will need to generate an up-to-date model for the definition, by clicking the regenerate button you will see in the message on the dialog box, as seen below.The job will open in a new browser window and once it is complete, you can save your rule set.

Once you have created the rule set, you will need to configure it.
Configure the rule set
This action will let you set how data will be generated for each of the columns in the table.
You can update the rule set by clicking on the rule set within the data activity window.

On the rule set page, you can view the columns for a table, by clicking the arrow beside the table name. Then you can set up rules for each of the columns. For example, in the view below, the first_name column is set to:
RandomHelper.Faker.Name.FirstName("")
Which will generate a random first name.

Note that modeller will attempt to set up functions to create the data, but you can replace these as necessary.
On each column row, there are a set of symbols that will respectively:
| Open the data painter |
| Insert a function |
| cast the type |
| start an action based on the column |


Additionally there is a switch to activate the column, if it is set to Yes, then data will be generated for the column.
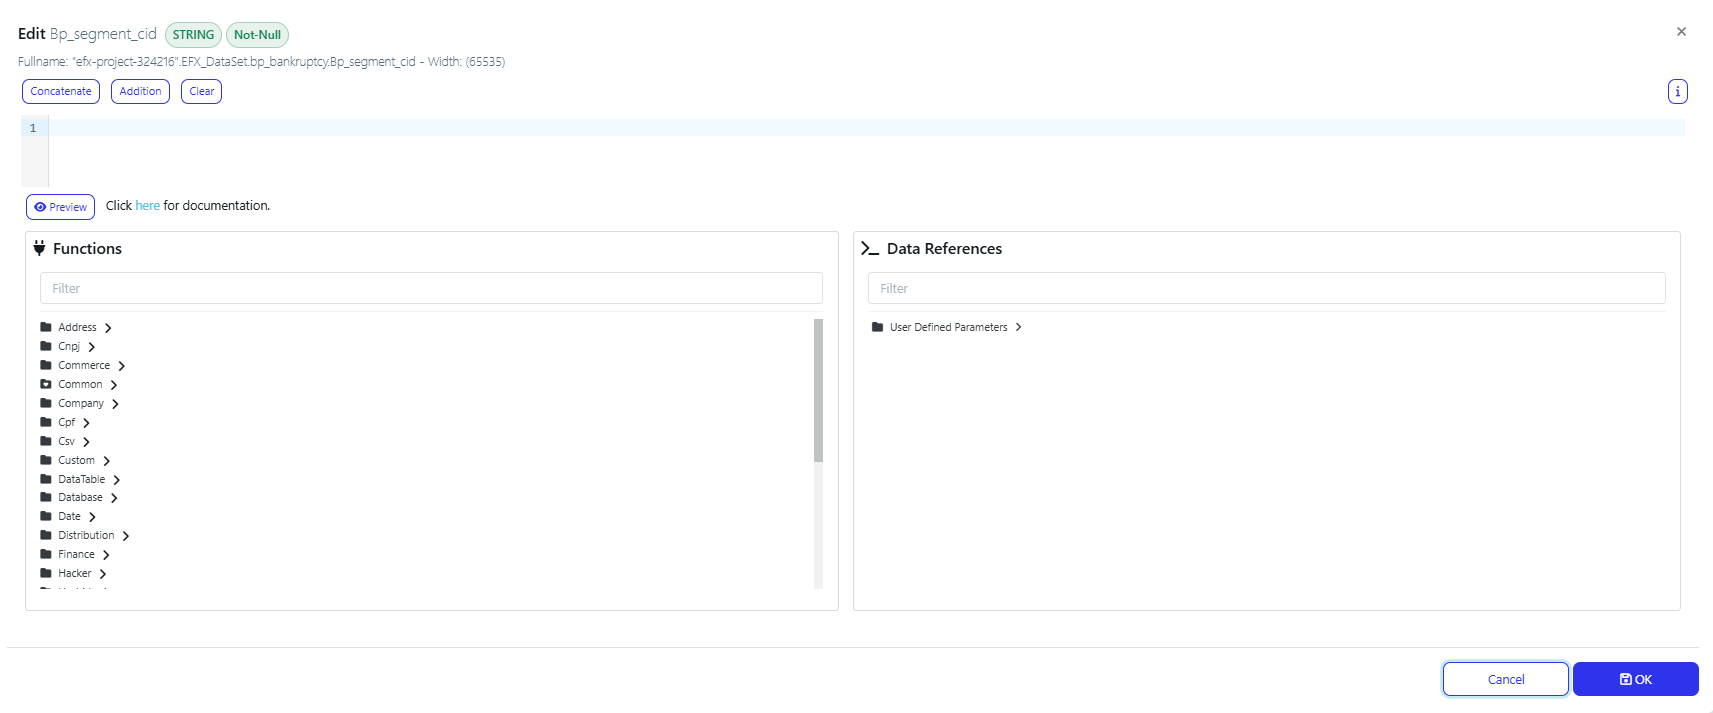
Data Painter
The Data Painter enables users to either select from a range of pre-built functions or create their own using VB.Net.
In the Function Editor, users can write custom logic using VB.Net to suit specific data generation needs.
This section provides a collection of ready-to-use functions designed for common data generation scenarios, helping users get started quickly.
The Data References section allows for parameterization of data using local and global variables, supporting referential integrity and dynamic data generation.
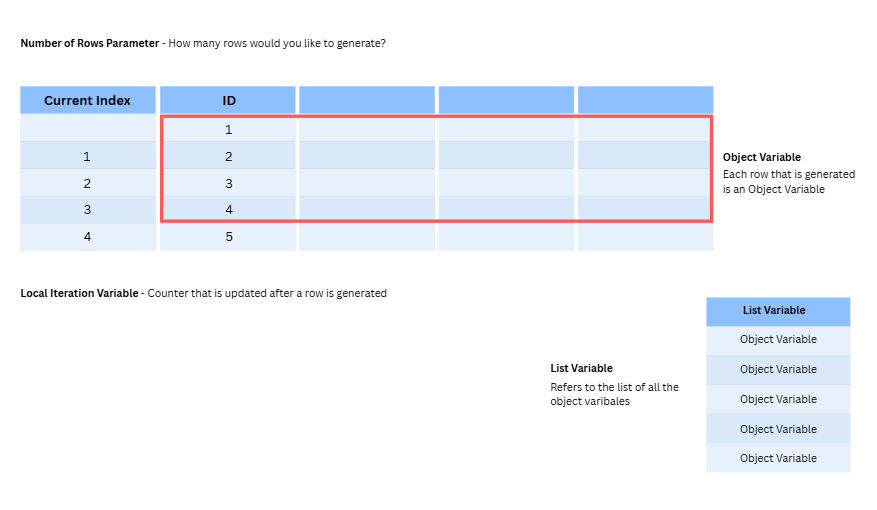
Data Reference Variables
Object Variable
Represents the current row of data being generated.
Data is stored in an object named
var_tableName.To access a specific column's value within this row, use the syntax:
var_tableName.columnNameExample:
var_Employees.FirstName
Number of Rows Variable
Represents the total number of rows you intend to generate.
Syntax:
parItemThis variable can be used in custom logic to determine the data set size dynamically.
Local Iteration Variable
Refers to the count of rows generated within the Data Painter tool, not the original data source.
Syntax:
parCount_tableName
List Variable
Refers to the list containing all object variables generated.
Syntax:
lst_tableName
Current Index
Indicates the current row number being generated within the list.
Syntax:
_tableName
User Defined Variables
The values can also be set to a variable in the User-defined Variables section of the Rule set page. For example, below, I have created a user-defined variable called LastName.

This was added by clicking the +Add button and filling in the New User-defined variable dialog, an example of which is below.

Note: The Form Parameter must be set to “Yes” otherwise you may see an error when trying to create a submit form.
This can then be added to the Rules field for the relevant column. In the example below, the last_name column will be set to the value of the LastName variable which will have a default value and can be set at runtime, when you create the data.

Once you have set up the rules for generating the data, you should run the following actions on the Data activity page:
“Run validate and Preview” (1)
“Rebuild VIP flow on Server” (2)

Run validate and Preview
This is to confirm that the rules create data as expected. You can leave the values on the dialog as default and click execute.

This will open a new browser tab, to show the running job, and when complete, the sample data will be visible in the results tab

Rebuild VIP flow on Server
This will allow the server to generate the synthetic data. It will display the Rebuild VIP Flow on Server dialog box and when you click execute, it will open a new browser tab to display the job details.
Once it successfully completes, the Flow will be added as a component

Generate data
Create a submit form
In order to generate data, you need to create a submit form. This will allow anyone with appropriate permissions in your organisation to create the data.
On the Data generation activity page, click the “Create Data Generation Submit Form” action.

This will display the Create Data Generation Submit Form dialog box

This is a job scheduling dialog box, and so you can schedule the job to run at a different time, if, needed on the schedule tab.
You can generate a CSV file instead by changing the ‘Type of Submit form to Be Created’ dropdown.
You can also use this to update an existing submit form, by selecting the form in the “choose an existing process and Update it” field.
When you click execute, a new browser tab will open, so that you can see the job to create the form being processed.
Once the job successfully completes, and you refresh the browser tab you should see the submit form appear as a component in the data activity.
Run the submit form
To run the form, make sure the action is set to execute for the form then click the blue arrow

When you run the form, it will create a job which will create data in the database you have chosen.

You can change the number of records created, and any parameters that you exposed on the activity. In this example I just added LastName.
Click execute to run the job
As this is a dialog to start a job, you can schedule it for later on the schedule tab.
Note that you can click </> to embed the form into a page on your intranet, use it in CI/CD or other server processes.
To confirm that the data is created, you can check the database table to ensure that the row was added. In this example:
I used Micro DB (1) in the Curiosity platform
Checked the database connection that I was writing data to (2)
Ran SQL to view the table data (3)
Which shows the row that I created has been added (4)

Next steps
This document shows you how to add one table to a data generation activity. Adding two or more is similar and is detailed in the related article: Multi-Table Data Generation
You can embed the data generation activity into a model, so that you can set up different test cases, for example different account types based on salary: Visual Modelling and Data Generation