This page shows the Test Data Activity for Database Scanning, a technique to assist with data discovery. In this tutorial, you'll learn how to set-up and configure the Database Scanning Activity.
About
Data scanning is a method used in database management to examine and analyse data within a database. It involves traversing through records in a database or specific tables, scrutinizing each column's schema and data to understand its type, sample data, and characteristics. This process is crucial for tasks such as data profiling, which helps to understand data patterns, data quality, and the existence of sensitive information. By performing a comprehensive scan of the database, data scanning provides a clear picture of the data landscape, aiding in data management activities like data cleaning, compliance checks, and data security measures.
Tutorial
Follow along with our video tutorial, or read the written tutorial below where each of the scanning steps is broken down and explained.
Prerequisites for Data Scanning
For this data activity, you will need a:
Step 1 - Create Scanning Data Activity
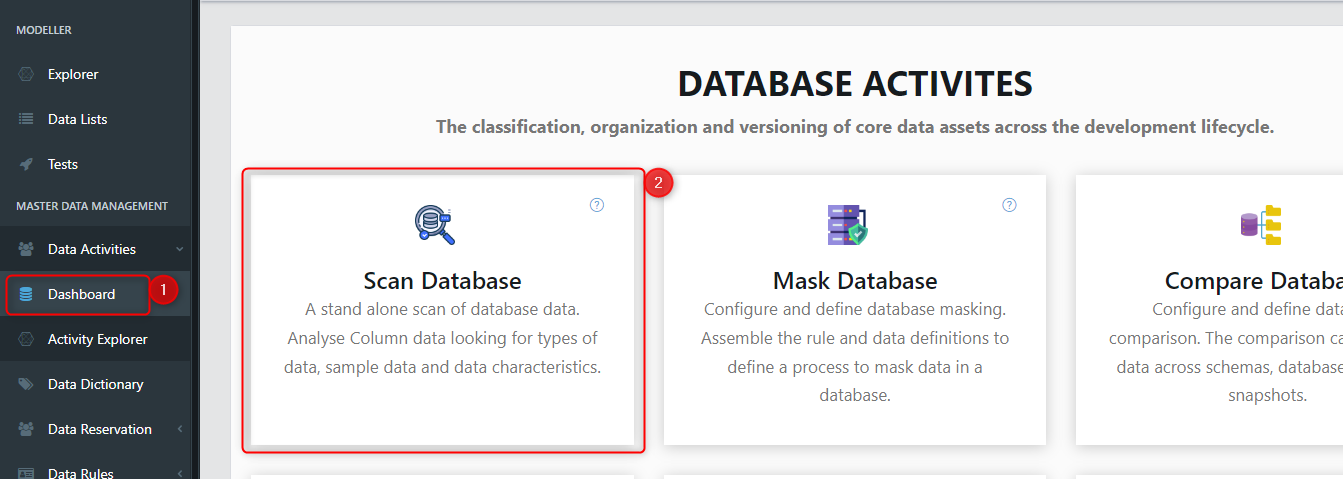
The first step to scanning your data, is to create a new data scanning data activity. Firstly, navigate to the Data Activities dashboard, then select the 'Scan Database' activity.
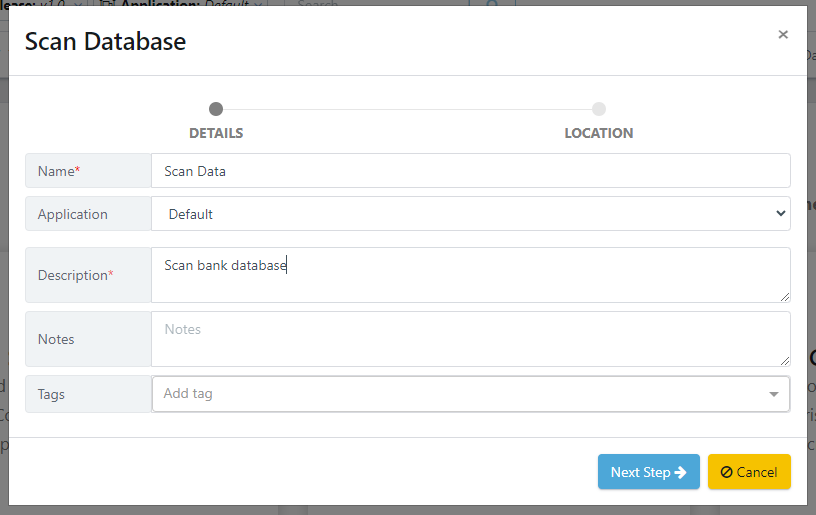
This will launch the wizard for creating data activities. In this section, you are required to provide specific details about the activity, including a mandatory name and description. After filling out the necessary information, click on the 'Next' button to proceed.
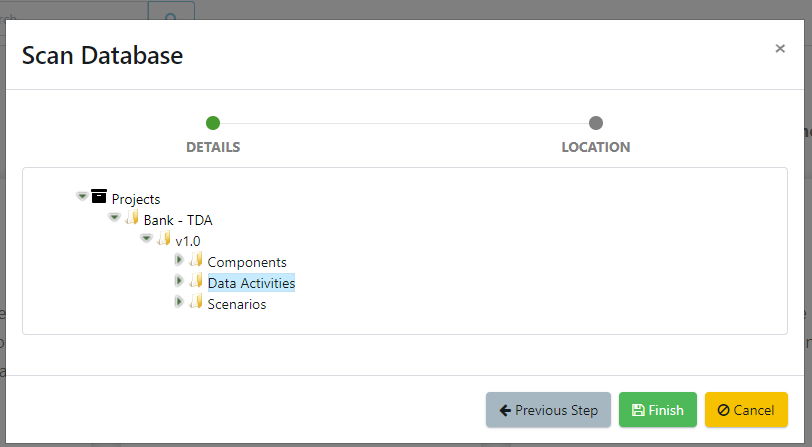
After entering the activity details, you must select a location to save the data activity. Once you have chosen a location, click the 'Finish' button to complete the wizard.
A new data activity will appear, ready for configuration.
Step 2 – Scanning Configuration
When a Scan data activity is created, a default configuration will be set. These specify different settings within the data activity. You will want to edit these default configurations to suit your needs. To do this, click the edit button in the top right hand corner.
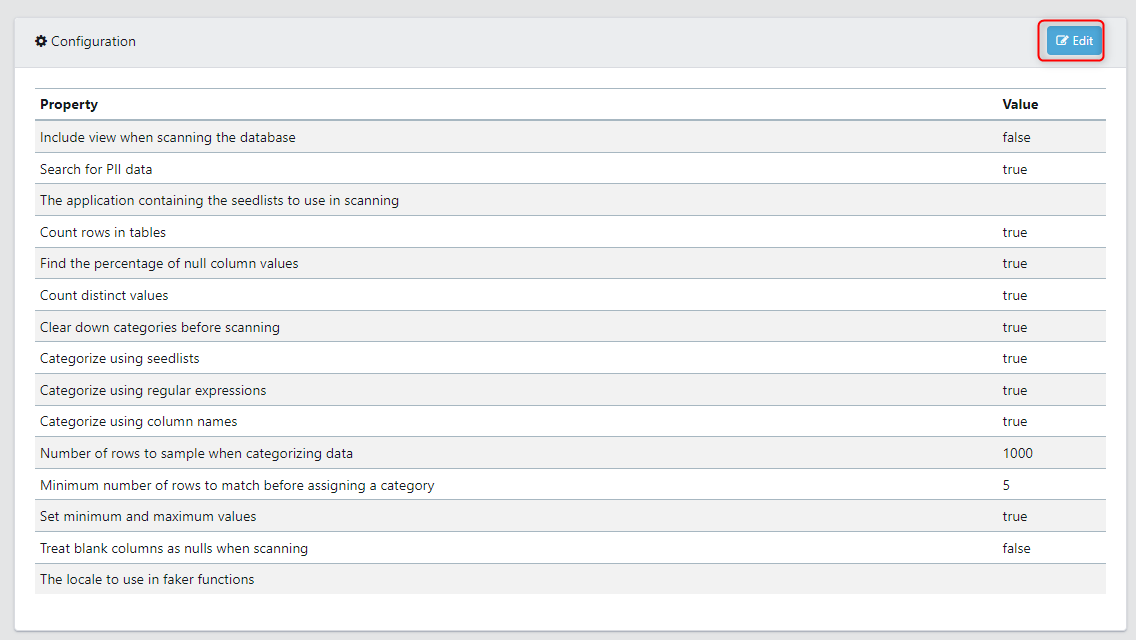
The following fields are available to edit.
- Locale: This is used to set the locale of the synthetic data generation functions. For some functions, the locale will change the result, e.g. addresses. By default, it will be in English.
- Include views: A view is the result set of a stored query, which can be queried in the same manner as a persistent database collection object. Toggle this to on if you want to include views, otherwise, it can be toggled off.
- Scan Data: This will scan for PII data.
- Scanning list application ID: this allows you to select the application that your Seedlists are in. Seedlist names should be unique within an application.
- Get table counts: Option to count the number of rows in each table
.By default, this is true. - Get null percentage: Option to calculate the percentage of nulls. By default, this is true.
- Get distinct count: Option to calculate the distinct count. By default, this is true.
- Clear down masking tags at each run: This will remove any existing tags before re-scanning to set tags. By default, this is true.
- Set seed list categories: Option to use this method of scanning. By default, this is true. Note: if you are not using seed list categories to categorise columns this will need to be disabled.
- Set regex categories: Option to use this method of scanning. By default, this is true. Note: if you are not using regex categories to categorise columns this will need to be disabled.
- Set meta columns: Option to use this method of scanning. By default, this is true. Note: if you are not using meta columns to categorise columns this will need to be disabled.
- Sample size: An integer input for how many rows to sample during scanning.
- List how many to match before assigning the tag: Controls the scanning sensitivity. For example, if the minimum number of rows is set to 10, and the sample size is 100, then a column that matches a seedlist value for 10% of its values will be assigned a tag.
- Get min max values: Option to calculate the min and max values. By default, this is true.
- Blanks as Nulls: If blanks are used in place of null values any SQL run during scanning will treat blank columns as if they were null, this could for example affect the result of the “get null perc” option.
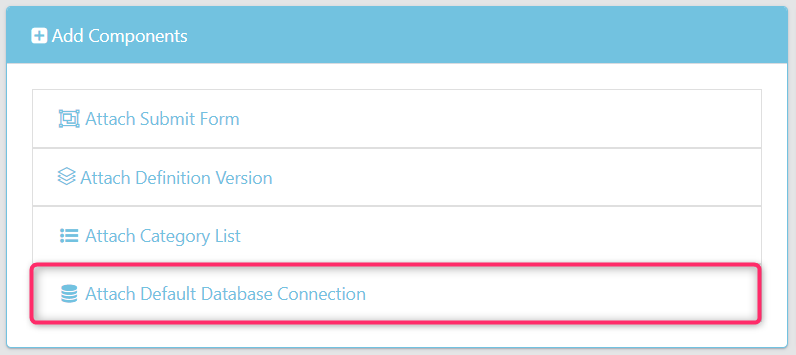
Step 3 – Attach a Database Connection
Now we will attach the database connection that we want to scan. Under Add Components, choose the Attach Default Database Connection component.
This will bring up a screen to select your Database Connection.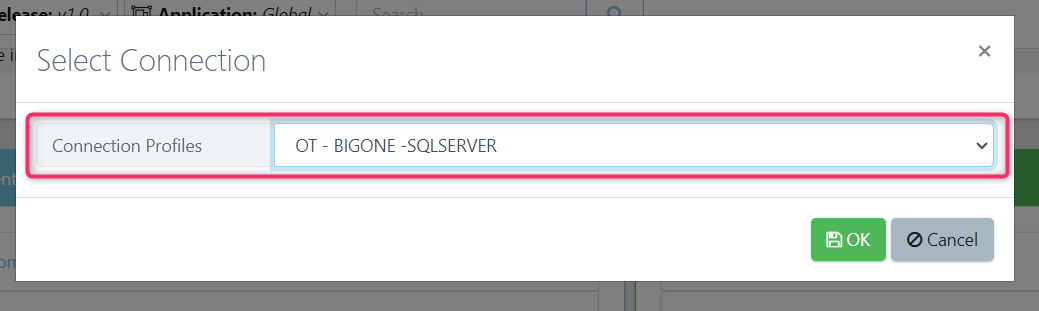
Step 4 – Attach a Database Definition
Next, attach the definition version to scan. Under Add Components, choose the Attach Definition Version component.
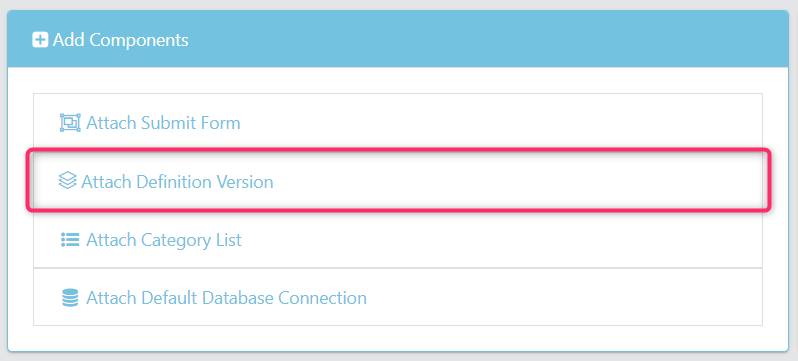
Note: The definitions and versions must be associated with the database connection we configured in the previous step. Definitions that are created from other database connections will not execute.
Step 5 – Specify Category Lists
Category lists are used to identify how columns are identified and tagged during scanning. There are 3 ways to scan a database:
1. Seedlist - This specifies lists of data, if a value exists in the database which is also in the seedlist, the column will be categorised as the corresponding data type.
2. Meta Columns - This looks at the column characteristics (e.g. the name of a column) and matches a tag based on the column configuration.
3. Regex Categories - This looks at the underlying data within a column and matches a tag according to the data characteristics specified using regular expressions.
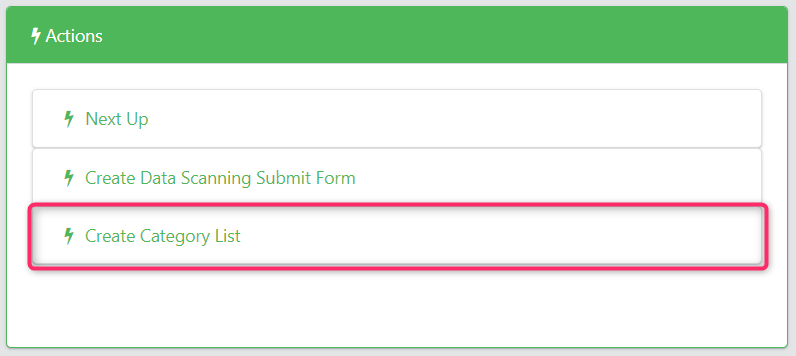
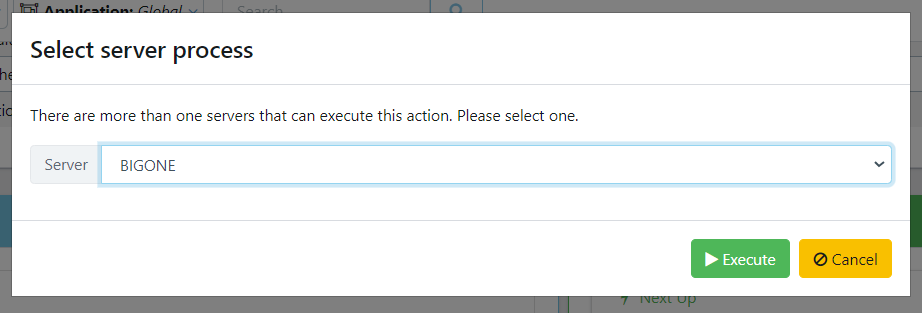
To add a starter Category List, choose Create Category List under Actions. The next screen will allow you to choose a server if there is more than one server in the workspace that can execute this action.
We will then give the list a name, select the type of starter list to create (from the three listed above), provide a description, and select an application.
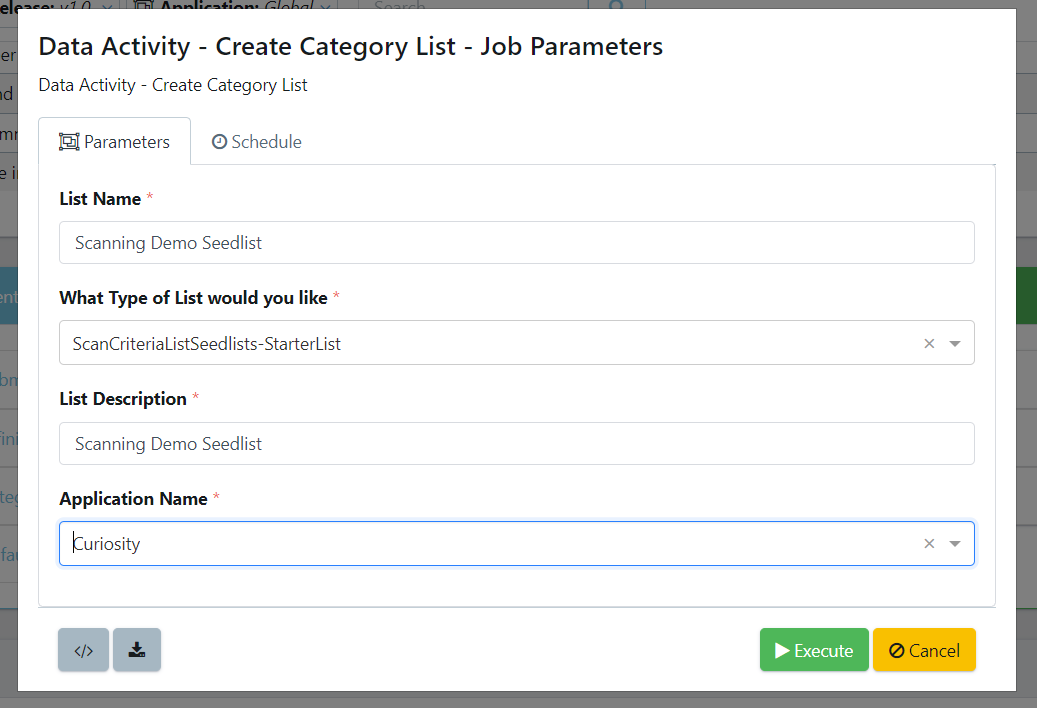
For this tutorial, we have run through the create category list three times, for each category list type. It is important to note, you only need to specify one type at a minimum. Make sure the configuration reflects the selected category lists.
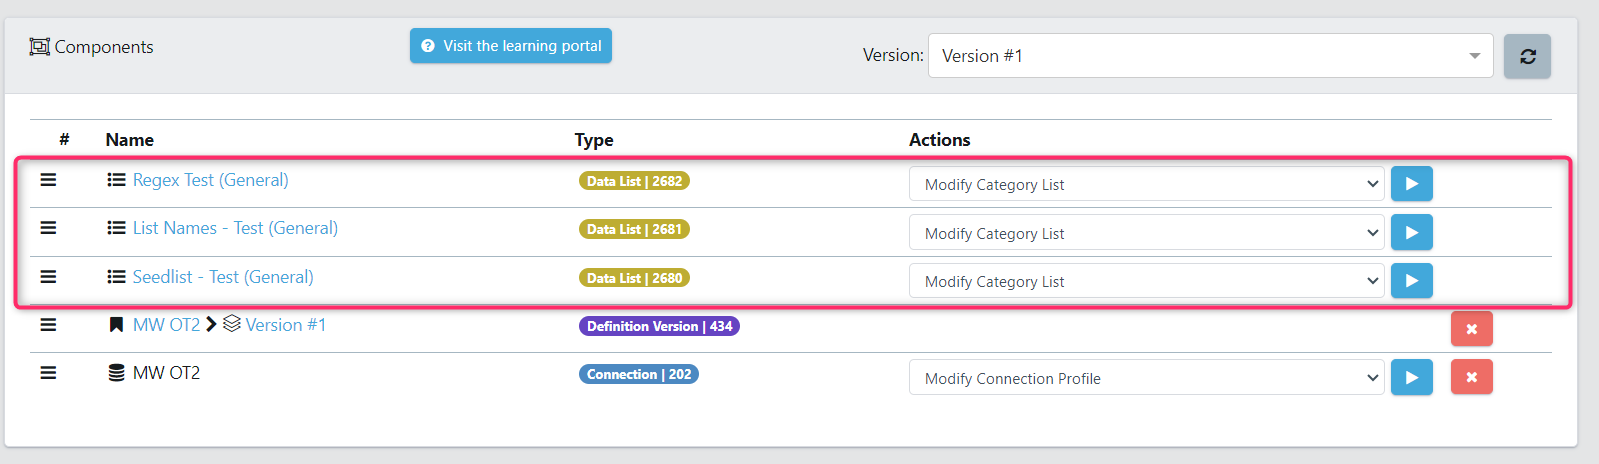
Step 6 – Modify Category Lists
The next step will be to edit the category lists to suit your scanning needs. To do this, for each of your Category Lists, select the Modify Category List from the Actions dropdown, and select Execute.

Below are all the customizable options for each type of Category List.
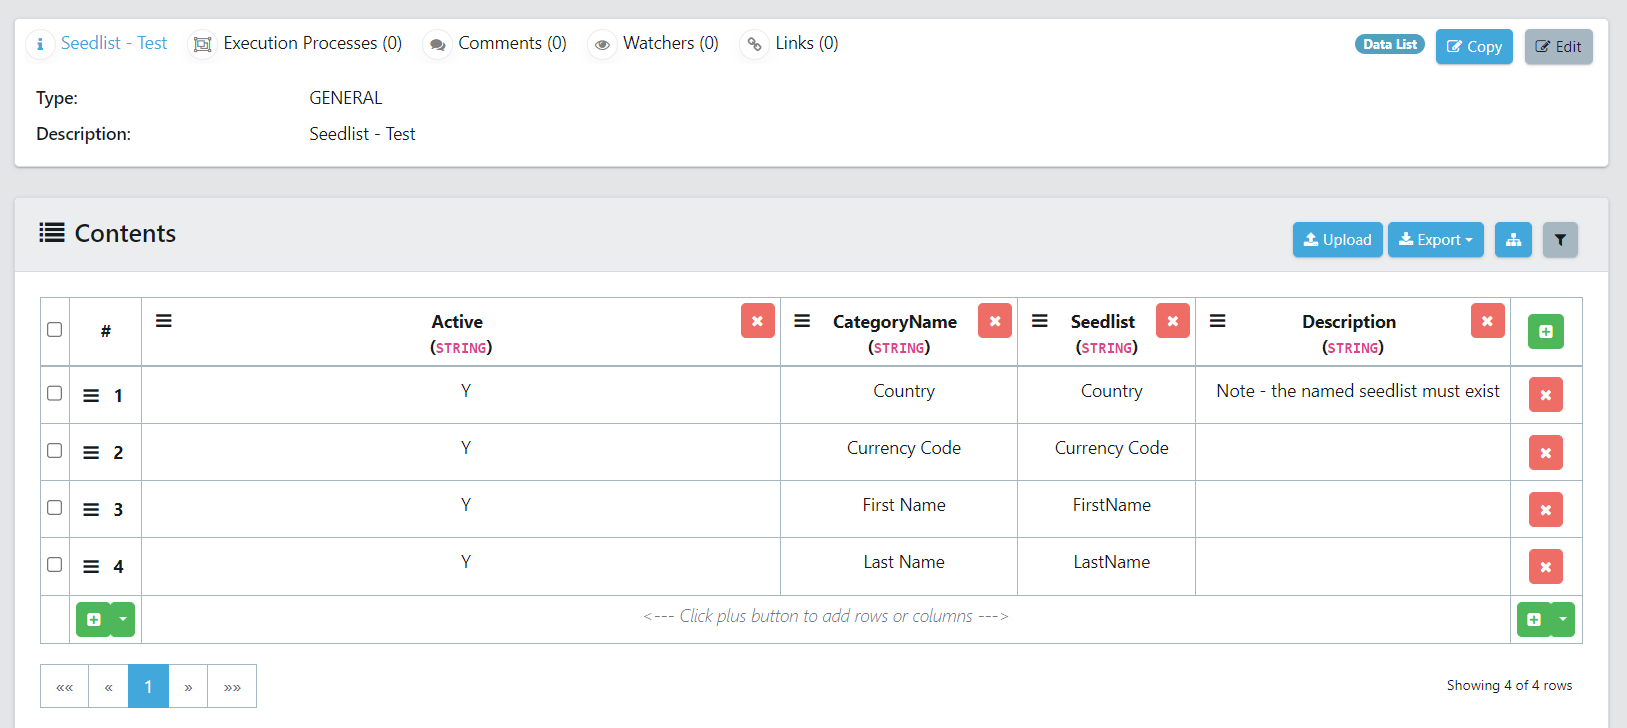
Seedlist Category List
The seedlists category list is used to specify example data to identify a column type. If data for a column is found in a specified seedlist it will be tagged with the corresponding category name defined.
Below specifies the columns in the seedlist:
- Active: This value specifies whether this seedlist will be used in the scan. This field accepts Y or N values.
- Category name: This value will become the tag name.
- Seedlist: This is the name of the seedlist used.
- Description: A section to provide notes.
Example:
In the example below, several seedlists have been referenced (Country, Currency Code, FirstName, and LastName), if any data exists in these seedlists for a given column then it will be tagged with the corresponding CategoryName.
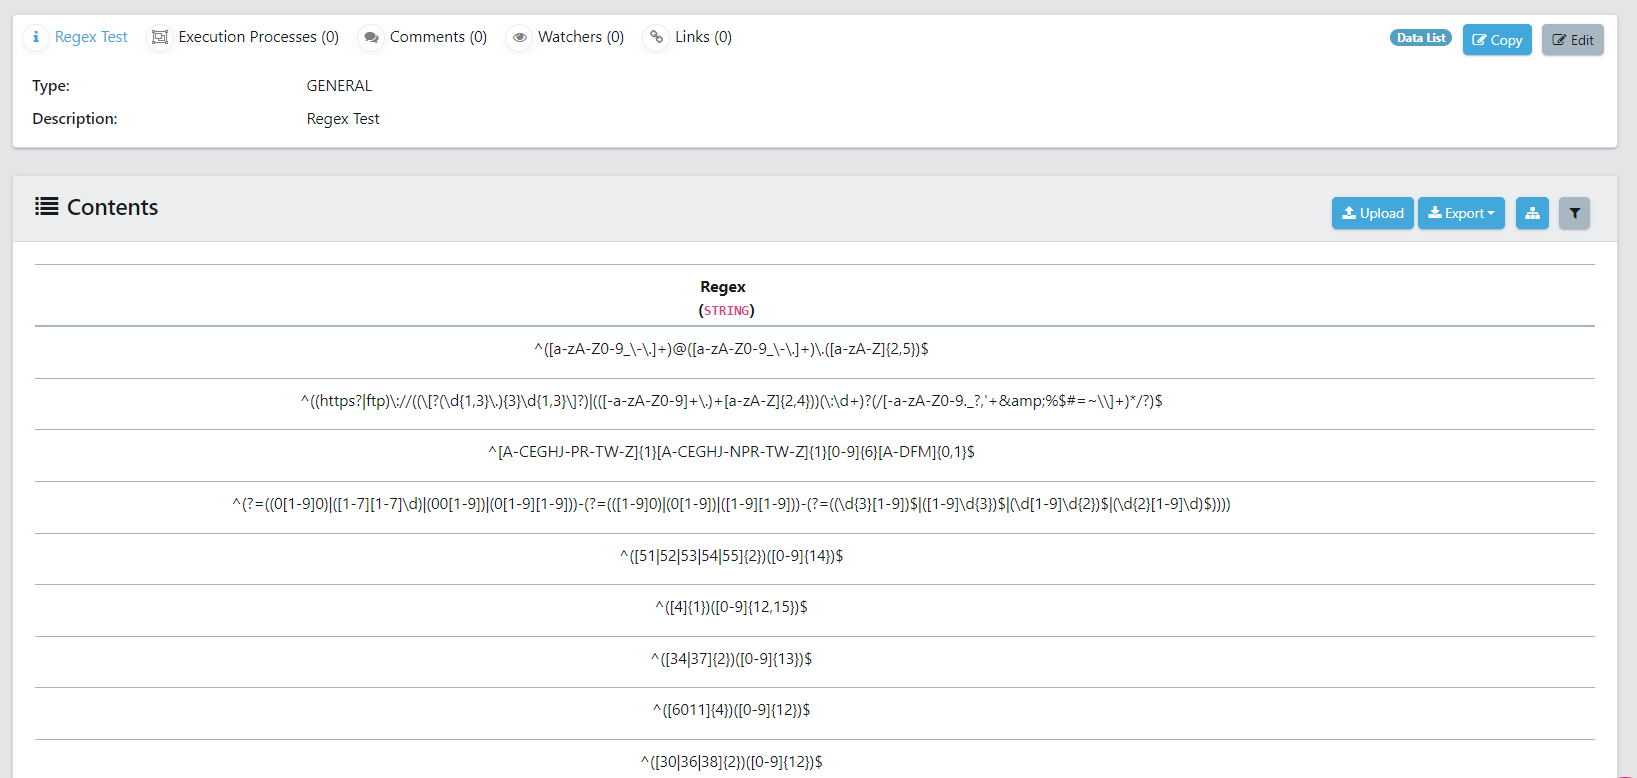
Regex Category List
The regex category list is used to tag columns if all the data in a column conforms to a specified regular expression. This is useful for data which has a specific format which can be characterised using regular expressions.
Below specifies the columns in the regex category list:
- Active: This value specifies whether this regex will be used in the scan. This field accepts Y or N values.
- Category name: This value will become the tag name.
- Regex: This is the regex used in the scan.
- Priority: This value allows you to assign a priority. The higher priority of two items will be chosen when there is a conflict.
Example:
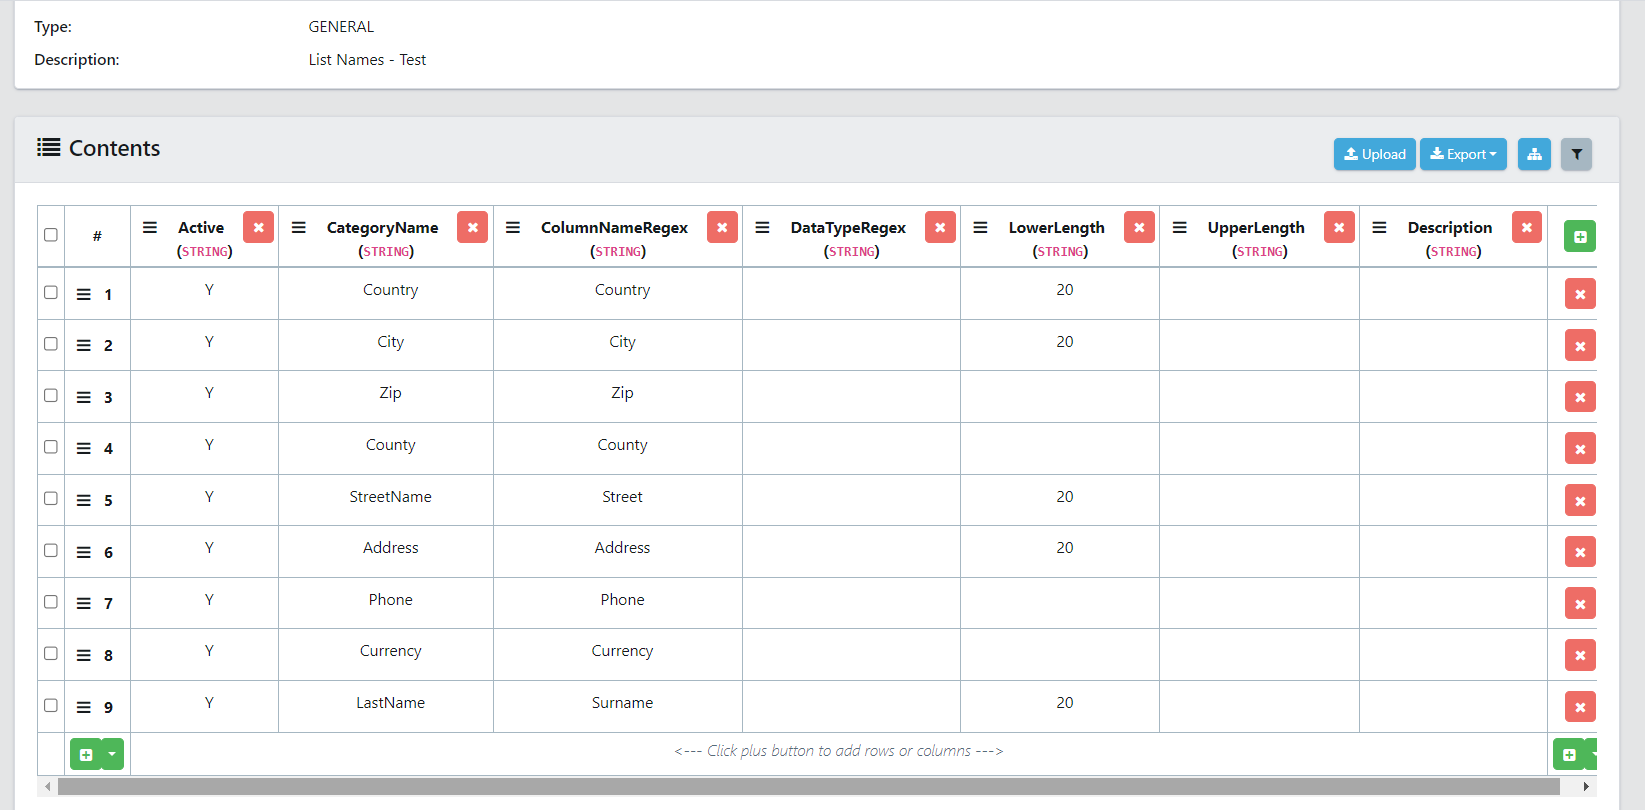
Column Names Category List
The column names category list is used to tag columns using the characteristics of a column in a table. This can be the column name, data type, lower length, and upper length of the data within the column. If a column matches the criteria specified, it will be tagged with the corresponding label.
Below specifies the columns in the regex category list:
- Active: This value specifies whether this Column Name will be used in the scan. This field accepts Y or N values.
- Category name: This value will become the tag name.
- ColumnNameRegex: This is the regex being used. Although the value may not look like traditional Regex, they work in the same way. For example, If the Country value matches exactly, the regex Country has been matched and a tag will be placed.
- Datatyperegex: This regex will check the data type of a column.
- Lowerlength: This allows you to specify the length of a value in a column to restrict the matching.
- Upperlength: This allows you to specify the length of a value in a column to restrict the matching.
- Description: A section to provide notes.
Example:
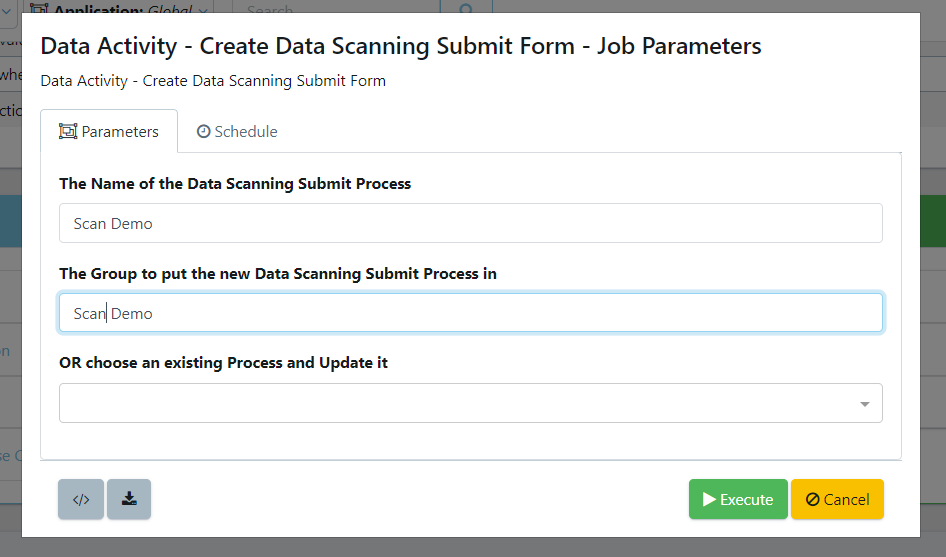
Step 7 – Create Submit Form
A submit form is a reusable form which can be embedded into the self-service portal for future use. Whenever any user wants to perform the defined scan activity, they can do so using the created form.
To create the submit form, from Actions, choose Create Data Scanning Submit Form.

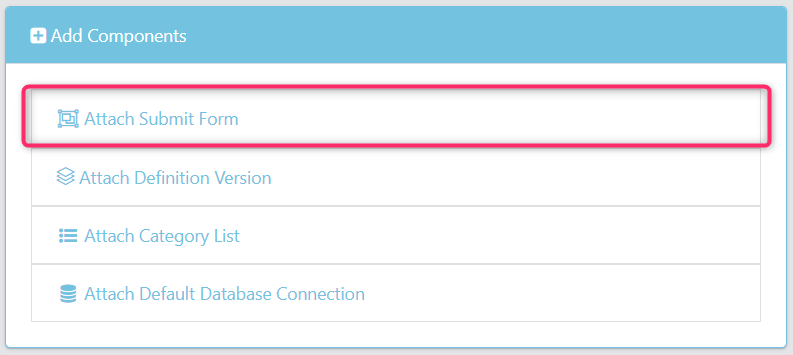
To use a form that has been created previously, choose from Add Components Attach Submit Form.
This will bring up a screen to select the server you want to use. This will be the server that executes the scanning job.
Next, we will define our form's parameters.
We will give a name for our new form, or choose an existing form to update. Then we will select the group the form will be saved in. Lastly, click Execute.
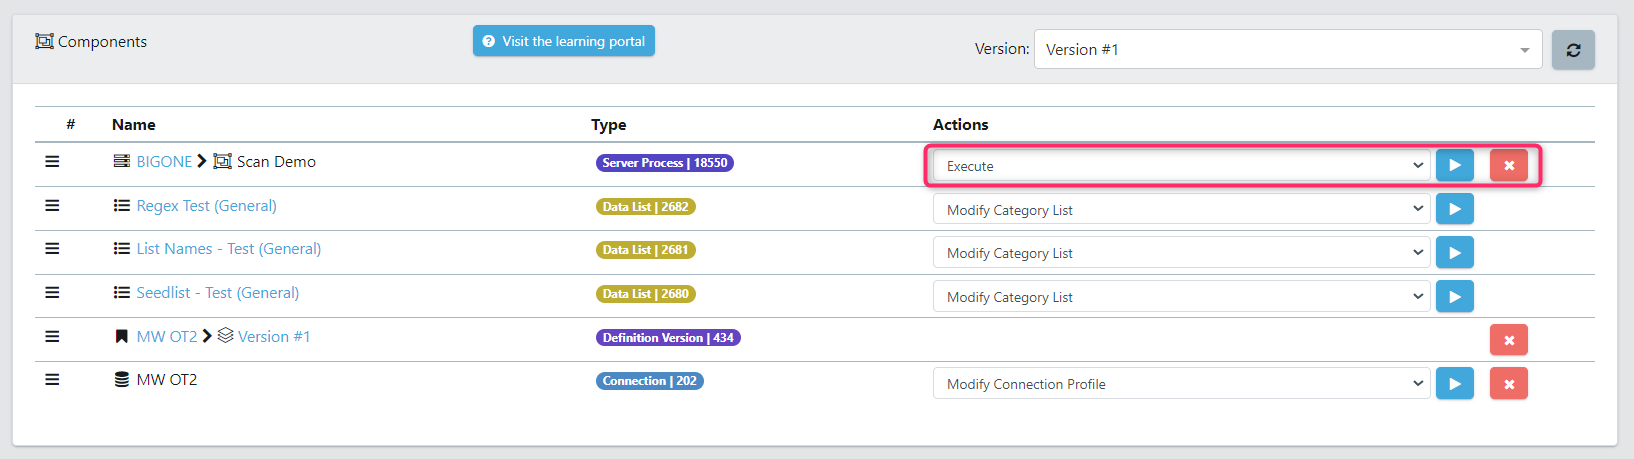
Step 8 – Scan Database
Now we can execute our scanning job. From the top component, choose Execute as the Action, and press the play button.
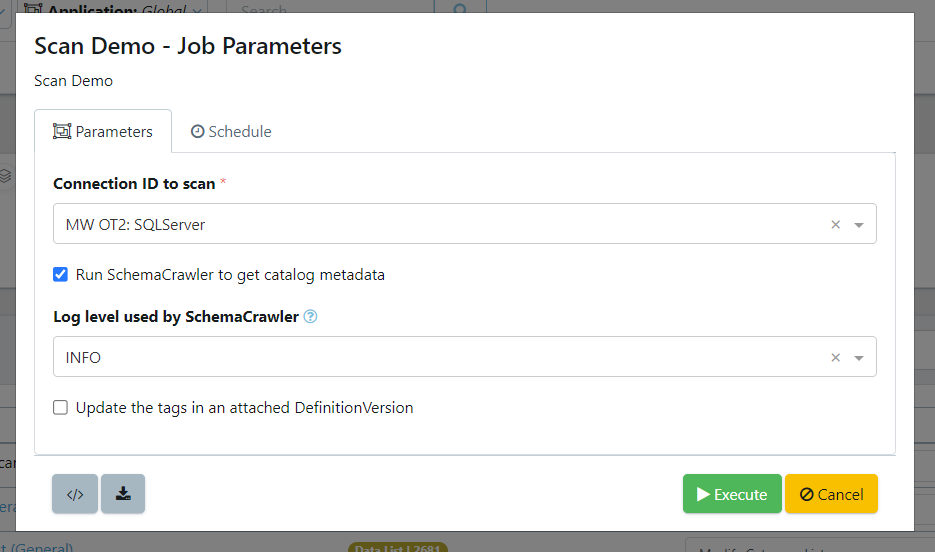
A form will appear to input our job details:
- Connection ID to scan: this defaults to the connection ID for a database connection attached to the activity.
- Run SchemaCrawler to get catalog metadata: If schema changes exist in the database since the last scan was performed, toggle this option to on. A new scan of the database schema will be performed. Update the tags in an attached Definition Version: This will create the scanned tags in the definition version. Otherwise, the scan results will only appear in the generated report.
- Update the tags in an attached Definition Version: This will create the scanned tags in the definition version. Otherwise, the scan results will only appear in the generated report.
Step 9 – Review the Results
Upon a successful scan you will see the data activity populated with several attachments. You can also download the job result zip file, and access each of the reports manually.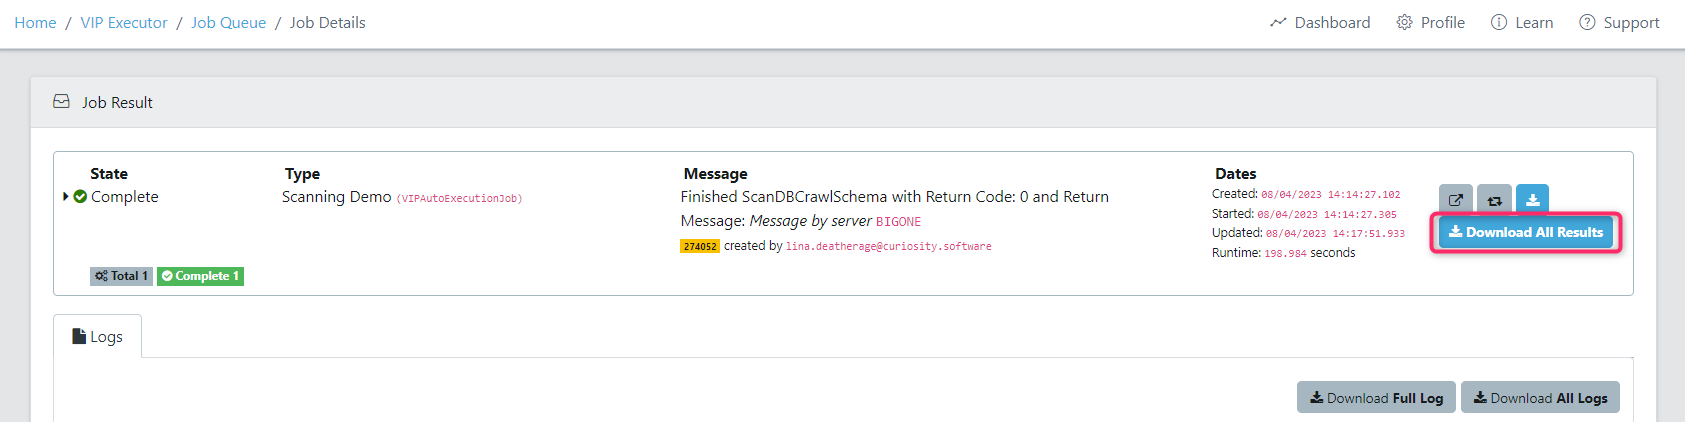
Within the downloaded archive we'll see the following files available.
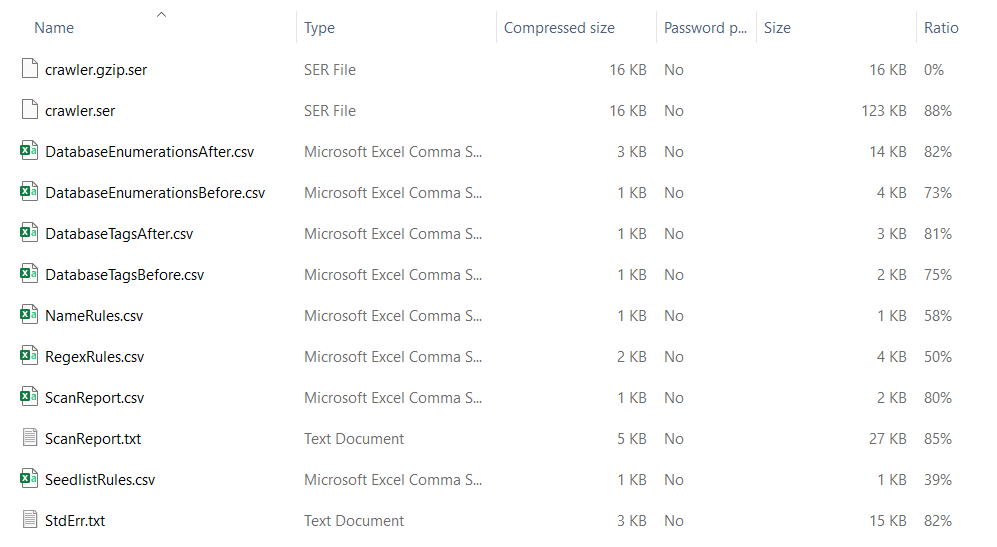
These reports will show the rules used during our scan for each of the selected Category Lists.
- NameRules.csv
- ScanReport.csv
- RegexRules.csv
Other Reports:
- Scanreport.txt contains a summary of the scan and where tags have been added. This report also shows enumerations, which check if there’s a limited number of values for a column (This could indicate that the column is a reference column rather than containing transactional data).
- Database enumeration before and after
- Tags before and after
Example Reports:
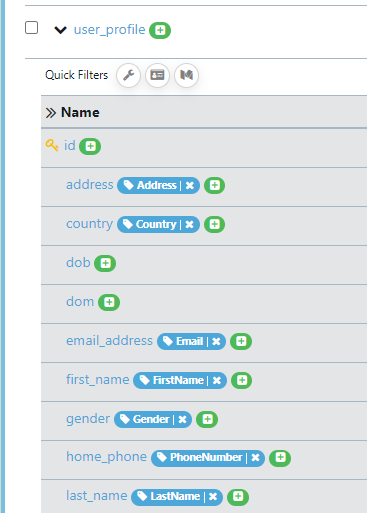
Below is an example scan for the OT database. Here we’ll see the database columns defined for each table, in each schema. The tag is displayed to highlight the categorised column from the defined scanning rules.
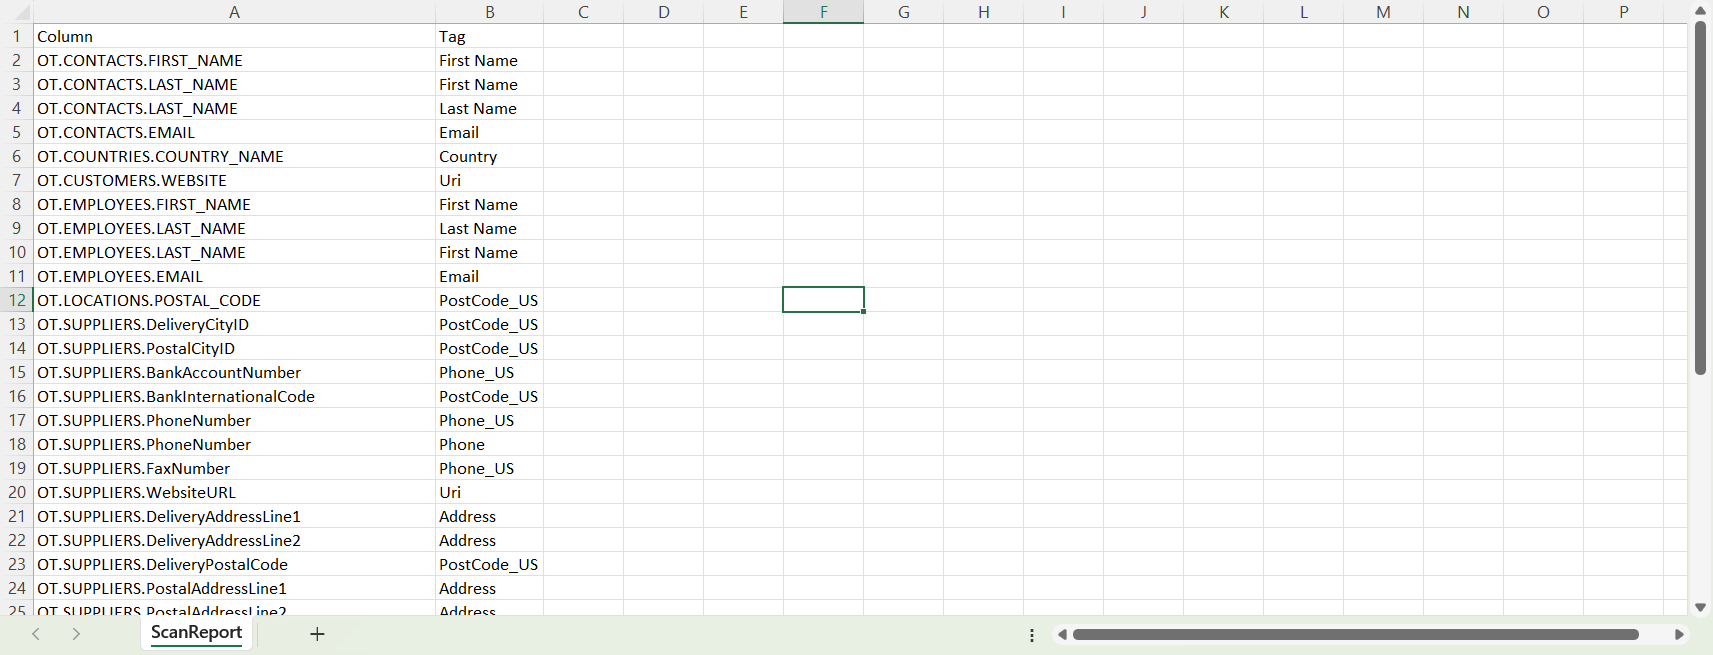
Along with the report you, if you selected to update the tags in the data definition you will also see the associated tags assigned to each column.