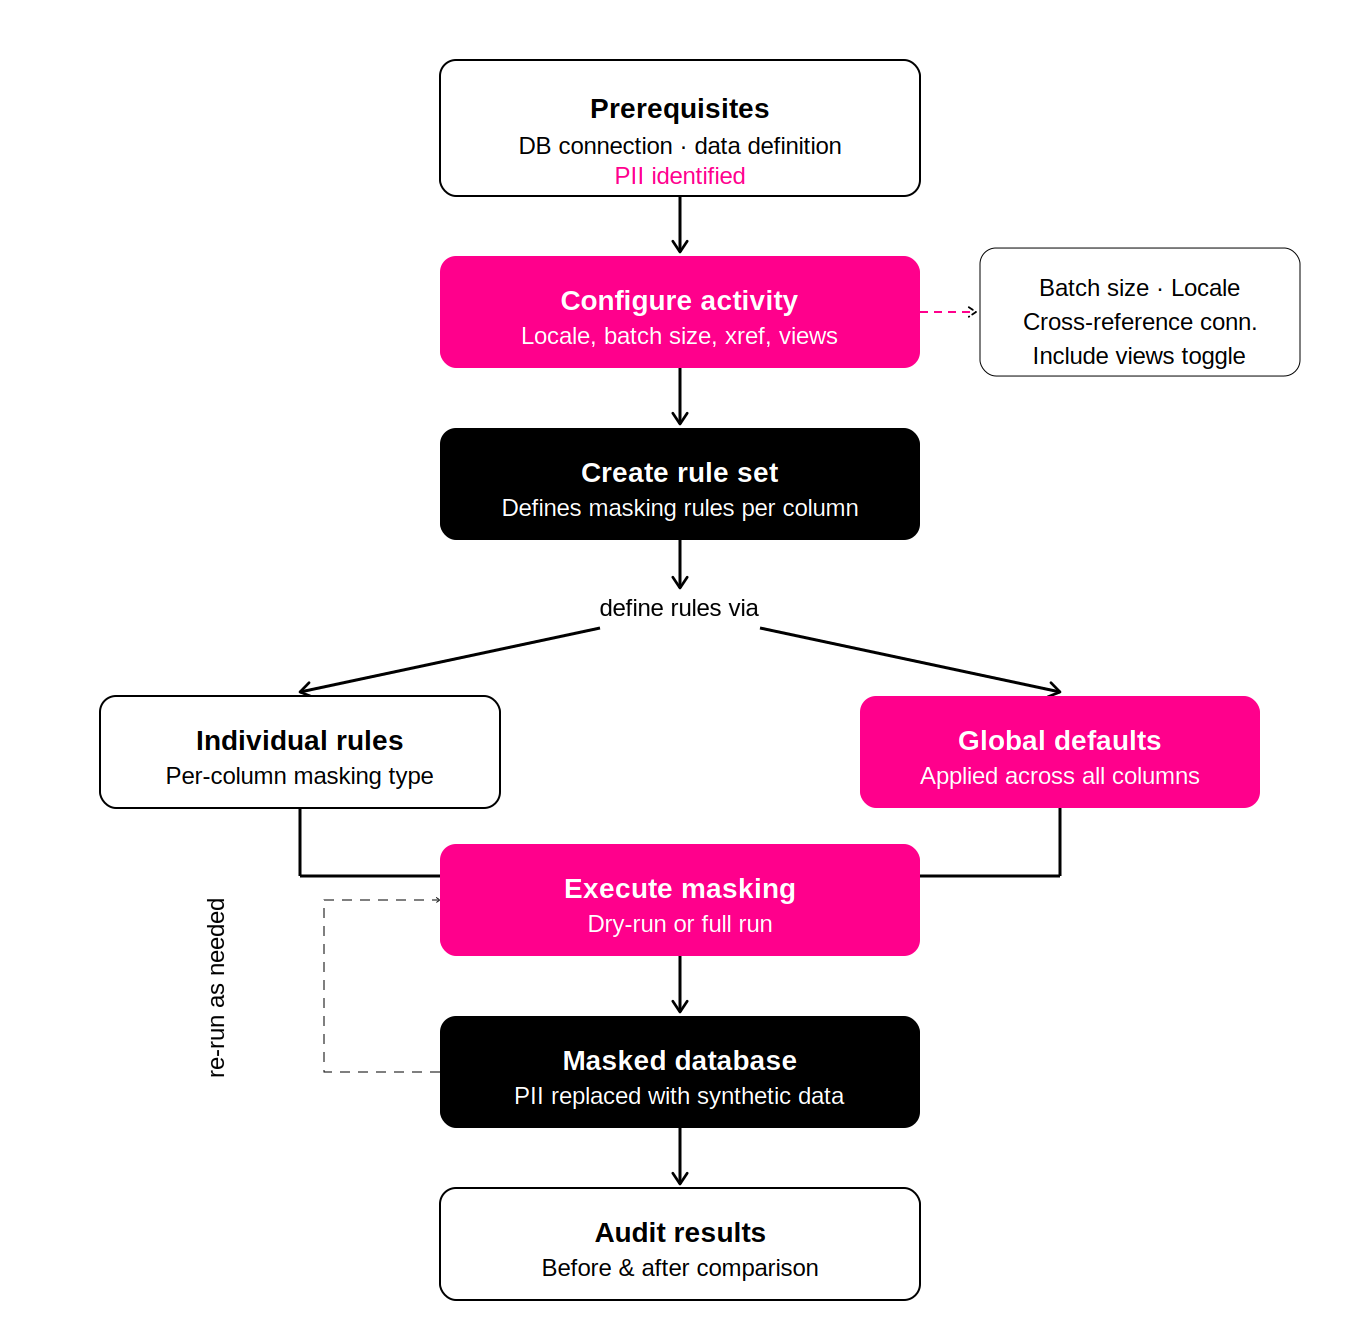
This page shows the Test Automation Data Activity for Database Masking, a technique to to desensitise data. In this tutorial, you'll learn how to set-up and configure the Database Masking activity.
About
Data masking involves replacing sensitive information in databases with fabricated, yet realistic data, thereby protecting the actual data while still enabling the use of the database system for various tasks such as software testing, development, user training, or data analysis. This ensures sensitive data, including Personally Identifiable Information (PII) and commercially sensitive data, remains inaccessible to unauthorized users, minimizing the risk of data breaches especially during non-production activities where full security measures may not be implemented.
Additionally, database masking is crucial for regulatory compliance, as many industries are subject to regulations like HIPAA, PCI DSS, and GDPR that mandate the protection of sensitive customer data. Non-compliance can result in substantial fines and reputational damage, making database masking essential for businesses to meet these requirements and protect stakeholders.
Tutorial
Follow along with the video tutorial, or read the written tutorial below where each of the data masking steps is broken down and explained.
Prerequisites for Masking
For this data activity, you will need a:
Step 1 - Create Masking Data Activity
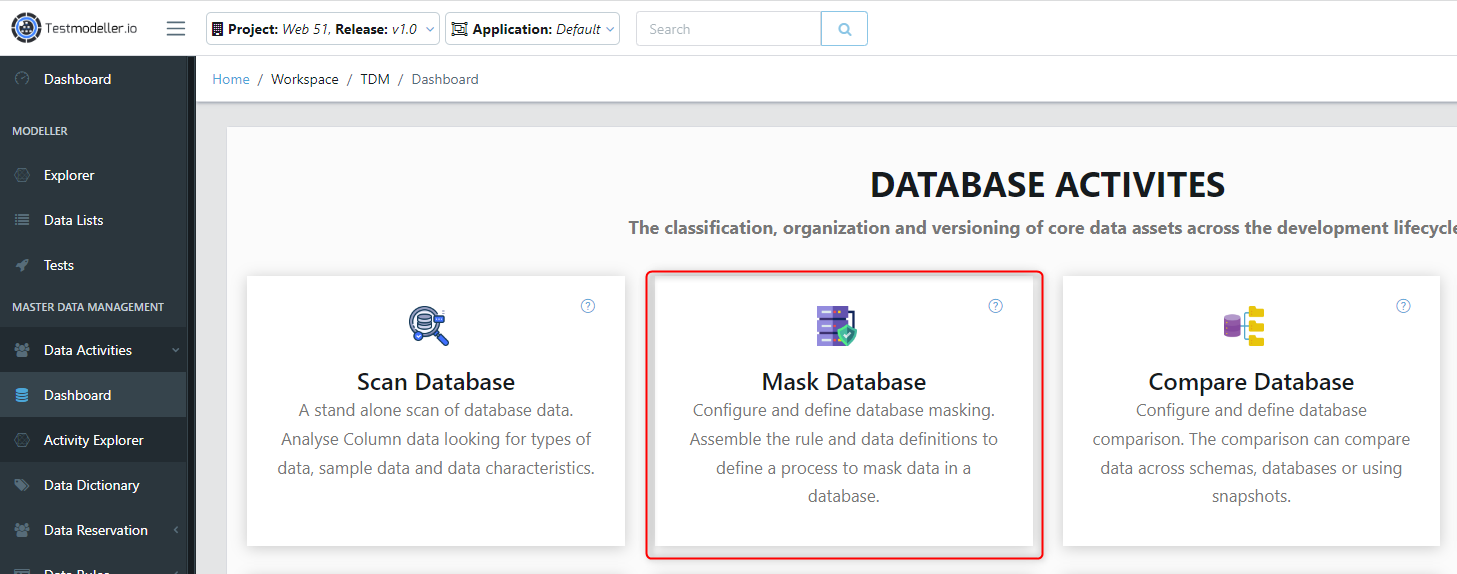
The first step to masking your data, is to create a new data masking activity. Firstly, navigate to the Data Activities dashboard, then select the 'Mask Database' activity.
This will launch the wizard for creating data activities. In this section, you are required to provide specific details about the activity, including a mandatory name and description. After filling out the necessary information, click on the 'Next' button to proceed.
After entering the activity details, you must select a location to save the data activity. Once you have chosen a location, click the 'Finish' button to complete the wizard.
.png)
A new data activity will appear, ready for configuration.
Step 2 - Masking Configuration
When a Masking data activity is created, a default configuration will be set. These specify different settings within the data activity. You will want to edit these default configurations to suit your needs. To do this, click the edit button in the top right hand corner.
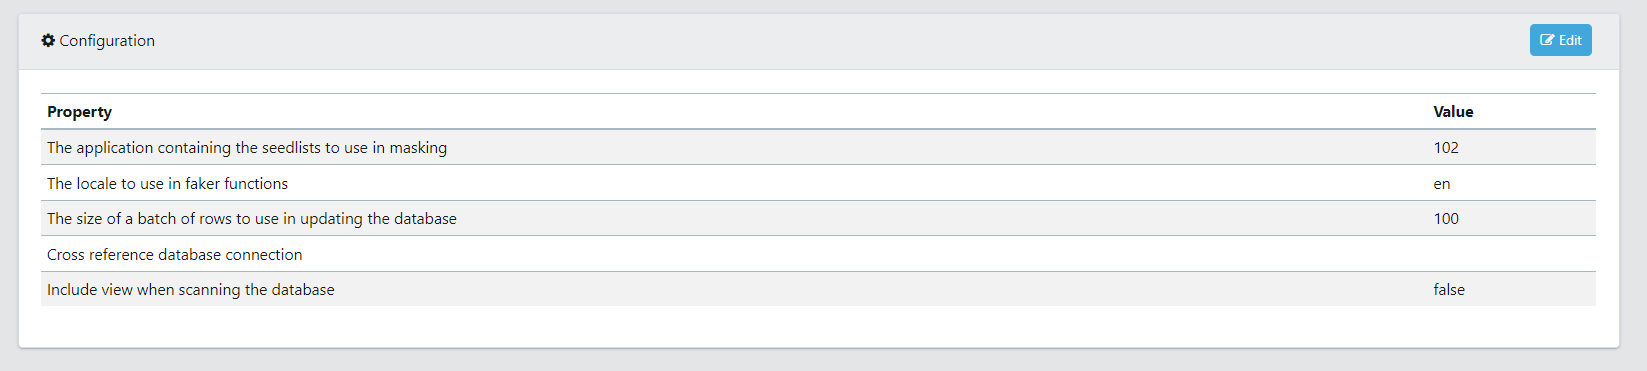
- Masking list application ID: If you’re using a seed list, you will need to choose the application that contains those seed lists.
- Locale: For some functions the locale will change the result, e.g. addresses. By default, it will be in English.
- Batch size: Enter the size of a batch of rows to use in updating the database
- Xref connection ID: If you would like to cross reference, choose the database connection you’ll be cross referencing against.
- Include Views: A view is the result set of a stored query, which can be queried in the same manner as a persistent database collection object. Toggle this to on if you would like to include views, otherwise it can be toggled off.
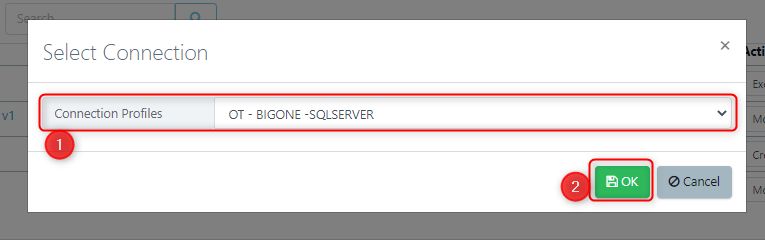
Step 3 - Attach Database Connection
Now we will attach our database connection that we want to mask. Under Add Components, choose the Attach Default Database Connection component.
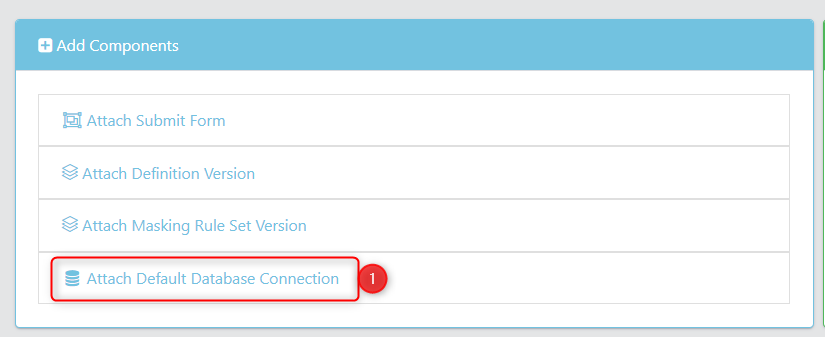
This will bring up a screen to select your Database Connection.
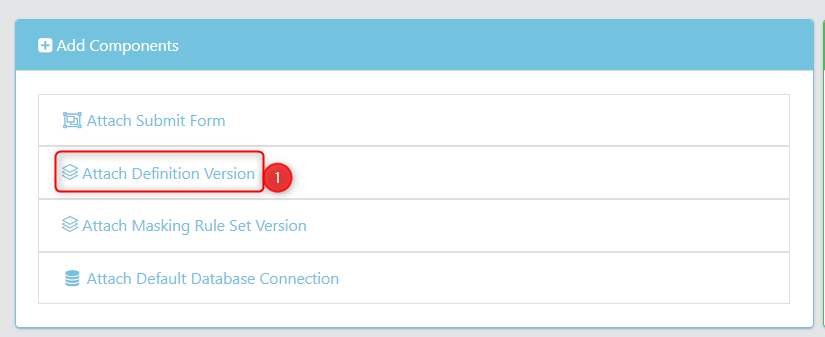
Step 4 - Attach Database Definition
Next, attach the definition version to mask. Under Add Components, choose the Attach Definition Version component.
Note: The definitions and versions must associated with the database connection we configured in the previous step. Definitions that are created from other database connections will not execute.
Step 5 - Create a New Rule Set
A rule set is utilized to determine the appropriate masking rules to be applied to each column in every table of the database. Masking rules define the functions that will substitute values and, in the end, obscure the data.
Now that we have our Database Connection and Definition Version chosen, we can create a new Rule Set. This Rule Set will be driving our masking rules.
In your newly created component for the definition version, choose “Create New Rule Set” from the actions dropdown list. Click the play button.
.png)
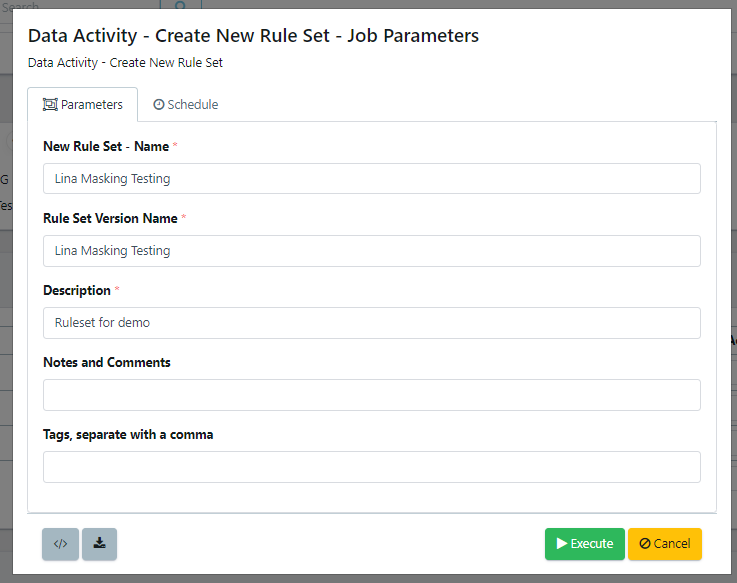
This will launch the dialog for creating a new rule set. In this section, you are required to provide a rule set name, version name, and description. After filling our the necessary information, click on the 'Execute' button to create the rule set.
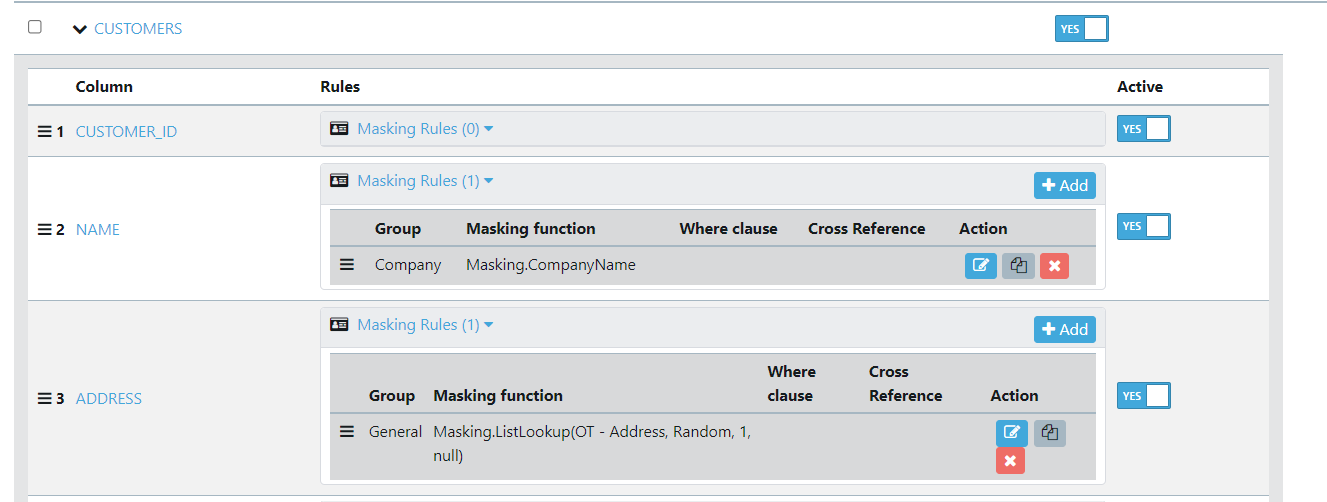
Step 6 - Customize the Rule Set
In this step, we’ll create the rules that will drive masking a database.
There are two ways to create rules:
- Use global defaults. These are rules that are defined globally. A global rule set is standalone and can be applied to any rule set to copy over the masking rules. This is a fast and powerful way to reuse masking rules between databases.
- Add individual masking rules onto each column. This allows you to specify a masking rule for each individual column.
To edit a rule set, select the “Modify” action for your newly created rule set, then click the play button.
.png) Individual Masking Rules
Individual Masking Rules
To add a masking rule to an individual column, locate the column you want to apply a rule to and open the Masking Rules dropdown. This will show any rules that are already in place. To create a new rule, click the Add button.
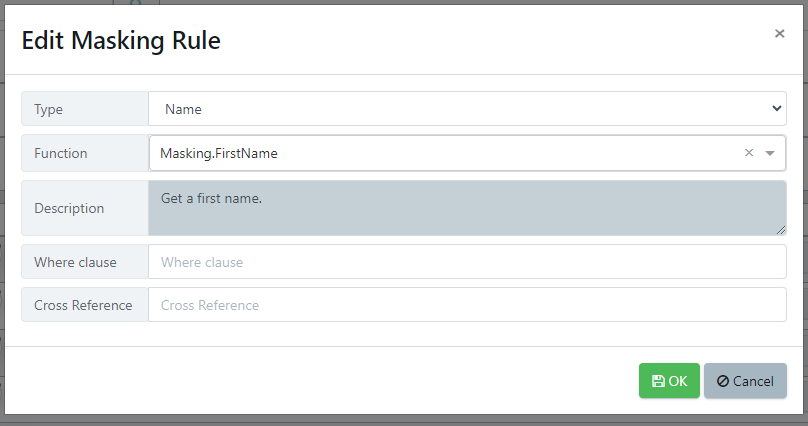
This will open a screen with the following fields:
- Type: This is the type of masking rule we want to apply. TDA has many different types of rules built in (e.g. address). To reference a list, select General.
- Function: This is the specific masking rule we would use. These are dependent on the type of masking rule chosen above.
- Where clause: This allows you to apply a where clause statement to your rule.
- Cross reference: This allows you to enter a database name to cross reference.
Depending on the type and function you’ve chosen, you may see a drop down with parameters.
Let's look at a simple example which applies a masking rule to replace the Name column with a random first name, by using the Masking.FirstName data generation function.
Another example below uses a List lookup, to lookup data from a seedlist.
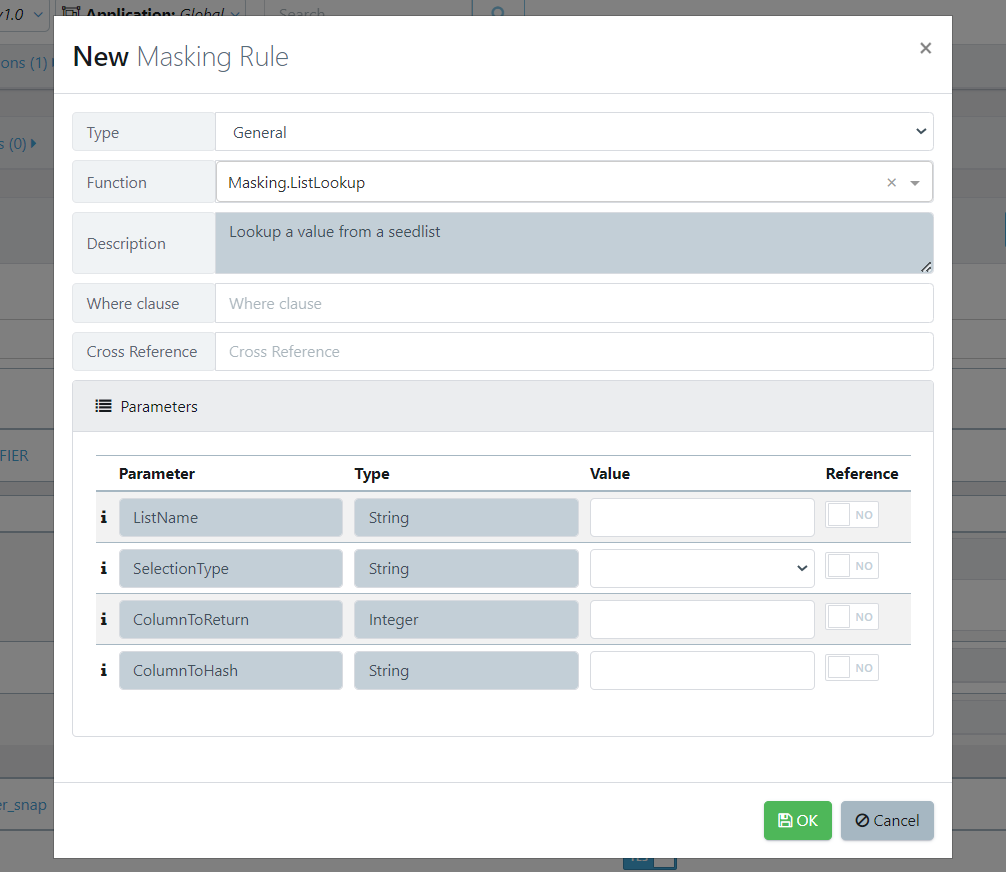
- ListName: This refers to the name of the seedlist you want to use.
- SelectionTypes: This allows you to chose the way in which values from the seed list will be chosen.
- For a given column, Random selects a row from the database at random
- For a given column, Sequential will go down each of the roles sequentially and start from the beginning again once exhausted.
- Hashing is the process of transforming any given key or a string of characters into another value. Hashing will take a column value, hash it to provide a large number, then modify that number by the number of rows in the list to tell you which row to use. This provides the same column value, same hash algorithm and same rows in the list to provide the same result wherever the hashing is run.
- ColumnToReturn: This is the column index in the list to use. This defaults to 1, but you can have a multi-column list.
- ColumnToHash: This is the column to hash if you use hashing to select the row. This defaults to the column being masked.
Creating Global Defaults
Global defaults refer to universal masking rules that can be integrated into any masking rule set. This enables the creation of universal rules that can be implemented collectively across various rule sets. This feature is particularly beneficial when masking multiple databases.
To view the global defaults in your space, navigate to Master Data Management → Configuration → Defaults. This page will tell you whether a tag is applicable to use for global defaults in synthetic data generation, masking, or both.
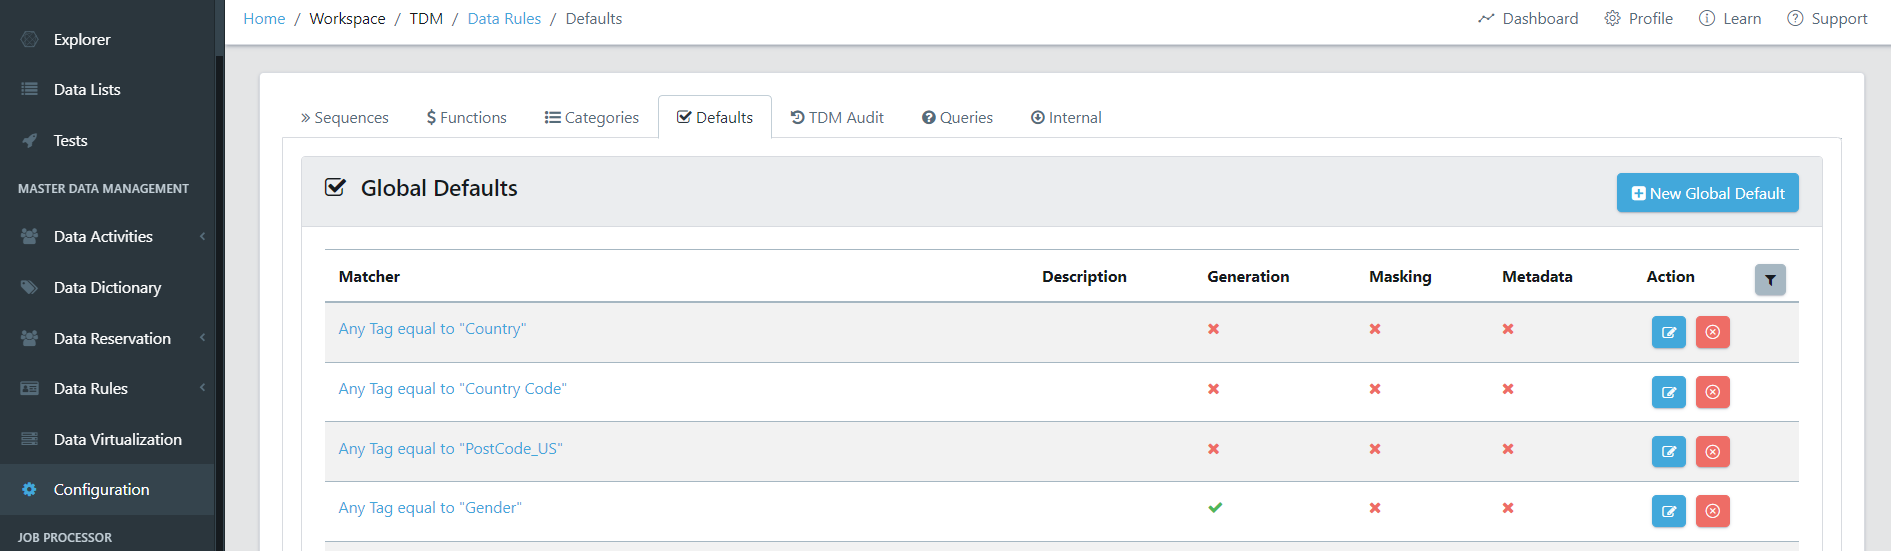
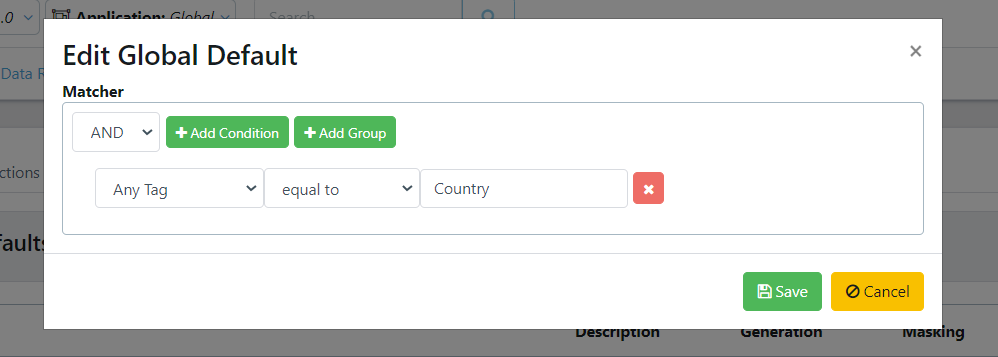
To edit a global default, click the Edit button. This will allow you to configure your tags and values.
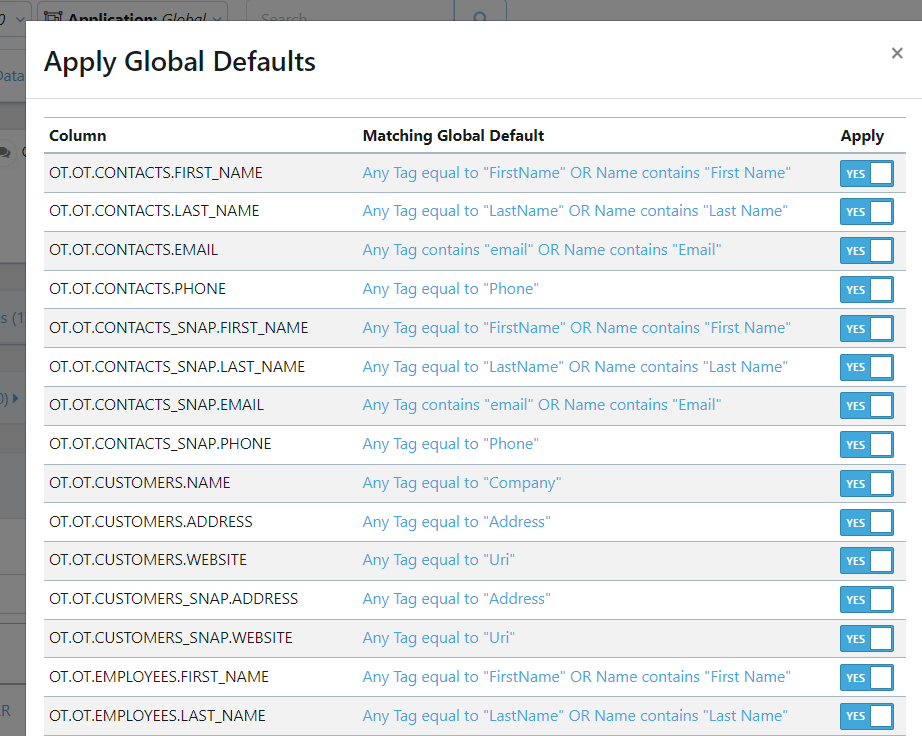
 To apply the global defaults to your masking Data Activity, click on the Re-apply global defaults button.
.png)
This will bring up a screen that shows which columns in your database will be affected by a global masking rule. It provides the option to apply the rule. Click Apply once you’re finished to apply the rules.
Step 7 - Create Masking Submit Form
A submit form is a reusable form which can be embedded into the self-service portal for future use. Whenever any user wants to perform the defined masking activity, they can do so using the created form.
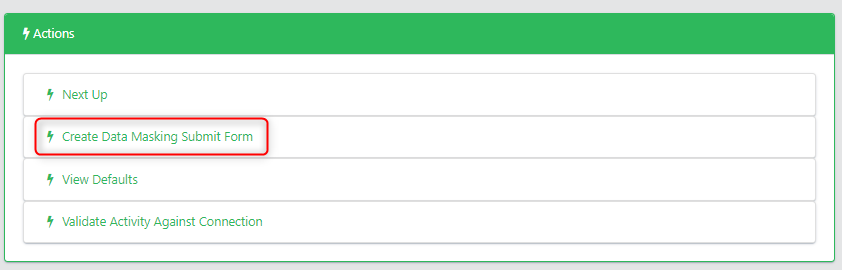
From Actions, choose “Create Data Masking Submit Form”.
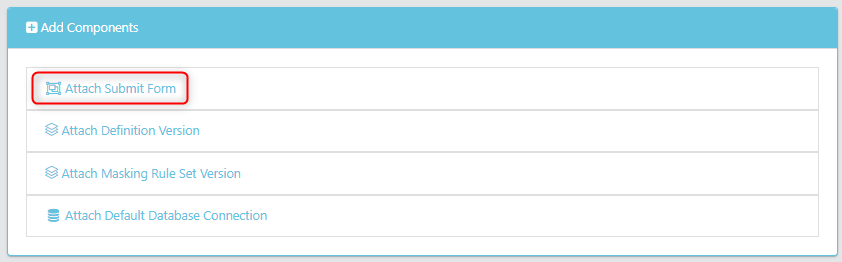
 To use a form which has been created previously, choose from Add Components “Attach Submit Form”.
Step 8 - Mask Database
Now we can execute our masking job. From the top component, choose Execute as the Action, and press the play button.
.png) A form will appear to input our job details.
A form will appear to input our job details.

- Select the Database Connection ID to mask.
- Selecting Create audit reports will create excels which can be downloaded at the completion of a job. This will show the changes made to the database.
- This will contain the data you are masking, so this is recommended only under special circumstances.
- The number of batches to audit: Enter the size of a batch of rows to use in updating the database
- Validate masking rules but don’t update the database will check if your rules are working as intended without altering your database.
Your Job will now run, and if the audit reports option was selected, provide a zip file to download.
.png)
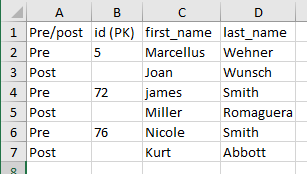
The database will be masked with the rulesets specified applied. If you have enabled auditing you will see an AuditResults.xlsx file which contains the pre-masking and replaced post-masking values. Below is an example report where the first_name, and last_name column values have been replaced with synthetic values.