Introduction
There are several axes available in XPath that help to locate elements in a webpage.
Axes define the relationship between nodes and allow us to select nodes based on their position relative to other nodes. This technique is useful when elements share similar names or characteristics, and we need to be more specific with our Xpath.
The diagram below shows the relationships between nodes.
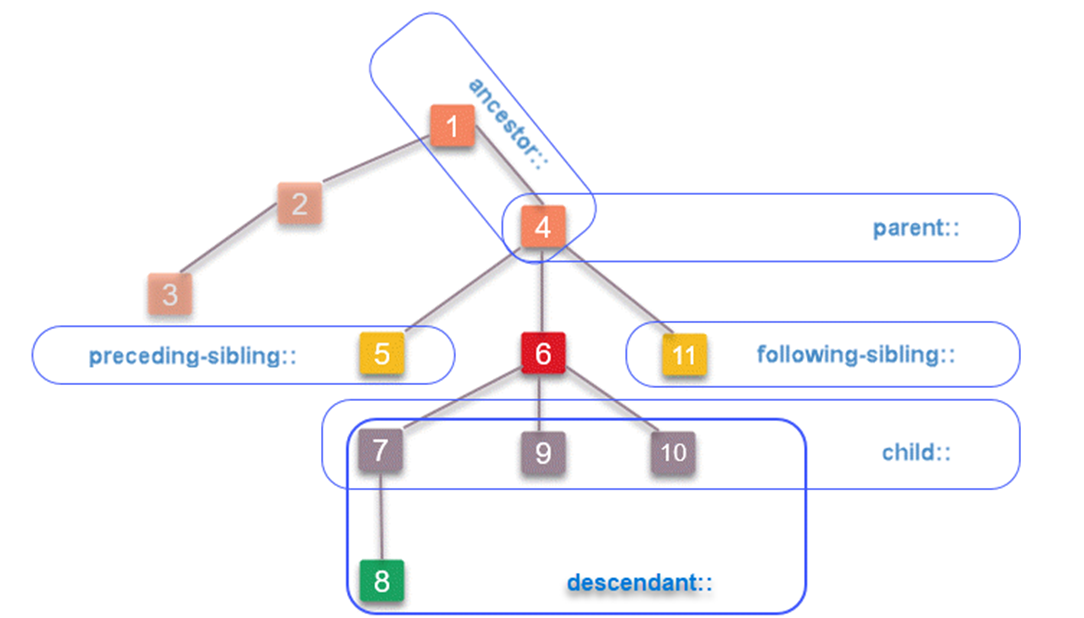

We can reference these relationships to make our Xpath choose a unique identifier.
The table below is a reference of commonly used axes in Xpaths:
| Ancestor | Selects all ancestors of the current node. |
| Descendant | Selects all descendants of the current node. |
| Parent | Selects the parent of the current node. |
| Child | Selects the children of the current node. |
| Following-sibling | Selects all siblings that come after the current node. |
| Preceding-sibling | Selects all siblings that come before the current node. |
The syntax for axes is / followed by the type of axis, then :: followed by the tag name. Here is an example using the parent axis:
/parent::tagNameA full Xpath using axes looks like this:
//div[@class='parent']/child::spanAs axes are a way to travel within an HTML document, there are some axes that require you to start from a specific node (such as preceding). The node you start on for these queries are called a context node.
Pre-requisites
We will be using http://xpather.com/ for the exercises in the practice section. This site enables you to query XML/HTML documents with your browser in real time.
Practice
Let's practice writing Xpaths manually using axes. Copy the code below and paste it into the left hand side of xpather.
<!DOCTYPE html>
<html>
<body>
<div class="Books">
<h2>Books</h2>
	<div class="Fiction">
		<h3 align="left">Fiction</h3>
		<div class="Science Fiction">
		<h4>Science Fiction</h4>
		</div>
		<div class="Fantasy">
		<h4>Fantasy</h4>
			<div class="Lewis">
				<h5>C.S.Lewis</h5>
			</div>
			<div class="Tolkien">
				<h5>J.R.R. Tolkien</h5>
					<div class="The Lord of the Rings">
						<h6>The Lord of the Rings</h6>
					</div>
					<div class="The Hobbit">
						<h6>The Hobbit</h6>
					</div>
			</div>
		</div>
	</div>
</div>
</body>
</html>
You'll type your xpath in the search bar, and the results will be shown on the right hand pane.
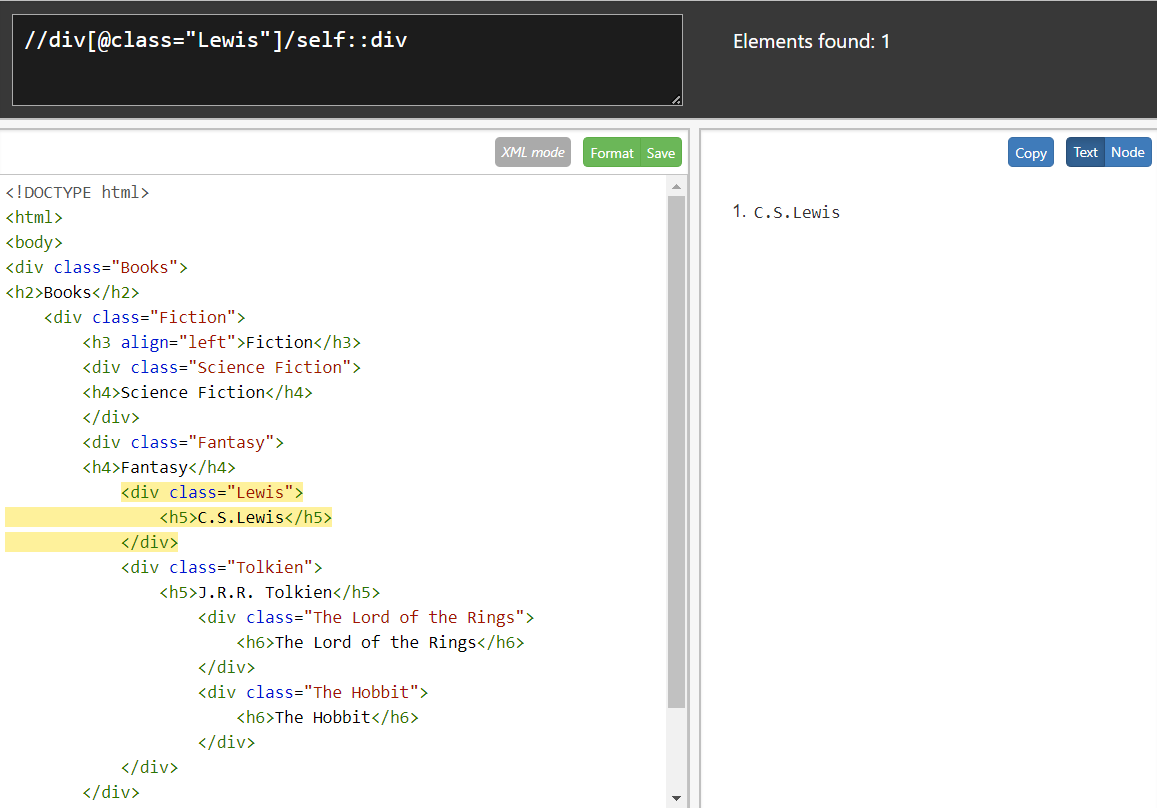
Exercise 1 - Self
Let's write a Xpath for the context node "C.S. Lewis". The self axis will always only find one node that represents the context node, so this is useful for creating unique identifiers.
We'll start by writing the path for the class that C.S. Lewis is in, which is "Lewis". The tag that contains the Lewis element is a div, so we will start our xpath with //div. Then, we have our attribute Class with the value "Lewis".
//div[@class="Lewis"]Now we'll add the axis for the self. The class Lewis is a div, so we will add that as the tag.
//div[@class="Lewis"]/self::divTry writing the Xpath in xpather to see the results.
Answer:
The C.S. Lewis element is chosen.
Exercise 2 - Child Axis
Let's write a Xpath for the node that contains "The Hobbit".
The tag that contains the The Hobbit element is a div. Next, we have our attribute Class with the value "Tolkien". Then, we want to look for the child elements of the Tolkien element, so we will end the xpath with /child::div.
//div[@class="Tolkien"]/child::divType in your Xpath into xpather to see the results highlighted:
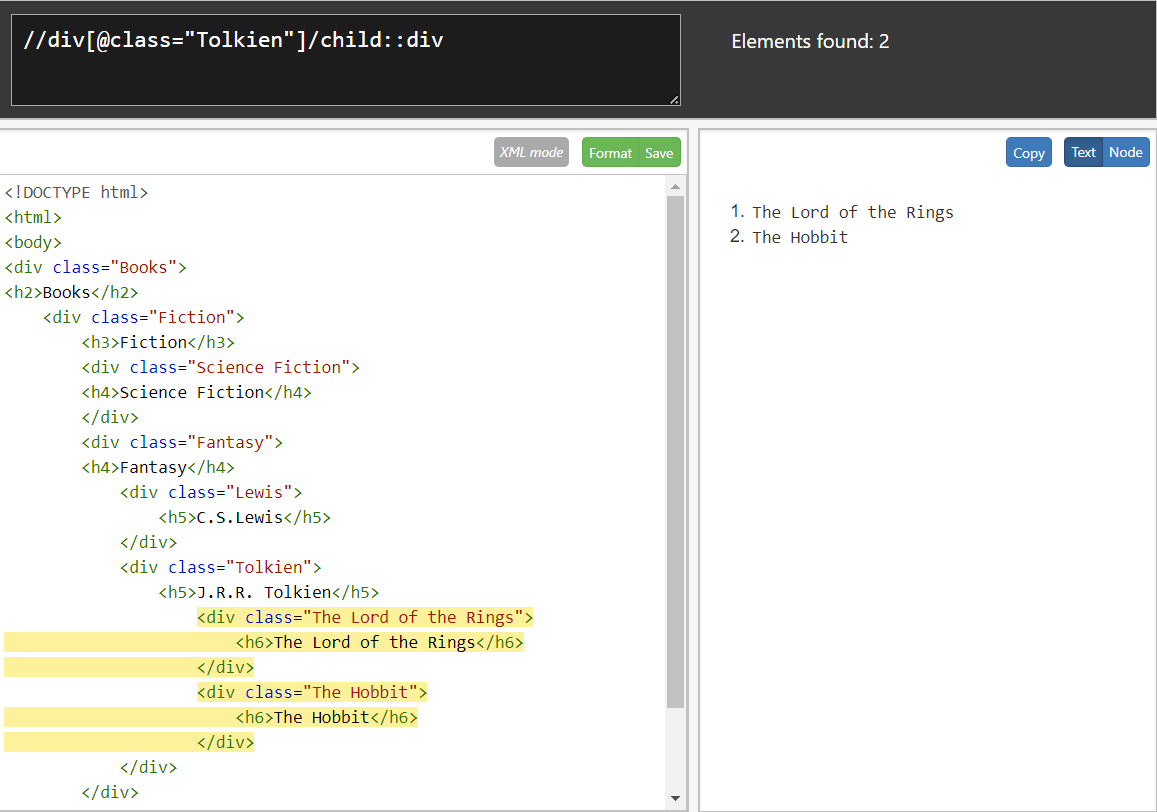
Now we have both "The Lord of the Rings" and "The Hobbit" selected. We need to add another attribute to the end of our current Xpath in order to just select the The Hobbit. Try this for yourself and check your answer below.
Answer:
//div[@class="Tolkien"]/child::div[@class="The Hobbit"]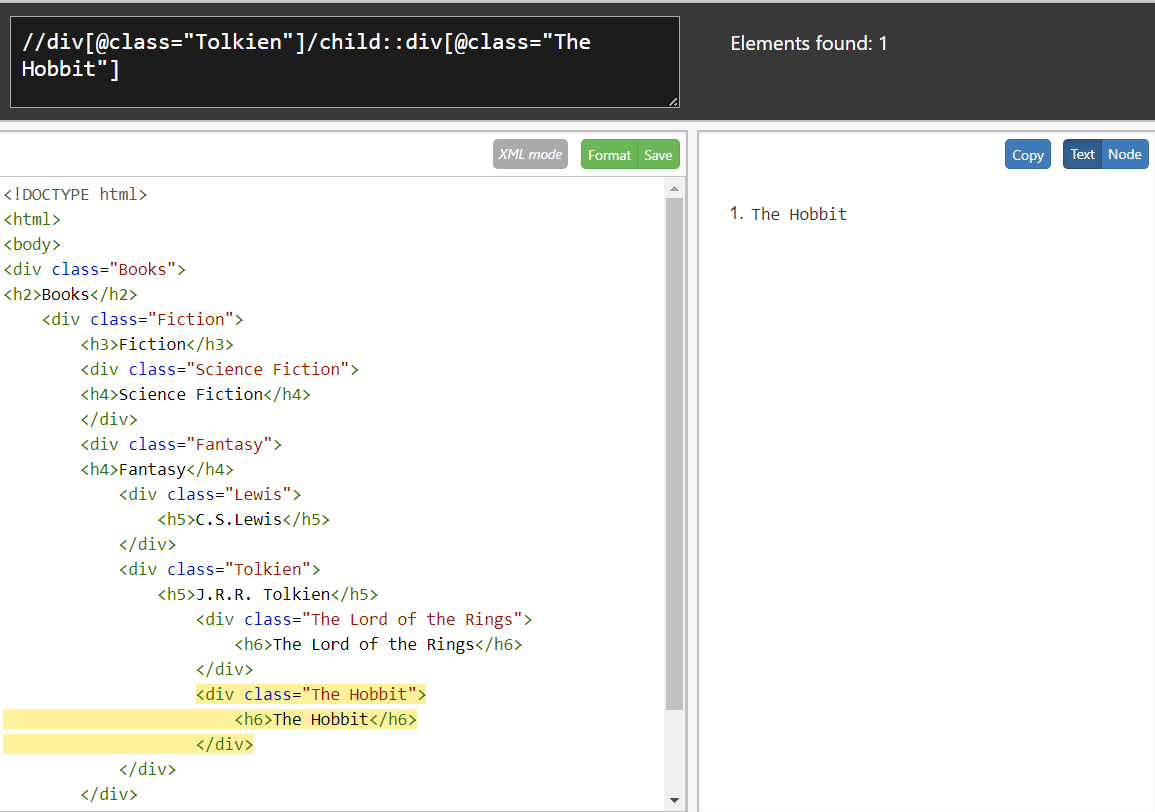
Exercise 3 - Preceding Axis
Finally, let's look for the class "Science Fiction" while starting from the context node "The Hobbit".
We'll start by writing an Xpath for our context node:
//div[@class="The Hobbit"]Then, we'll add the preceding axis at the end: /preceding::div.
//div[@class="The Hobbit"]/preceding::divThis will show all the nodes that precede our context node.
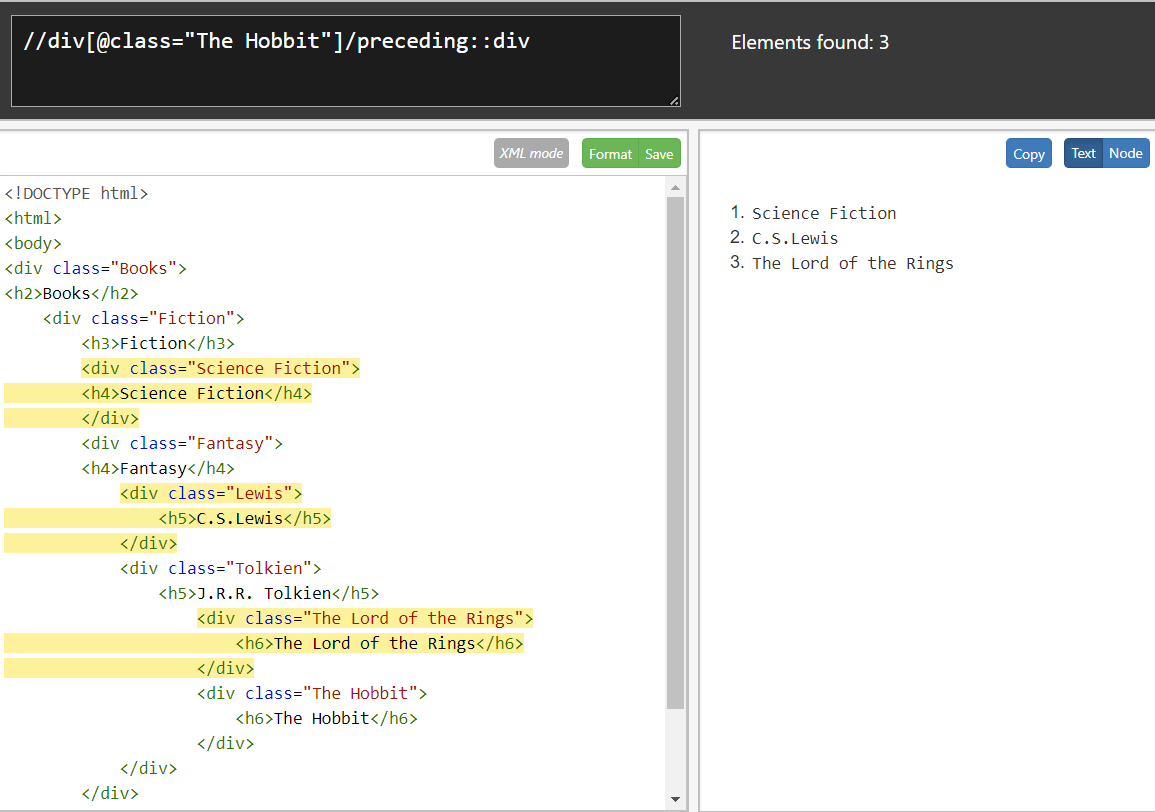
You'll notice that the classes "Tolkien" and "Fantasy" are not selected. This is because the preceding relationship takes only adjacent nodes into consideration - in other words, "Lewis" is selected because it's next to the actual parent node "Tolkien".
Now, we'll want to select the "Science Fiction" node by index. Indexes work from the bottom up, in sequential order. In our example, the indexes for our current Xpath are as below:
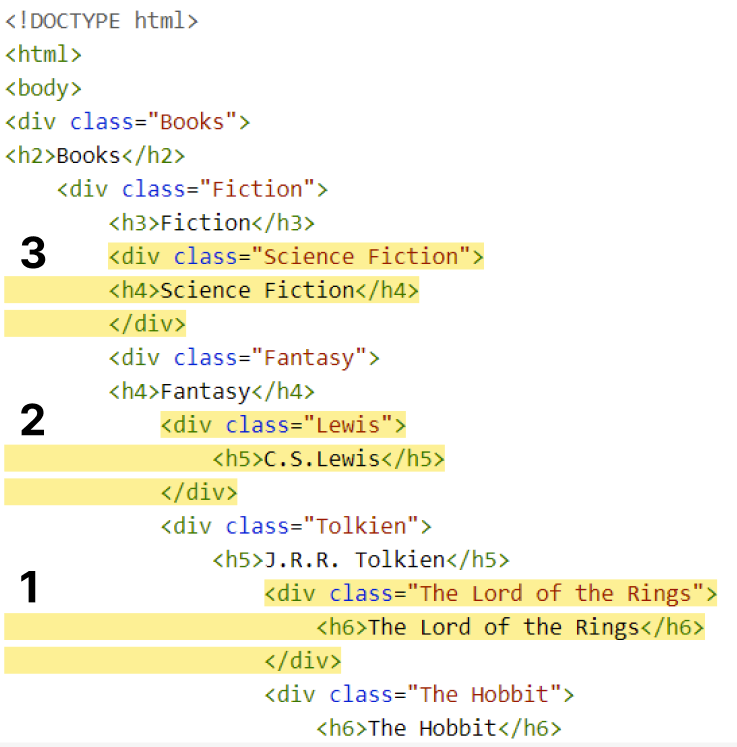
The syntax for writing the number of the index is [number]. If we wanted to select "The Lord of the Rings", we would write an Xpath like the below:
//div[@class="The Hobbit"]/preceding::div[1]How would you write the Xpath for "Science Fiction"?
Answer:
//div[@class="The Hobbit"]/preceding::div[3]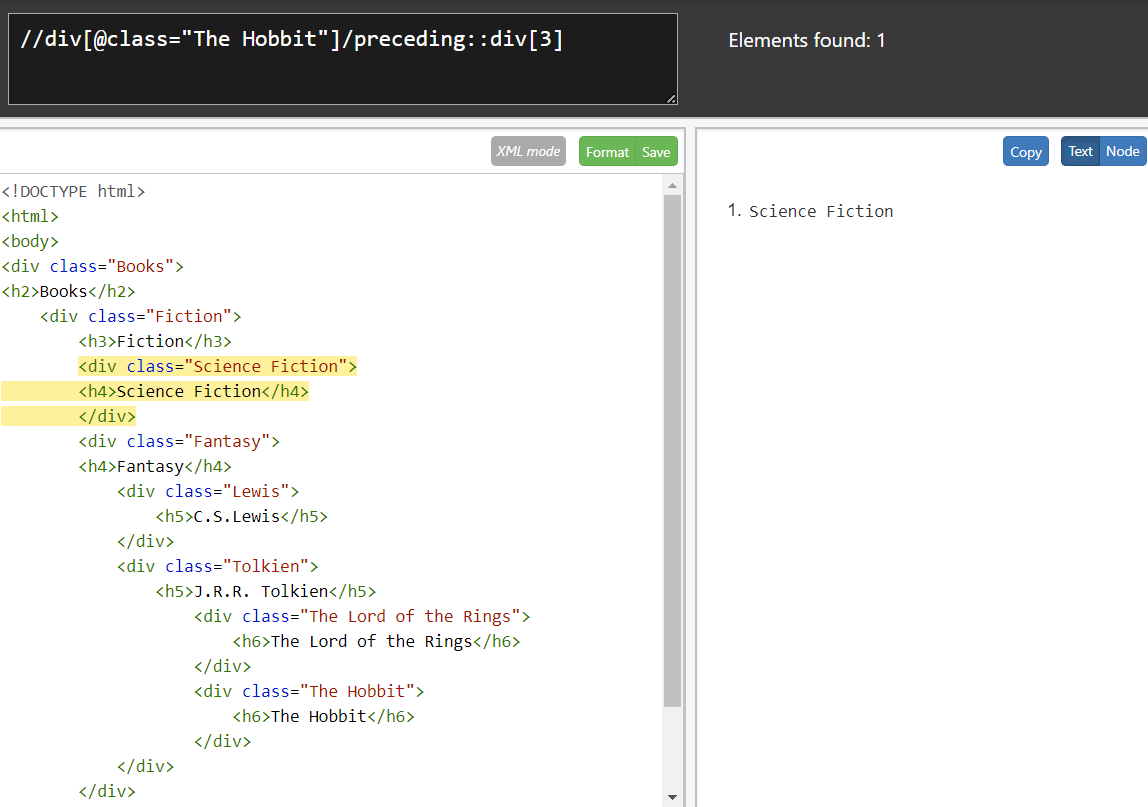
In the next article, we'll cover how to use functions in Xpath.
Additional Resources
Xpath Axes by Scientecheasy
Xpath Axes by Software Testing Help