In this article, we'll be exploring how to create custom modules in Quality Modeller for testing your API endpoints.
1. Create Module Collection
To get started, you need to create a new Module Collection in Quality Modeller. This will hold all of the API definitions and functions created. A best practise is to keep everything as componentised as possible, either by endpoint or business function.

Once clicking on creating a New Module Collection, the new module collection will appear. Select the appropriate framework, name, and description for your module.
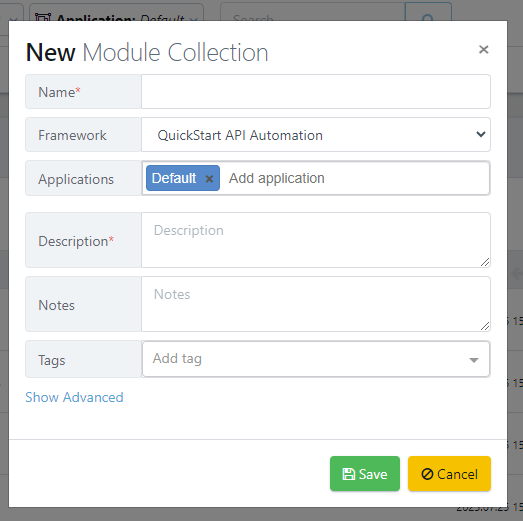
On clicking save, the module collection will be persisted.
2. Create Function
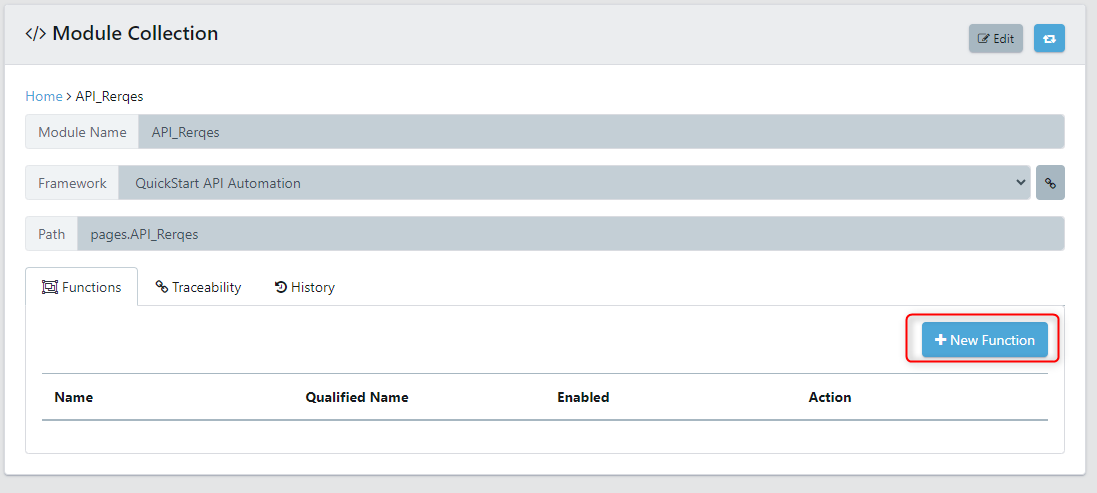
Next, open the module collection. Here you will be able to see the module collection details. We will create a new function to create a client to interact and call our API endpoint which we want to test.
2.1 Function Details
The new function dialog will appear. Firstly we need to define the details of the function that we are going to create. In this instance, we will give a name, qualified name which is the automation name (typically this must not contain special characters), and with the function type. We will be create an API Request function.
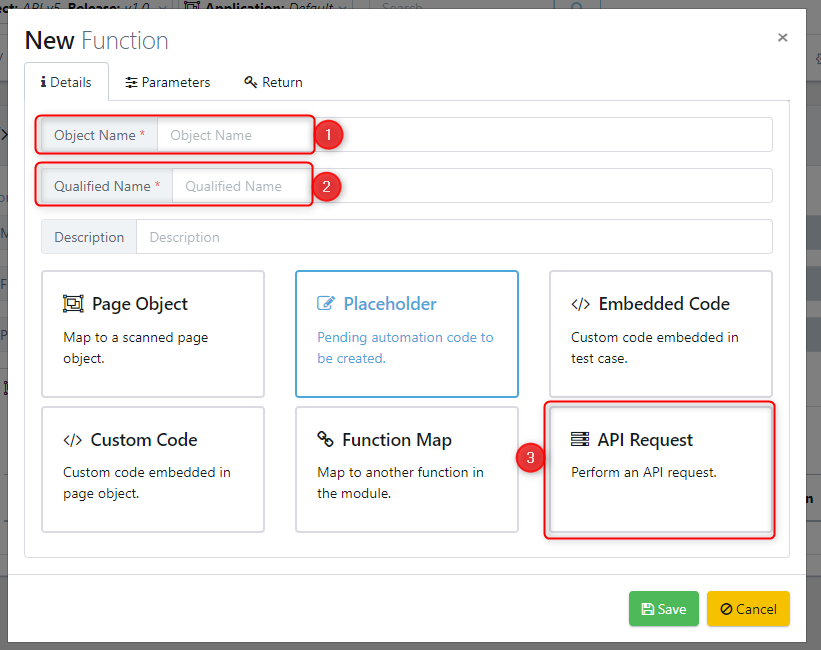
On clicking API Request, you will see the tabs available change,
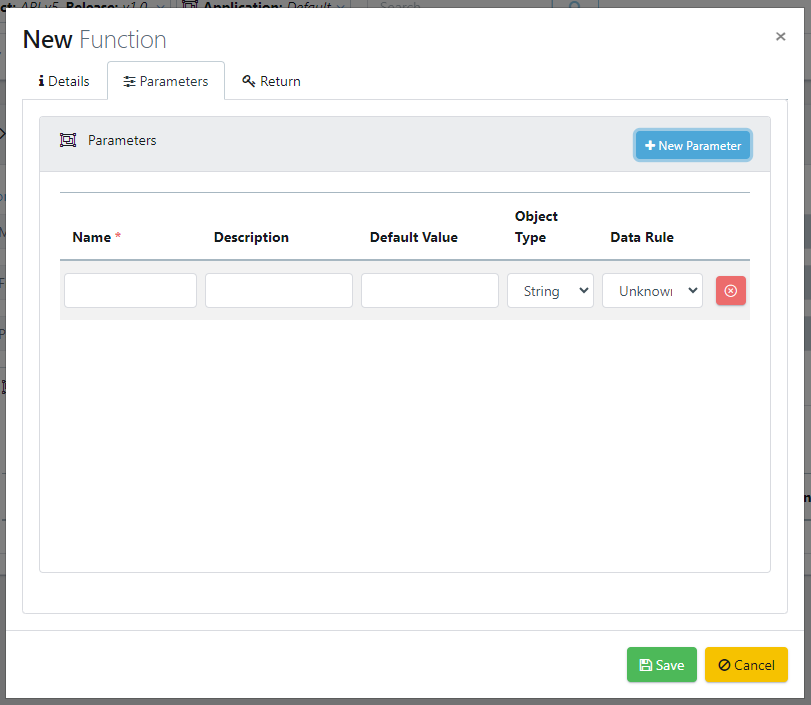
2.2 Function Parameters
Our product features a 'Function Parameters' tab, a crucial component for customizing API requests. Users can parametrize any API attribute - be it parameters, endpoints, headers, or JSON payloads. These parameters are dynamically replaced at run-time, enabling diverse testing scenarios. This feature, although commonly used for the mentioned attributes, offers broad flexibility for API testing, accommodating a wide array of API attributes.
To use the parameters capabilities, add a 'new parameter' and populate the associated fields. The name, description, default value, object type, and also a data rule if you want to select from apre-existing equivalence class.
2.3 API Request Definition
The API request tab encompasses all the necessary elements for shaping an API request. The initial parameters specify the nature of the API request to be carried out, be it GET, POST, PUT, DELETE, or others. Accompanying this is the endpoint URL, which dictates where the said request will be directed.

Underneath the definition, are a separate set of tabs which define the details of calling the API. We will now detail each of these.
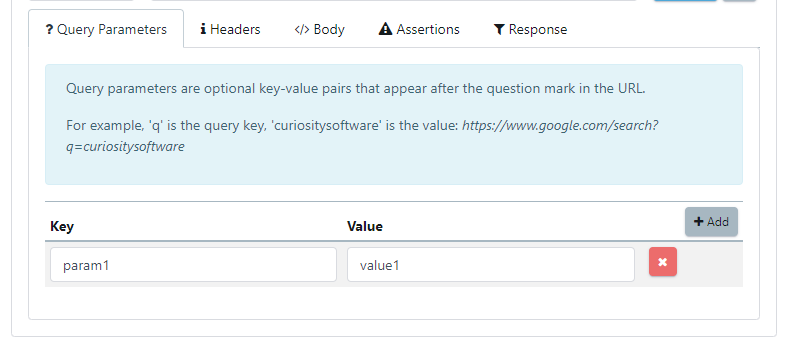
2.3.1 Query Parameters
Query parameters in an API are a type of parameter that is used to filter or sort the response data or to alter the behavior of the endpoint. They are included in the URL of the request, following a '?' symbol and are usually formatted as key-value pairs. For instance, if you were retrieving data from a database about employees, you might include a query parameter to only return employees in a certain department.
In our product, we provide a dedicated tab for specifying these query parameters for any given endpoint. This functionality allows you to tailor your request by defining key-value pairs. You can specify as many pairs as necessary, offering flexibility to refine your API request and control the returned data more effectively. This makes your API testing process more precise and efficient, as you can modify the request to suit a wide array of specific testing scenarios.
2.3.2 Headers
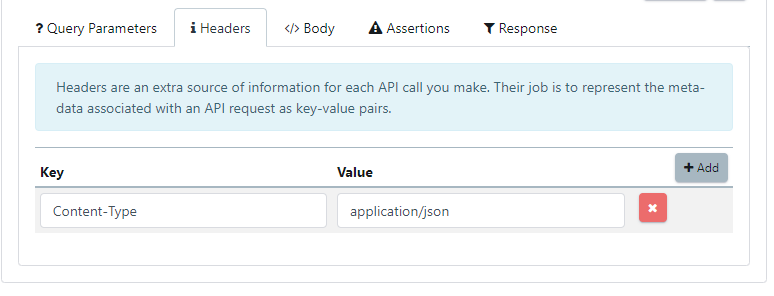
API headers are a type of HTTP message component used to convey additional information between the client and the server. They can be used to define the context of the request, specify how to process the request, or provide other information, such as authorization tokens or the type of content being sent.
Within our product, there's a designated tab for setting up these API headers. This feature allows you to input your desired key-value pairs to construct the headers according to your specific needs. Whether you're defining the content type, sending authentication tokens, or managing caching directives, you can easily customize your headers by entering as many key-value pairs as your scenario requires. This functionality provides an efficient way to test different headers and their impact on API responses, thereby facilitating a more comprehensive API testing process.
2.3.3 Payload Body
The payload body in an API request refers to the part of the transmitted data which is the actual intended message. It carries the specific information or the content that the API call is intended to send or retrieve from the server.
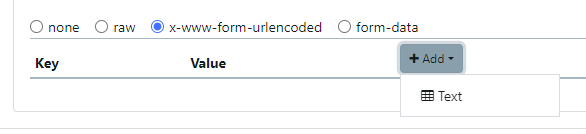
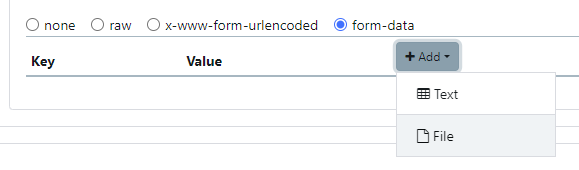
Our software includes a 'Payload Body' tab that provides various options for constructing the payload of your API request. These options include None, Raw, x-www-form-urlencoded, and form-data.
- None: This option is selected when there's no data to send in the body of the request.
- Raw: If you have a block of data that you want to send exactly as it is, without any encoding or formatting, you would use the Raw option. This is often used for sending JSON or XML data.
- x-www-form-urlencoded: This format sends the data as a query string, with keys and values separated by '=' and pairs separated by '&'. It's commonly used when the data being sent is simple and doesn't include any non-alphanumeric characters.
- form-data: This option is used for sending key-value pairs, and it is especially useful when you need to upload a file as it supports multipart/form-data, which allows the sending of large and binary data.
This tab allows you to customize the payload body as per your testing scenario, ensuring a comprehensive and tailored API testing experience.
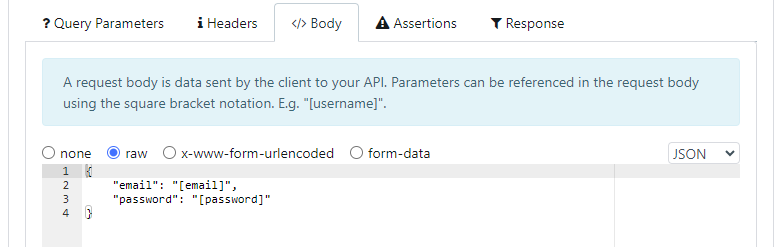
If the type is selected to raw, you can set the content type of the payload, either, text, JSON, XML, or custom. This automatically adjusts the 'Content-Type' header set in the Headers tab.

For x-www-form-urlencoded data you can add textual based key value pairs of each parameter to be sent.
For form-data you can specify both textual based parameters, along with file uploads.
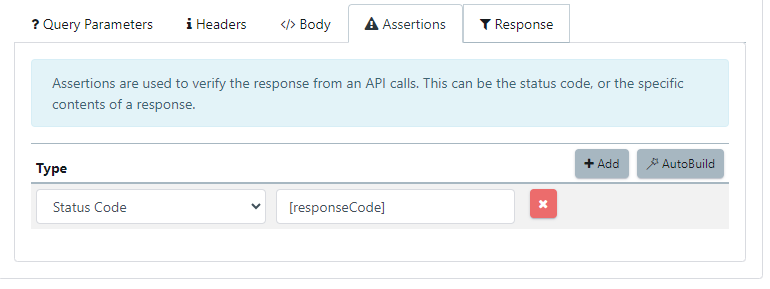
2.3.4 Assertions
The 'Assertions' tab in our software plays an instrumental role in validating the API responses. Assertions are essentially checks that ensure the response received aligns with the expected outcome.
Our software includes a wide array of pre-built assertions to cater to a diverse range of testing scenarios. These include:
- Text Contains: Checks if the response body includes a specified string.
- Status Code: Verifies the HTTP status code of the response.
- JSON Path Equals: Checks if a specific JSON object, identified by its path, has the expected value.
- Response Time: Verifies if the response time is within the expected range or below a specified threshold.
- Header Contains: Checks if a specific header exists within the response.
- Header Equals: Verifies if a particular header in the response matches a specified value.
- JSON Path Exists: Checks if a specified path exists within the JSON response.
- JSON Path Not Exists: Verifies that a specific path does not exist within the JSON response.
- JSON Validation: Validates the response's JSON structure and checks for data types, nested fields, and other JSON-specific characteristics.
- Custom Code: In addition to these, you can also insert custom code for creating tailored assertions based on your specific needs.
The 'AutoBuild' feature endeavours to auto-build the API assertions based on an example request, streamlining the process and providing an intuitive approach to validating API responses. This feature greatly reduces the time spent on manual creation of assertions, boosting efficiency, and enhancing the accuracy of your API testing process.
2.3.5 Response
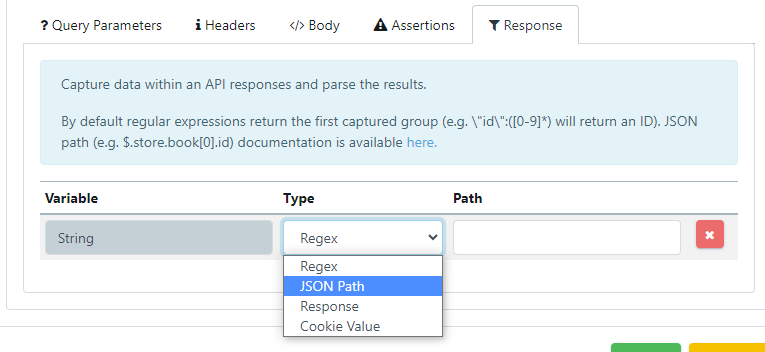
The 'Response' tab in our application is a crucial component that allows you to capture and use a response from the API returned by a function. This captured response can serve multiple purposes, such as feeding into the computational model or enabling chaining of subsequent API calls.
You can select from multiple methods to extract specific features or attributes from the response:
- Regex (Regular Expressions): This is a powerful tool for matching patterns within the text of the response. This can be used to extract specific pieces of data, regardless of their location in the response.
- JSON Path: This is particularly useful for parsing a JSON response object and extracting specific elements. By specifying the path to the desired data in the JSON structure, you can extract the exact piece of data you need.
- Cookie Value: This option allows you to extract specific cookie values from the API response. This can be particularly useful for scenarios where session information or other data is stored in cookies.
- Whole Response Object: If required, you can choose to return the entire response object. This gives you the flexibility to manually extract specific features or attributes from the response later, based on evolving requirements.
Our software provides a rich set of tools to help you make the most of the API response. The information extracted using these options can then be used in your model or chained into subsequent API calls, ensuring a high degree of flexibility and adaptability in managing API interactions.
2.4 Executing API Request
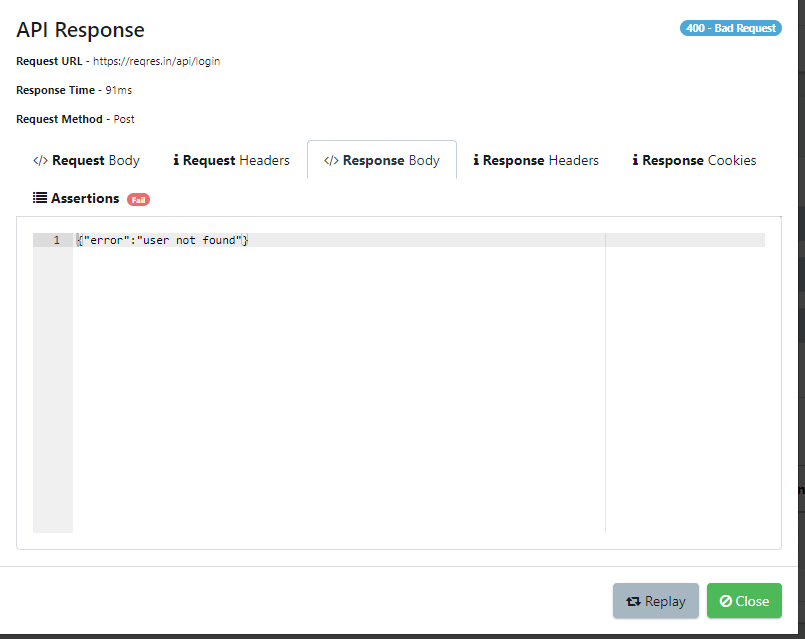
Our product features a 'Run' button, a straightforward yet vital tool for executing API requests. This button serves as a trigger to launch the request, allowing users to see the response directly within the browser interface. By removing the need for external tools or command-line interfaces, this makes the process of sending requests and receiving responses more efficient and user-friendly. The immediate feedback it provides is invaluable for testing and verifying configurations. Users can quickly confirm if their functions are correctly set up, assess the responsiveness of their APIs, and view the example responses they receive. This process not only aids in real-time debugging but also facilitates a deep understanding of how their API behaves under various scenarios. Overall, the 'Run' button equips users with the capability to interactively manage, validate, and refine their API configurations, fostering a more dynamic and productive testing environment.
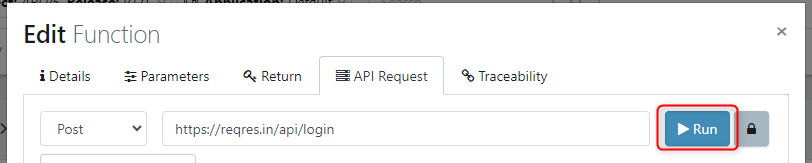
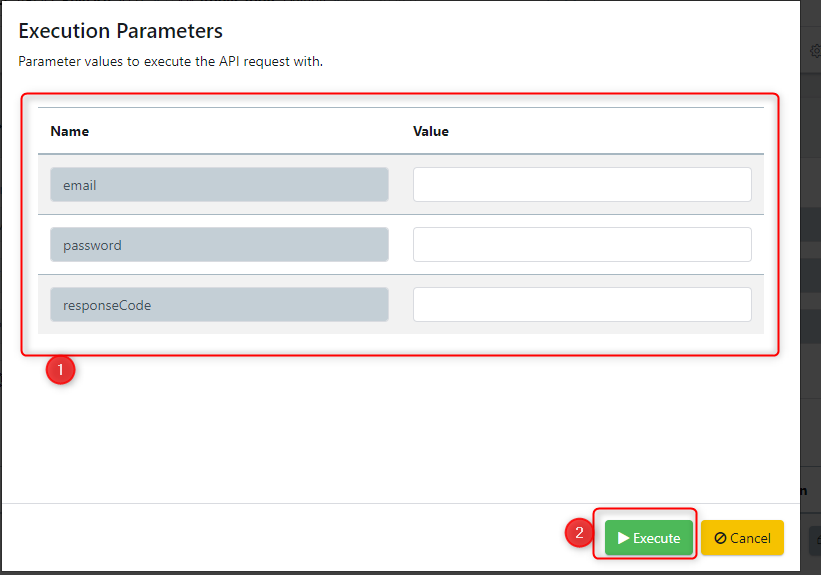
On clicking the run button, if any parameters are set the user is asked to provide values for them. Any default values will be set automatically.
An example response dialog is shown below. Here we can see the response time, method, response code, and JSON body returned.