In this article, we'll cover configuring the GitLab connector. Navigate to Workspace -> Connectors, add a new GitLab connector.
The configure connector dialogue has three tabs:
- Details: Where the connector type and name is set.
- Connection: The connection and configuration information for the connector.
- Traceability: Shows which Automation Frameworks in the workspace use this GitLab connector.
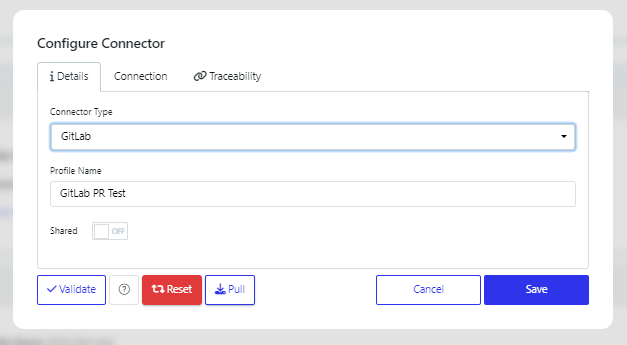
Select GitLab from the Connector Type dropdown and give this a recognisable Profile Name. Also choose if you would like this connector to be shared among all users in the workspace.
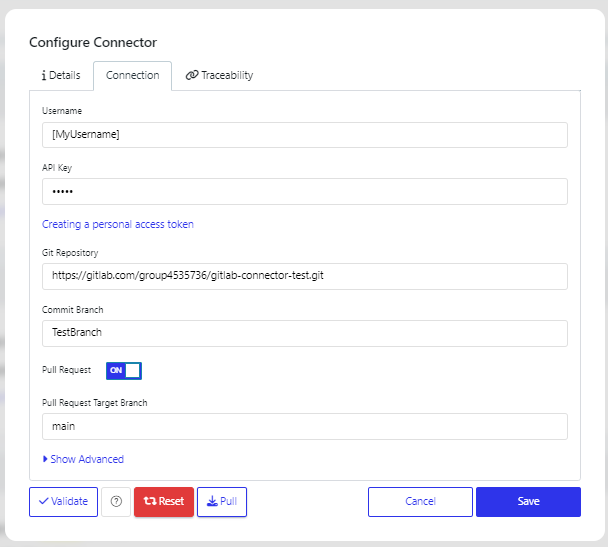
In the connection tab, configure the following information:
- Username: The user you would like to commit code with in GitLab.
- API Key: Personal access token in GitLab - https://docs.gitlab.com/ee/user/profile/personal_access_tokens.html - this personal access token must have read and write access to the target repository.
- Git Repository: The Git repository URL, you will be able to copy this from GitLab. Ensure that this includes '.git' at the end.
- Commit Branch: Defines the branch you want to commit code to in GitLab, this must already exist in GitLab before committing code from Quality Modeller.
- Pull Request: This is an On or Off toggle.
- If OFF, code will be pushed directly to the branch specified above.
- If ON, then a second field will show called Pull Request Target Branch. Here you can specify a branch to create, that will in turn create the pull request to the main commit branch. This is very useful for code reviews before committing to a repository.
There are a number of Advanced optional fields:
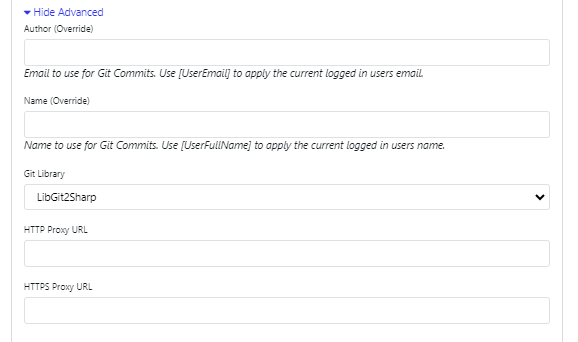
- Author (Override): Allows you to override the Author of the code commit. This can be hard coded or you use [UserEmail] to apply the current logged in users email.
- Name (Override): Allows you to override the Name associated with a code commit. This can be hard coded or you use [UserFullName] to apply the current logged in users name.
- Git Library: This field lets you choose the underlying library that handles Git operations. This can be set to LibGit2Sharp, a C# wrapper around the native Git library, or Native.
- HTTP Proxy URL: This field is where you specify the URL of an HTTP proxy server if your network requires it to access external resources over HTTP. For example, http://proxy.mycompany.com:8080. In this example, the proxy server’s URL is
proxy.mycompany.com, and it’s using port8080. The proxy would forward your tool’s HTTP requests to GitLab. - HTTPS Proxy URL: This field is used to specify the URL of an HTTPS proxy, which handles encrypted HTTPS traffic. For example, https://secure-proxy.mycompany.com:443. In this example, the proxy server is
secure-proxy.mycompany.com, and it is listening on port443(the standard port for HTTPS traffic)
Finally, there are a number of User Actions that can be applied to the connector.

- Validate: Takes the Saved Username and API Key credentials and tests that a connection can be established and the user can be logged in.
- ?: Links to this documentation section.
- Reset: Clears the temporary copy of the Git repository that Quality Modeller stores, this can be useful to run as a troubleshooting step if something goes wrong.
- Pull: Pulls the latest version of the Git repository into Quality Modeller.
- Cancel: Cancels any changes made to the configurations.
- Save: Saves changes.